By Bridget M. Sunderlin of Be Rooted Genealogy
Hoping to figure out who is in an old family photo, what year it was taken or what the reason for the shot was? There is no doubt that discovering the who, when, where and why of family pictures is one of the most rewarding forms of genealogical sleuthing there is, but sometimes the job can seem nearly impossible. The good news is, there are some strategies that can help. If you’ve been lucky enough to get your hands on some old images, following the steps below can help you finally decipher them.
We suggest that you also take this time to digitize your old photos. Doing so preserves them and can also reveal hidden details. You can find tips for doing so here.
4 Simple Steps to Help You Decipher Old Family Photos
Step 1: Determine Photo Ownership
Whose photo, photo album or collection was it? Who took or owned the photo? Ask family members to help you sort it out, or use clues from the photos to narrow it down.
Knowing this information will help you determine which branch of the family it came from and will make a huge difference if you’re trying to make sense of notes on the back. Since people often write things such as “Aunt Maggie at her wedding” instead of “Maggie Margaret Jones at her wedding in West Falls in 1921,” knowing who took or owned a photo originally can give you a huge head start figuring out exactly who is in it, as well as the date and location it was taken.
Step 2: Group Like Objects
Like objects attract other like objects. Although it’s a great idea to focus on one photo at a time, it can be even more beneficial to use a group of photos to solve your mystery. Take some time to sort your collection before diving into all of your questions.
People often take multiple photos, not one single shot, and you are likely to recognize photos of the same person, family group, time period or location. Choose the type of sorting that makes the most sense for your collection and get this out of the way. You might be surprised what you learn just by completing this activity.
Step 3: Look for Clues to the Who, When, Where and Why
– Take Notes
Now is the time to start taking notes about each photo. Do this on your computer, phone, tablet or in a notepad. This will help you keep track of everything you learn and want to find out. Notes are an incredibly important way to stay organized and learn as much as possible about each item.
You might also want to grab a magnifying glass or download an app for magnification on your phone so that you can explore the fine details.
– Start Asking Questions
Now that you have a place to take notes, grab a photo or group of photos and describe what you see. Begin with any writing. Is there any on the front? On the back? Is the writing hand-lettered, stamped, embossed, typed? Is it pencil or ink? Jot it all down.
Use what you know about the photo’s owner to make sense of what is written. Who or what is in the photo? What are they doing? What is the focus of the event? Are the people seated or standing? Are they close in age or far apart? Are they dressed in everyday clothes or something fancy? Is the scene natural or posed? Every photo has a story to tell.
Do the photos include details that help to pinpoint its locale? Were the shots from a vacation far away? Are the family members in the mountains or at the beach? Do you recognize the inside of someone’s home?
Start dating the photo by looking for clues about the people you know. How young do they look in this photo? Compare this photo to other photos of them – putting the shots in chronological order to capture the exact time this picture was taken.
What type of photo it is also matters greatly when dating. Is it black and white or color? Was color applied with dyes? Is the photo on a large postcard? Is it a tintype? The type of photo can help connect it to a specific time in history. Tintypes were created from 1860 to 1875. Large postcard photos were popular after 1900. Polaroids were developed in the 1970s. Find a guide to photo types here to help.
– Understand the Details
Identify the fashion, architecture, art, and transportation within the photograph. These can tell you so much by helping you place the photo in a specific place and time. Break down the fashion you see by asking questions. When did men wear white shoes or bowler hats? When did women wear puffed sleeves?
Fine-tune the time of year by questioning the clothes and natural forms that you see. Are trees in full bloom or are people surrounded by mounds of white snow? Are women wearing flowing skirts and short-sleeved tops? Are the men wearing white shoes? White was often not worn until Easter Sunday or even Memorial Day.
Look for wedding rings to determine who is married and not, this can help you place the photo in a timeline.
Visit Pinterest to find your fashion answers. Don’t have an account? Read this to learn more. Search using historical, fashion and architectural keywords. Did you know that you can also use Google Chrome image searches to link your photos to others found within the worldwide web? Don’t take my word for it, learn more here.
Step 4: Place it in Your Family Tree
Although some of the above-mentioned questions may seem overly specific, these details can help you place the photo at a specific event in your tree – such as a wedding or baptism – and you should be doing this for every old photo you have. Connect what you see with what you know. Repeat this process with each individual in the photo, examining them alongside the date(s) and events of their lives.
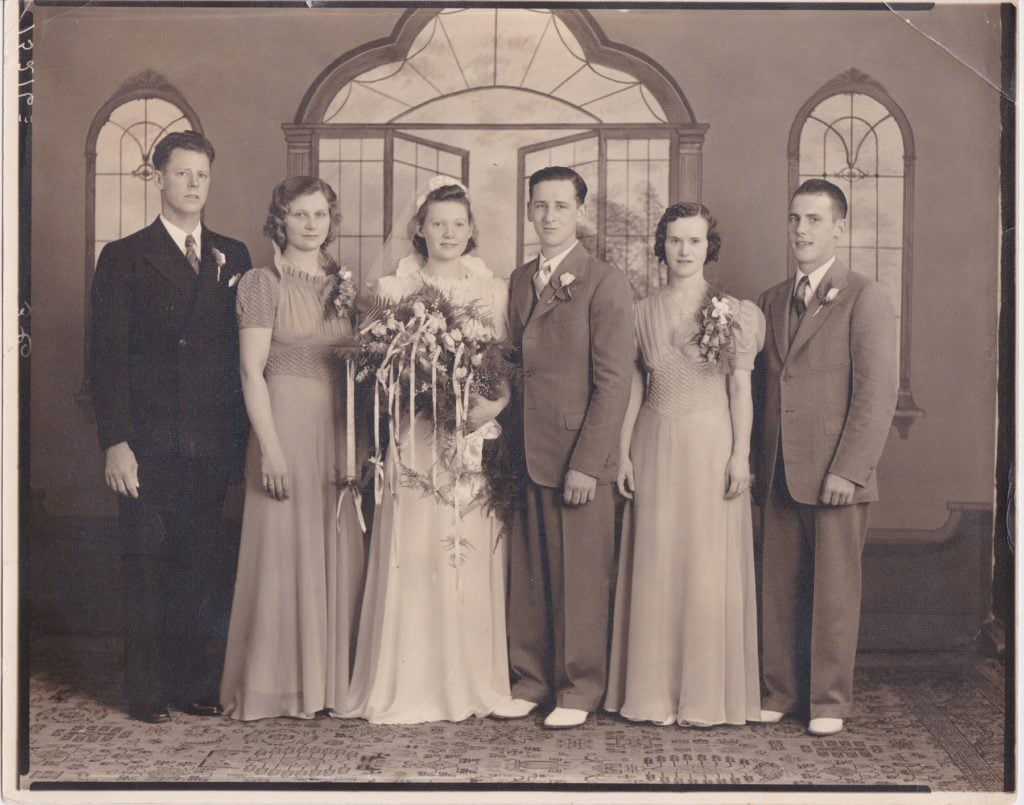
The photo above included only one person in it that I know; my grandmother. The rest were a complete mystery to me when I received this image. Yet, by following the steps, I have been able to identify almost everyone in the photo and the event where it was taken.
My paternal grandmother owned this photo. Years after she died, my cousin shared it with me, in the hopes that I could identify the people. My grandmother, I believe, is the female on the right side, who appears to be a bridesmaid.
Within the photos I received, there was one other photo that I could group it with; a solo shot of my grandmother in the very same dress. That photo was hand-colored, making her dress pink. Hand-coloring was a popular technique to add color to black-and-white photos in the early 1900s.
My grandmother was obviously part of a wedding party. The room includes a backdrop in which the wedding party is formally posing. The carpet appears real, however the beautiful trompe l’oeil windows are painted on a backdrop. If you look closely on the bottom right side of the photo, you can detect the canvas hanging in front of a wooden structure.
Knowing that my grandmother spent most of her life in Baltimore, Maryland, I would assume that the wedding took place there. The photo is printed on heavy matte photo paper, and is 8” X 10” in size. The only writing on this photo is a series of backward printed numbers written in white, on the front of the photo, “15216” and “36.”
To date this photo through fashion, I would search within Pinterest for men’s white shoes, ladies’ puffed sleeves, women’s wavy short hairstyles, and wide striped ties. The men’s shoes pop right off the page, they are so unique and were definitely from the early 1930s. The short sleeves and white shoes together hint at a possible Spring or Summer wedding.
The only jewelry I detect includes my grandmother’s cross necklace and the ring on the other bridesmaid’s hand (on the left). The fact that my grandmother has no wedding band tells me that she is unmarried. My grandmother married in 1931, so the date of this photo can be isolated to before that time.
I find it intriguing that she is on the right side with two men. My grandmother had three brothers. Perhaps she is flanked by two of them in this photo. When I investigate this photo, attempting to date it using my existing family tree, I find that it is most likely not her eldest brother’s wedding. He married in 1925, when my grandmother was only eleven. She looks a bit older in this photo.
Her youngest brother married in 1936, after my grandmother married. The lack of a wedding band eliminates that scenario. Her middle brother and his wife probably married around 1930, having their first child in February of 1931. It seems quite plausible that they married in the Spring of 1930 or possibly even the Summer of 1929.
When I investigate my family tree in depth, I find that her middle brother and his wife were living together as man and wife in the 1930 census, with the bride’s parents. The census states that she was 21 and he was 25 when they married. He was born in 1904 and she in 1909. From this, I can infer that they married in 1930. My grandmother was age 16, single and living with her parents in the 1930 census.
At this point, I feel very confident about three people in the photo, my grandmother and the bride and groom. I believe that the chances are great that the young man to the right of my grandmother is her youngest brother. The man and woman on the far left, I believe are related to, or are friends of the bride. I would continue to investigate them using family tree information for her family or stop here, having satisfied my own family connections.
Use these tips to make sense of your own family photos and you never know what you might discover. If the struggle is greater than you thought, don’t be afraid to enlist the help of others.
Host a Photo Detective Party or post photos online to family groups or Facebook. Invite your cousins, aunts and uncles to chime in or even bring their photo albums over for an afternoon of solving photo mysteries. Perhaps they have copies of the same photos, but theirs have labels that solve your mystery immediately. Or perhaps they have memories of these people that you don’t have, and they can fill in the missing blanks. This can lead to quite a rewarding afternoon. Two or more heads are always better than one.
Good luck!
Bridget Sunderlin is a professional genealogist serving clients in and around Maryland with a Master’s in teaching. She has been actively researching her Irish roots for well over 30 years. Throughout her research, she has come to find that her family actually hails from all of the countries within the British Isles. In 2017, she visited some of her ancestral lands, meeting quite a few Irish and Scottish cousins along the way. Ms. Sunderlin believes that the act of researching one’s family history helps us to “be rooted.”


I’m anxious to receive updates and further information. Really appreciated the hints to help in identifying further information for old photos. Unfortunately I’m one of the oldest living members of my family and relocated when I was young and rarely had a chance to see or get to know any of my closest relatives.