Modern technology has completely revolutionized family history research over the last 25 years. From providing access to billions of records, to connecting us with cousins from across the globe, genealogy would not be as fulfilling as it is today if it weren’t for these improvements. And now, we have another game changer to add to the mix.
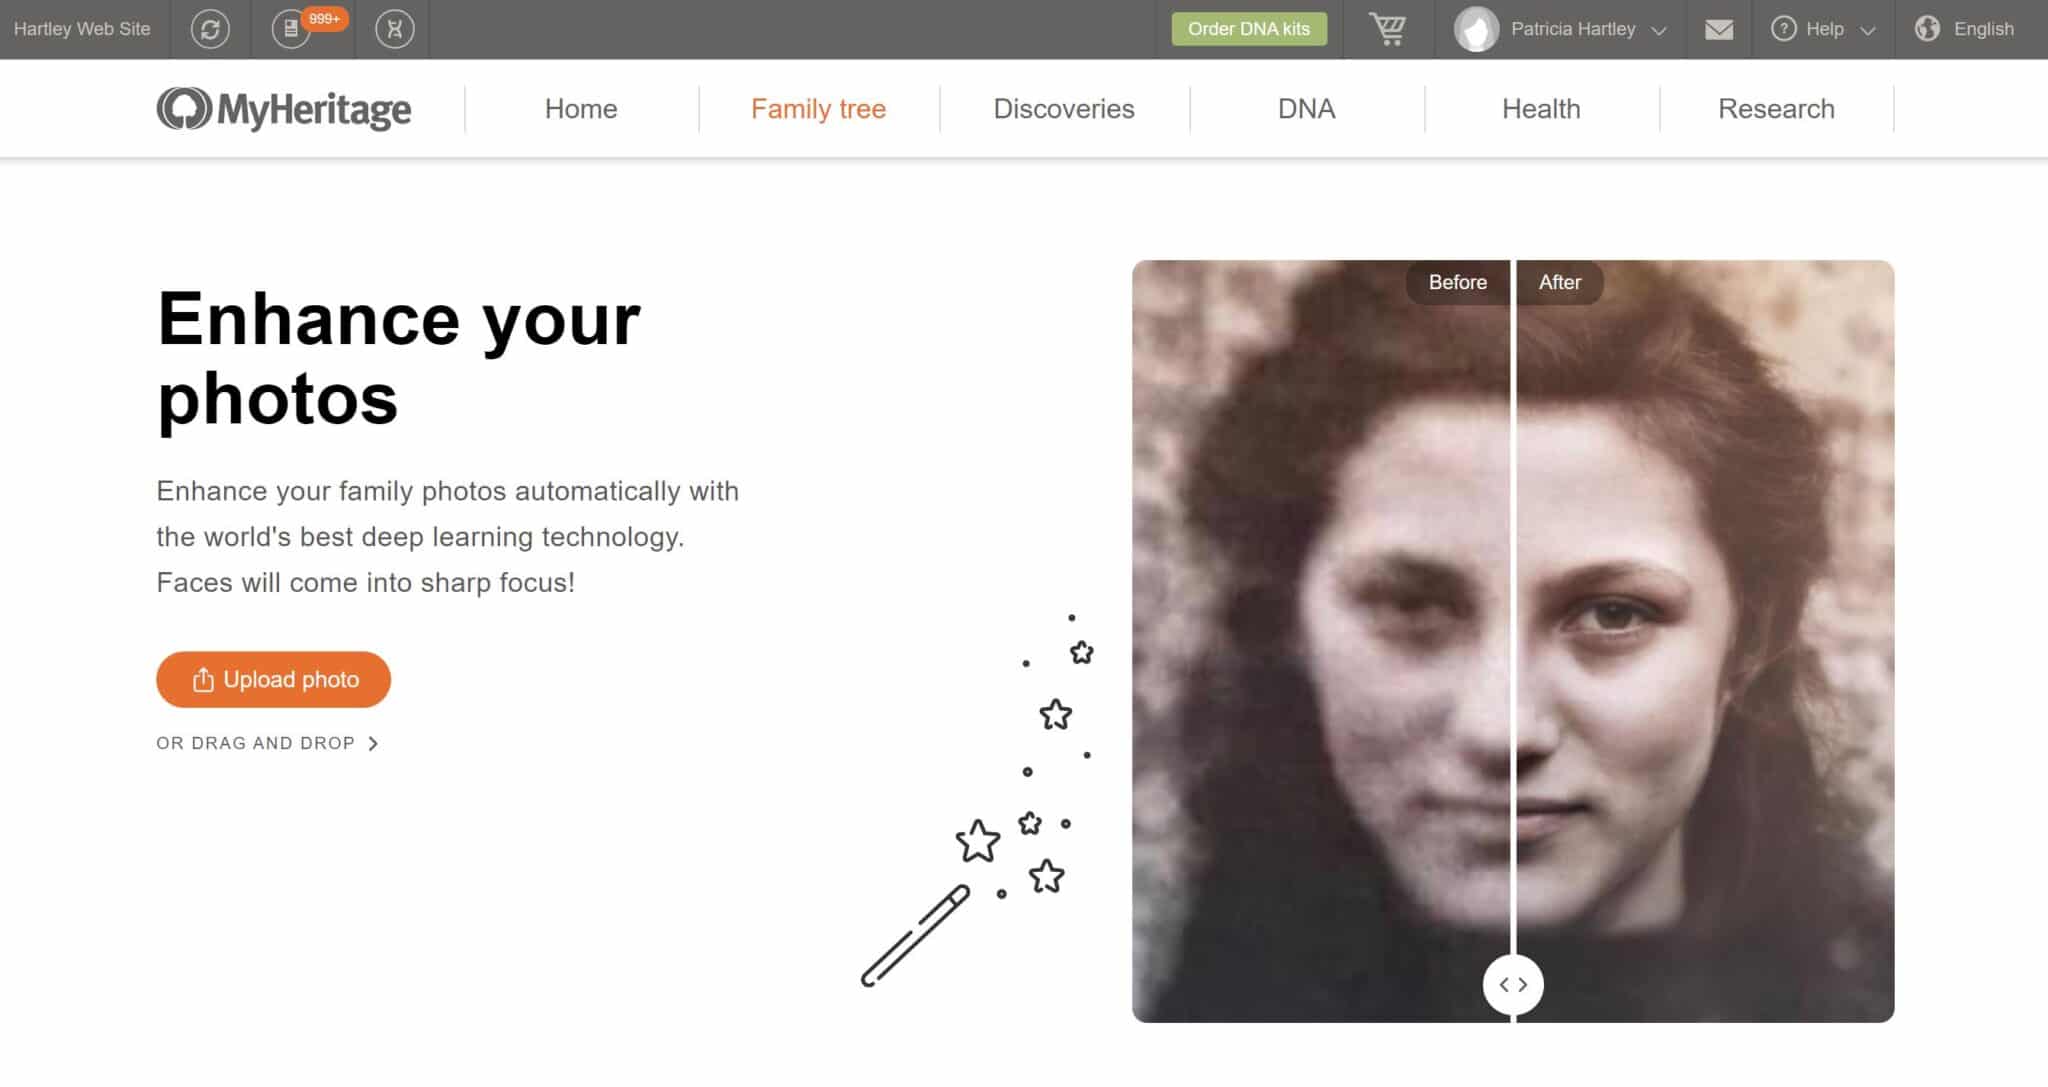
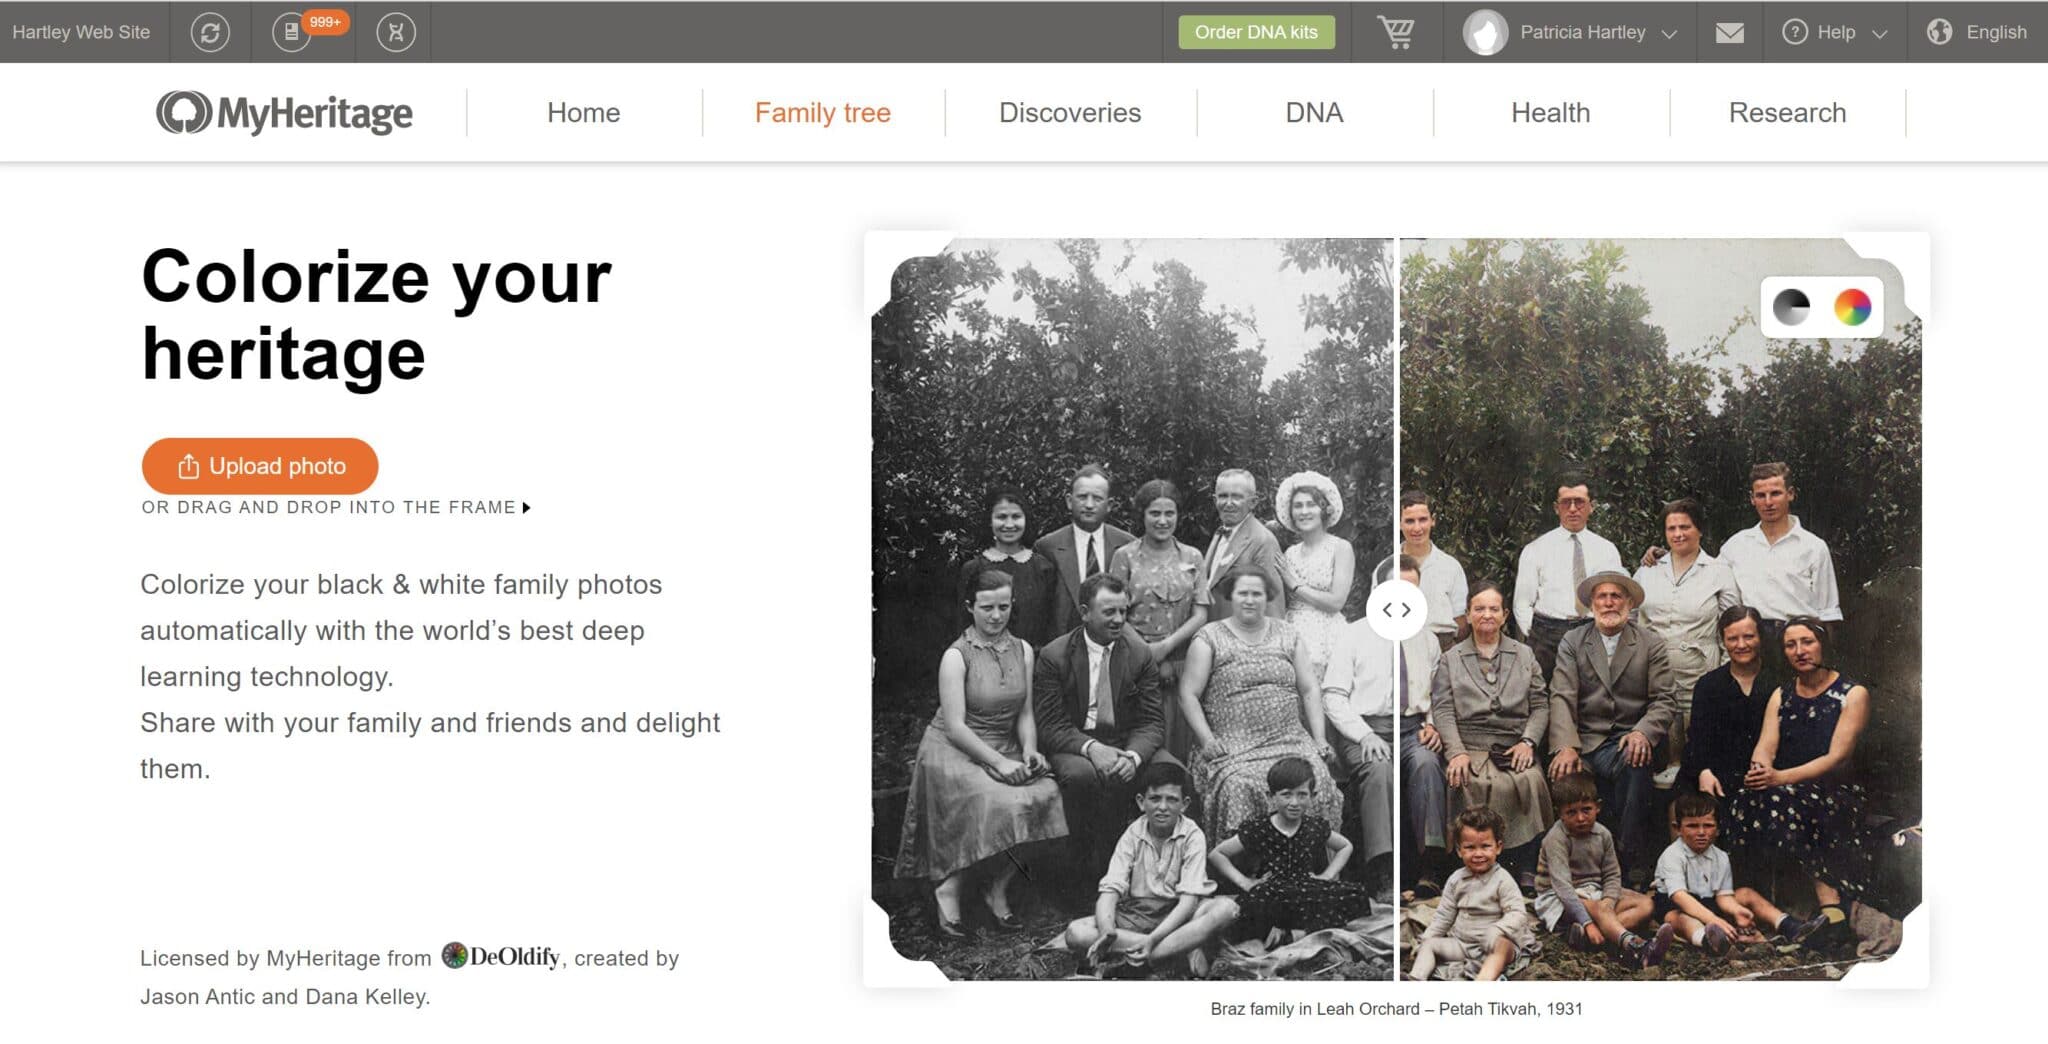
The genealogy research site, MyHeritage, has created two advanced photo enhancing tools that will help you get to know your ancestors in a whole new way. MyHeritage in Color, coupled with the site’s Photo Enhancer technology, can transform your old family photos into sharp and vibrant images that reveal previously hidden details. Making these tools even more exciting is the fact that they are free to try and very easy to use.
Although the tools are technically separate, MyHeritage allows you to simply upload your photo to one and apply both improvements to speed up the process. And those without an active MyHeritage subscription can use the tools to colorize and enhance up to ten photos at no charge (your final results will include a MyHeritage logo watermark).
Make Instant Discoveries in Your Family Tree Now
Imagine adding your family tree to a simple website and getting hundreds of new family history discoveries instantly. MyHeritage is offering 2 free weeks of access to their extensive collection of 20 billion historical records, as well as their matching technology that instantly connects you with new information about your ancestors. Sign up using the link below to find out what you can uncover about your family.
How to Access and Use MyHeritage in Color and the New Photo Enhancer
Read on and we’ll walk you through the steps in detail (and show you some examples), or just jump in by uploading a photo to the enhancer(right here) and hit the colorize button afterwards. You can then download the improved image with both filters applied.
To colorize or enhance more than ten images and remove the watermark you will need a MyHeritage Complete subscription, which also includes access to billions of records, an advanced discoveries engine and many additional specialized tools found nowhere else. You can start a two week free trial here to see if MyHeritage is a good fit for you – it will allow you to enhance and colorize unlimited images.
How the Technology Works
The technology for MyHeritage in Color was created by deep learning experts Jason Antic and Dana Kelley of DeOldify. “Deep learning” is a type of artificial intelligence technology — the same kind used for voice and facial recognition. Basically, deep learning uses computers to “learn” more and more about human traits. In the case of MyHeritage in Color, DeOldify’s computers studied millions of real photos over two years to learn the details of our world in color.
MyHeritage licensed DeOldify’s technology so its users could be among the only people in the world with the continuously-improving ability to transform old family photos in such a cutting-edge manner. In the meantime, Antic and Kelley are still making enhancements to their algorithm, so MyHeritage users’ results will be even more realistic and detailed.
MyHeritage in Color takes only three to ten seconds to transform a photo into a color version and has become an incredibly popular part of the site’s offerings.
It’s good to keep in mind that just because an item of clothing or a family home is displayed in a certain color doesn’t mean it was exactly the same back in the day. Colors are always a “best guess,” as there’s no way for the computer to know the exact colors in Aunt Betty’s flapper dress or the paint on an old home. However, the technology applies what it has learned from millions of other real-life images, so there’s little chance your great-grandfather’s tie will show up in a 1980s’ neon green.
20 Billion Genealogy Records Are Free for 2 Weeks
Get two full weeks of free access to more than 20 billion genealogy records right now. You’ll also gain access to the MyHeritage discoveries tool that locates information about your ancestors automatically when you upload or create a tree. What will you discover about your family’s past?
In June, MyHeritage also added its revolutionary Photo Enhancer to its toolbox. MyHeritage Photo Enhancer clarifies and sharpens blurry photos or documents. According to the MyHeritage blog, in less than two weeks of its introduction, the tool was used to enhance more than one million images.
“Users describe being deeply moved by seeing such crystal-clear images of family members they only knew in their later years — or perhaps had never met,” MyHeritage shared in the June 22, 2020 post. “Some were brought near tears to see their ancestors in such realism.”
Like MyHeritage in Color, MyHeritage Photo Enhancer leverages state-of-the-art machine-learning technology created by the Remini mobile app to increase the resolution of digital images. The enhancer brings small, blurry, pixelated or low-resolution images into sharp focus, revealing incredible detail and lifelike results.
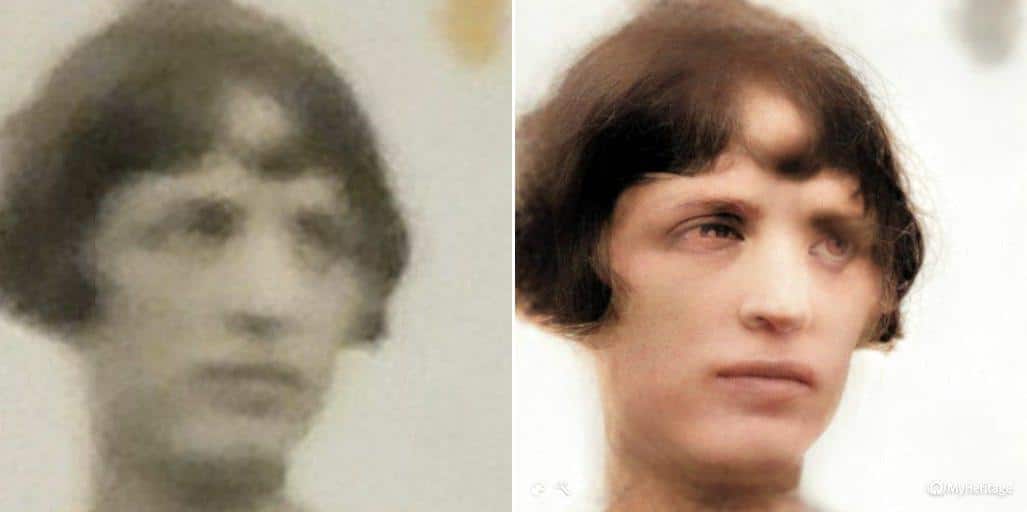
In single and group photos, the tool even pulls out individual faces for closer inspection – and this is where it really shines. The featured image on this article, also shown below, showcases a single face that was enlarged, enhanced and colorized using the enhancer first and then the colorizer tool.
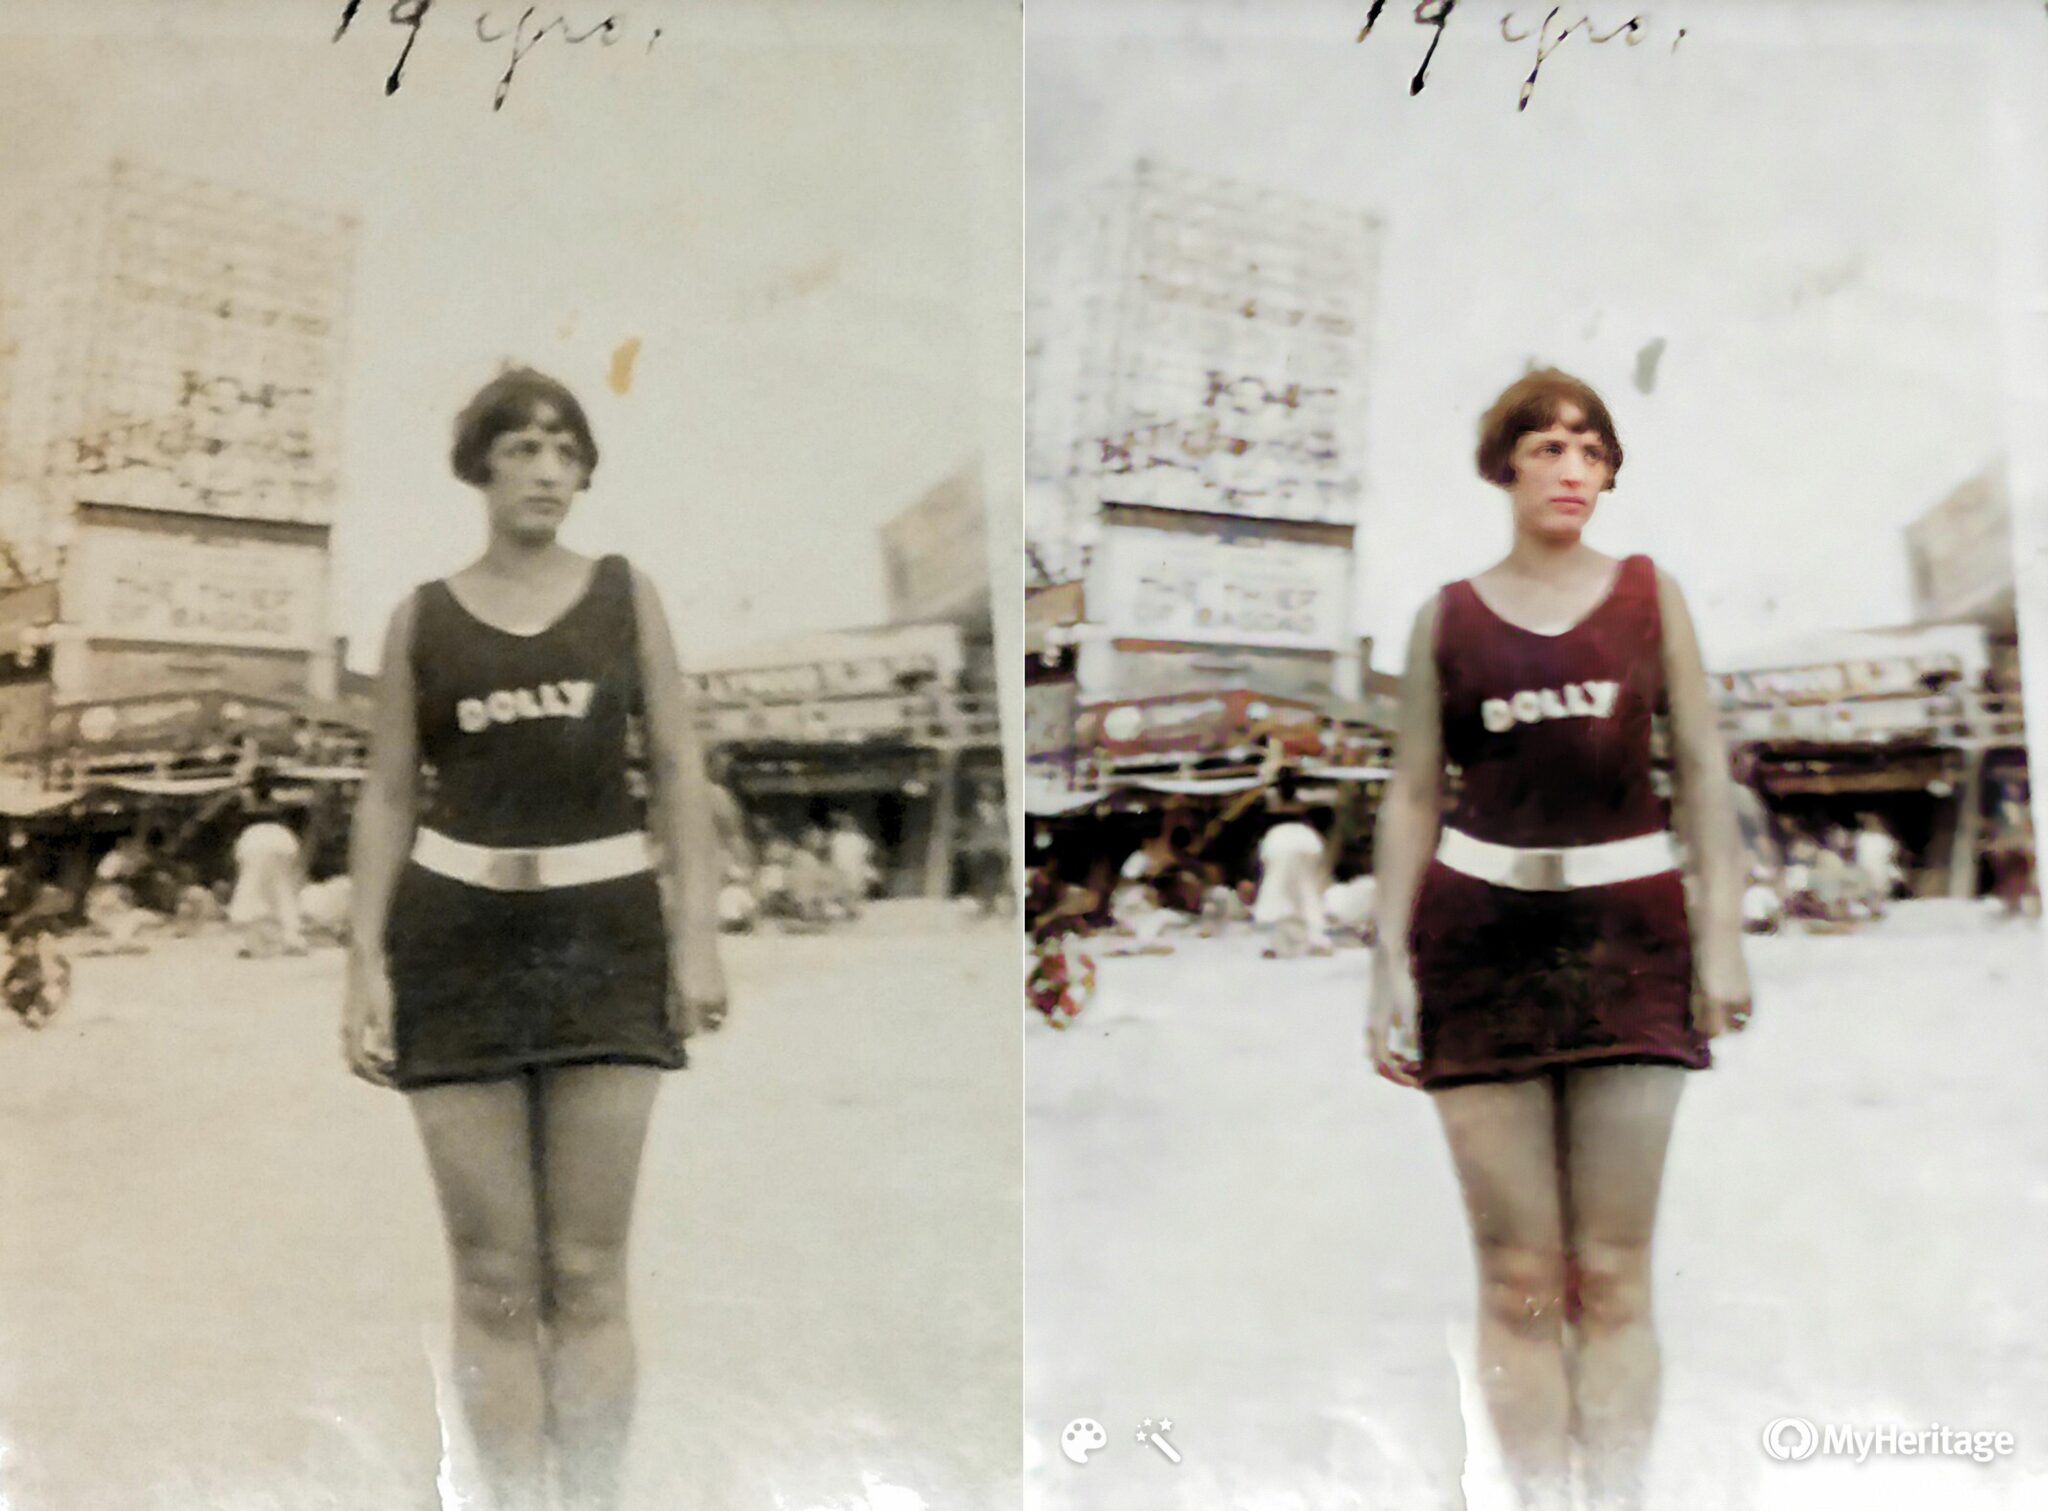
Below is the original, full-size image this face was pulled from, as well as the enhanced version.
The background received much less impressive enhancement than the face did, although once the image was downloaded and opened at 100% the improvements were much more apparent. Most importantly though, blowing up the new image shows a clear and colorful face – unlike the original when enlarged.
Emma (Dolly) Clark – great-grandmother of Melanie Mayo-Laakso, Editor of Family History Daily – c. 1924.
Let’s Get Your Photos Ready!
Ready to get started?
I have to admit that before researching this article, I had not yet tried MyHeritage in Color or the new Photo Enhancer, even though I’ve been a subscriber for years. However, once I got started, I didn’t want to stop. Now I’m on a mission to centralize, digitize, and colorize every black-and-white or sepia-toned photo in my vast collection! Suffice it to say, you’ve been warned!
Your first step to this potentially life-altering photographic journey is to digitize your photos. “Digitizing” simply means scanning your physical photos and uploading them in digital form. If you don’t have a scanner, the easiest way to digitize your photos is to use the free MyHeritage app. You can download the MyHeritage app in the App Store or Google Play and use your mobile device to snap and upload your photos to MyHeritage in seconds.
Family History Daily also offers help for digitizing your old photos here and here with more options.
Once You’ve Scanned Your Photos It’s Ready, Set, Go!
The next step is to choose the photo you’d like to enhance or colorize. There are a three ways to get started:
Option one is for those without a current account or for those who are not logged in.Go to MyHeritage Photo Enhancer or MyHeritage in Color individually. If you’re not a MyHeritage user, you’ll be prompted to create a free account. If you’ve already registered, you’ll be prompted to log in. You can then enhance and colorize in either tool.
For those with a current account who are logged in, you can access either tool from your family website menu, by clicking the “Family tree” option and choosing either “Colorize photos” or “Enhance photos” from the dropdown options.
With either of these options, you’ll next click the orange “Upload photo” button to upload a photo stored on your computer or use the “drag and drop” option to click a photo on your desktop and drag it into the tool’s frame.
If you keep your tree on MyHeritage and have stored photos there you can start directly with an image you’ve already attached to your tree. You can access these photos through the “My photos” option in the “Family Tree” dropdown menu on your family website, or click on a photo within an individual’s profile.
When you click on a photo already stored in MyHeritage, you’ll be presented with a screen that offers both enhancing and colorization options.
Enhance, Colorize or Both?
Although MyHeritage in Color or MyHeritage Photo Enhancer are two separate features within MyHeritage, they are extremely complementary, and it’s entirely possible (and recommended) to use both tools on each of your historical photos.
Conveniently, whichever tool you begin with, either MyHeritage in Color or MyHeritage Photo Enhancer, you’ll be offered the option to also apply the other feature. For example, after I enhanced this photo of my great-great-grandfather, I had the option to click the button above the image to colorize it as well. It doesn’t matter if you colorize first, then enhance, or enhance, then colorize. The results will be exactly the same. So don’t worry — there’s truly no right or wrong place to start.
Photo Enhancer in Action
I couldn’t resist using both tools on the photos I uploaded, but we’ll step through each feature individually. If you start out on either the Photo Enhancer or the MyHeritage in Color page, the enhancement or colorization begins automatically after your photo is uploaded.
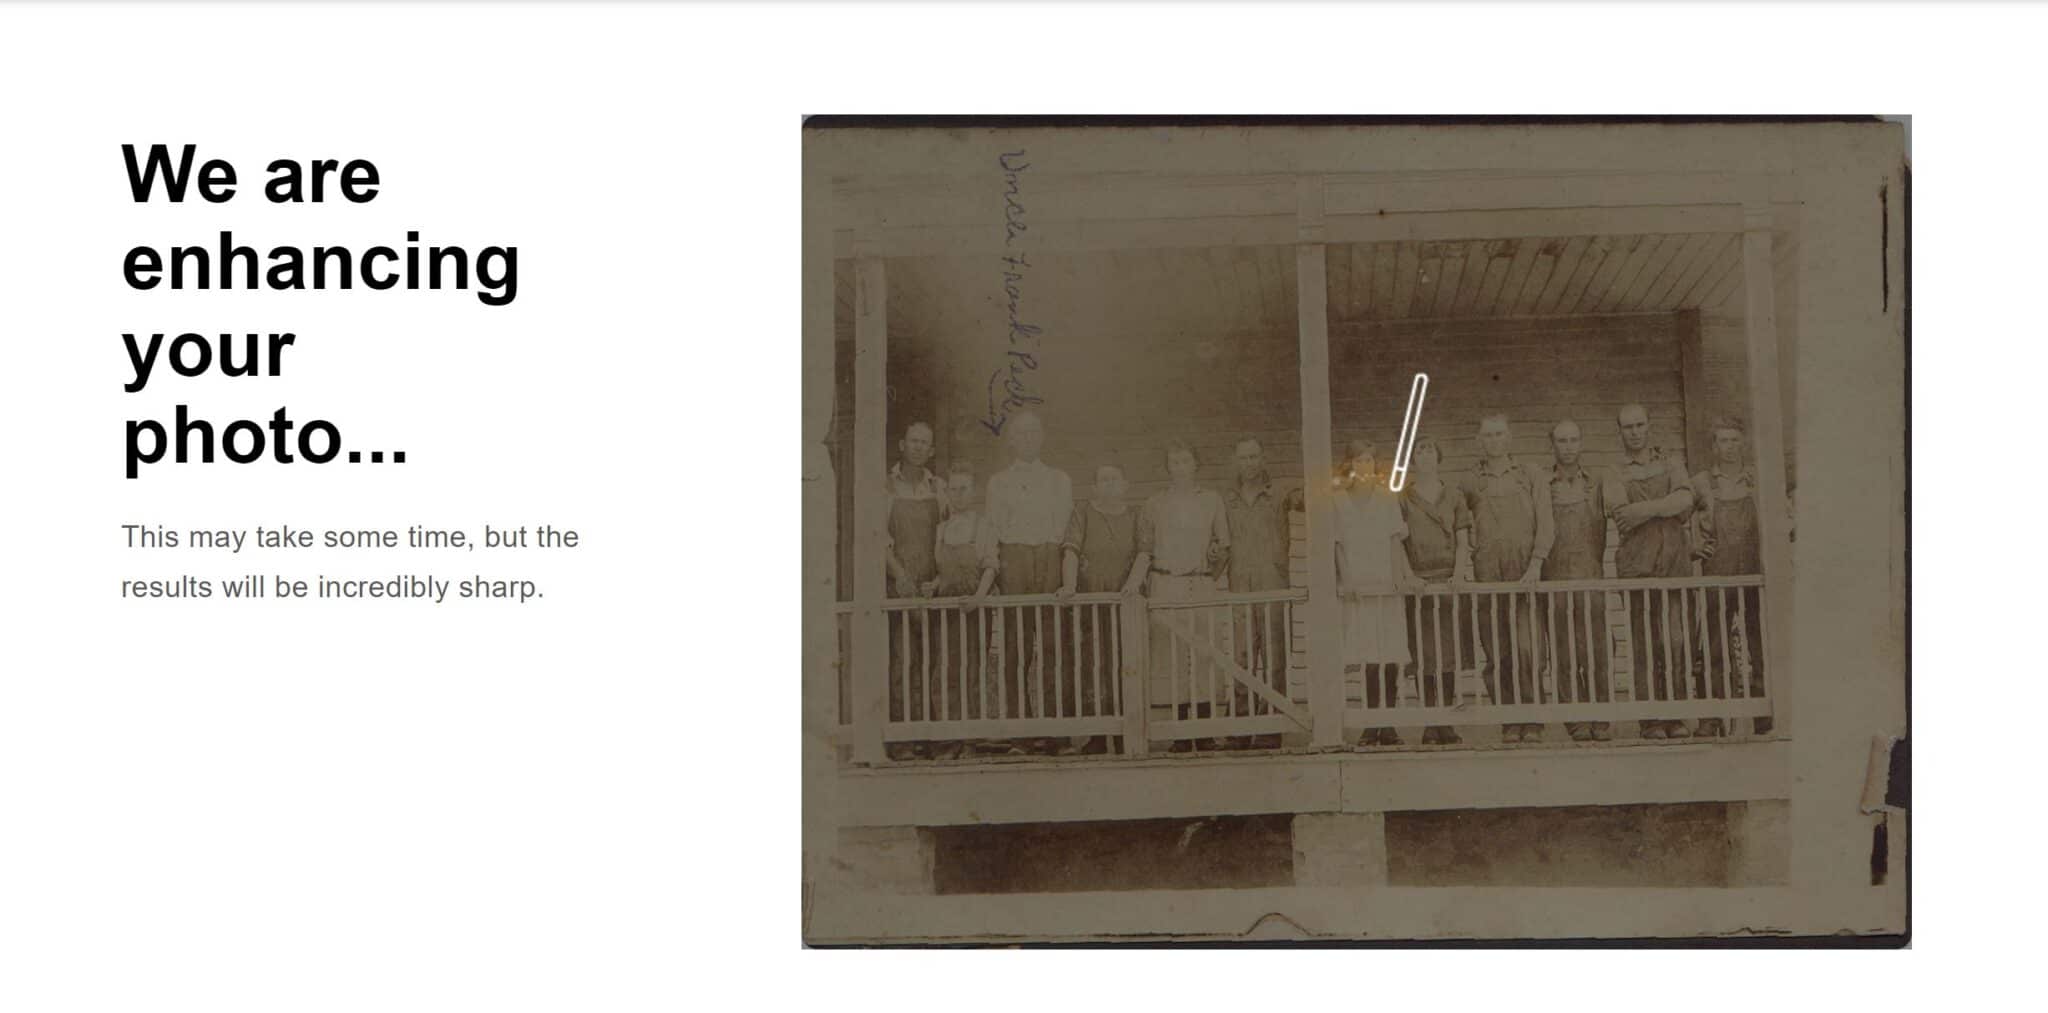
If you’re starting with a photo stored in MyHeritage you can simply click the appropriate button above the selected image to make the magic begin. In fact, you’ll see a virtual magic wand circling your photo while it’s processing!
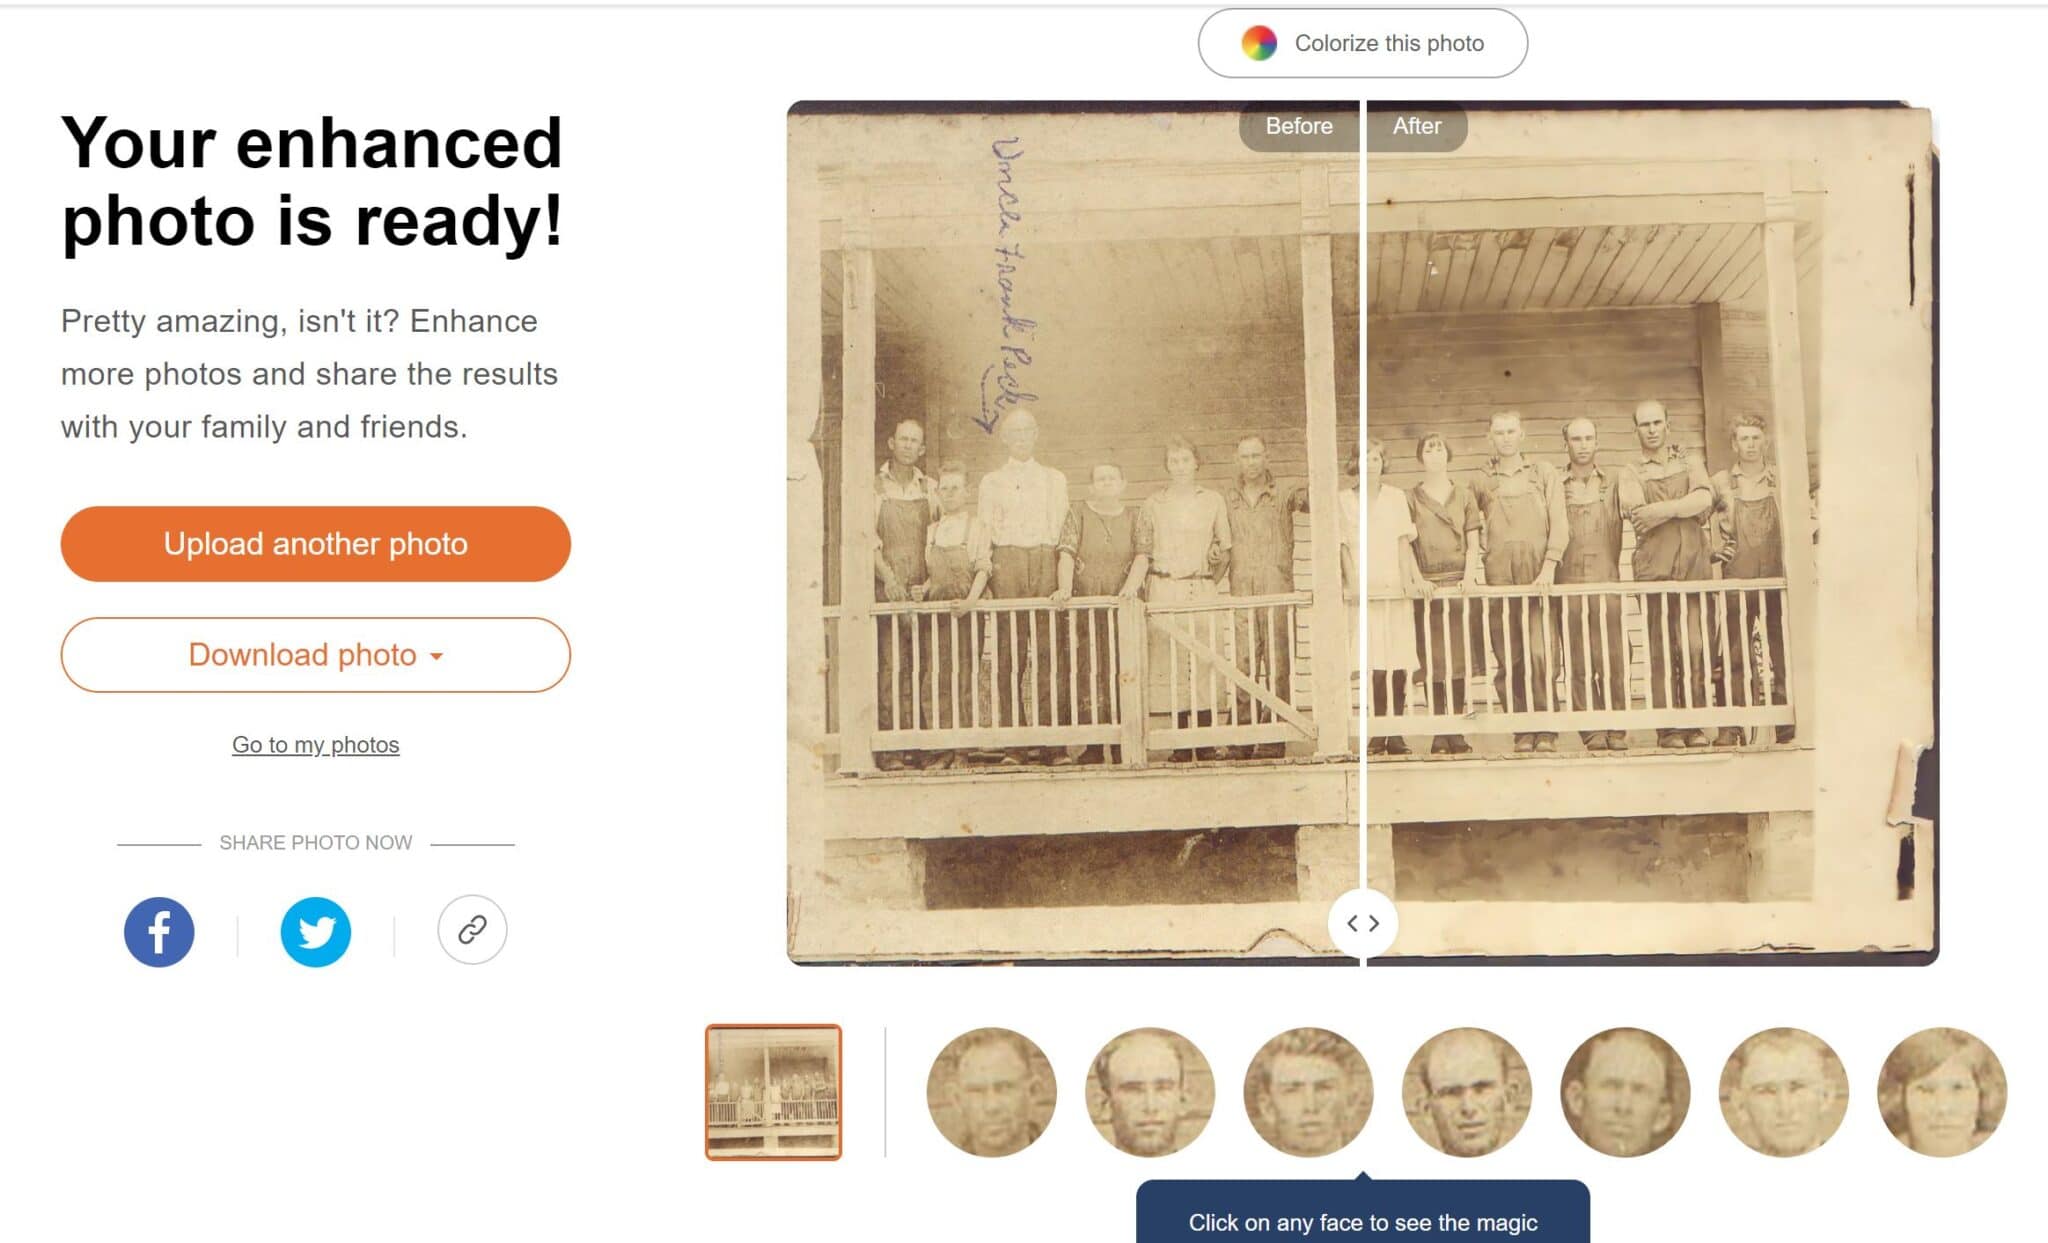
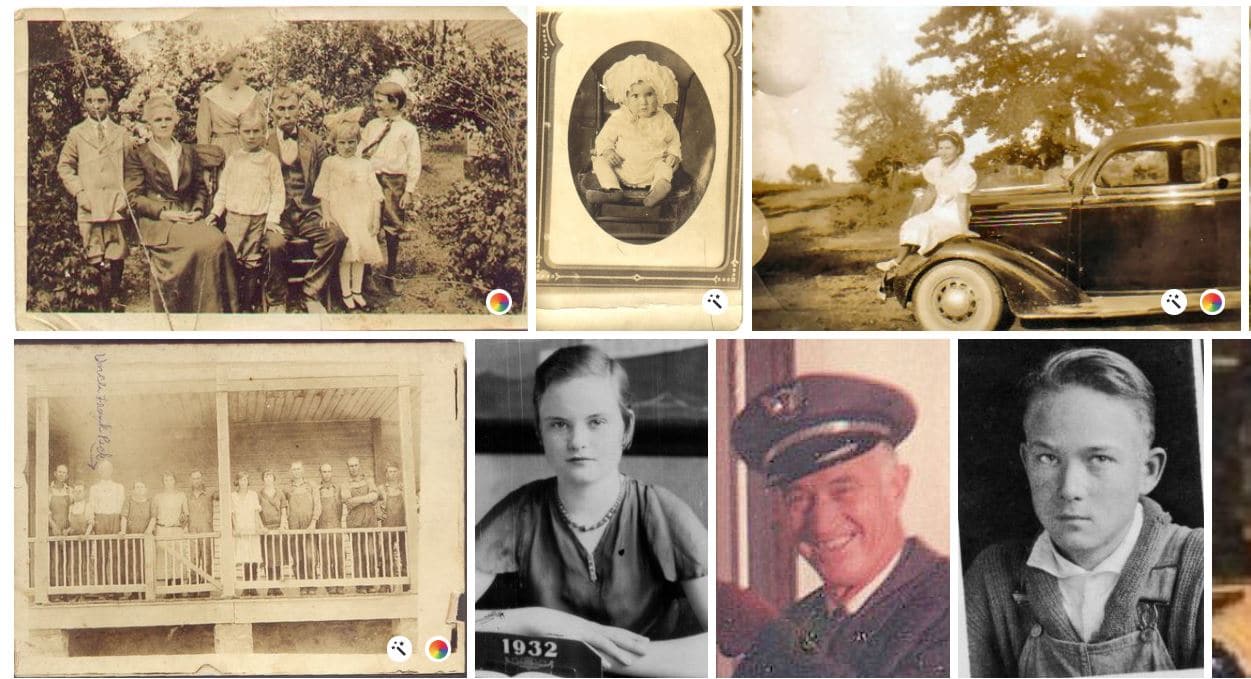
Here are some old photos from my collection that I enhanced myself:
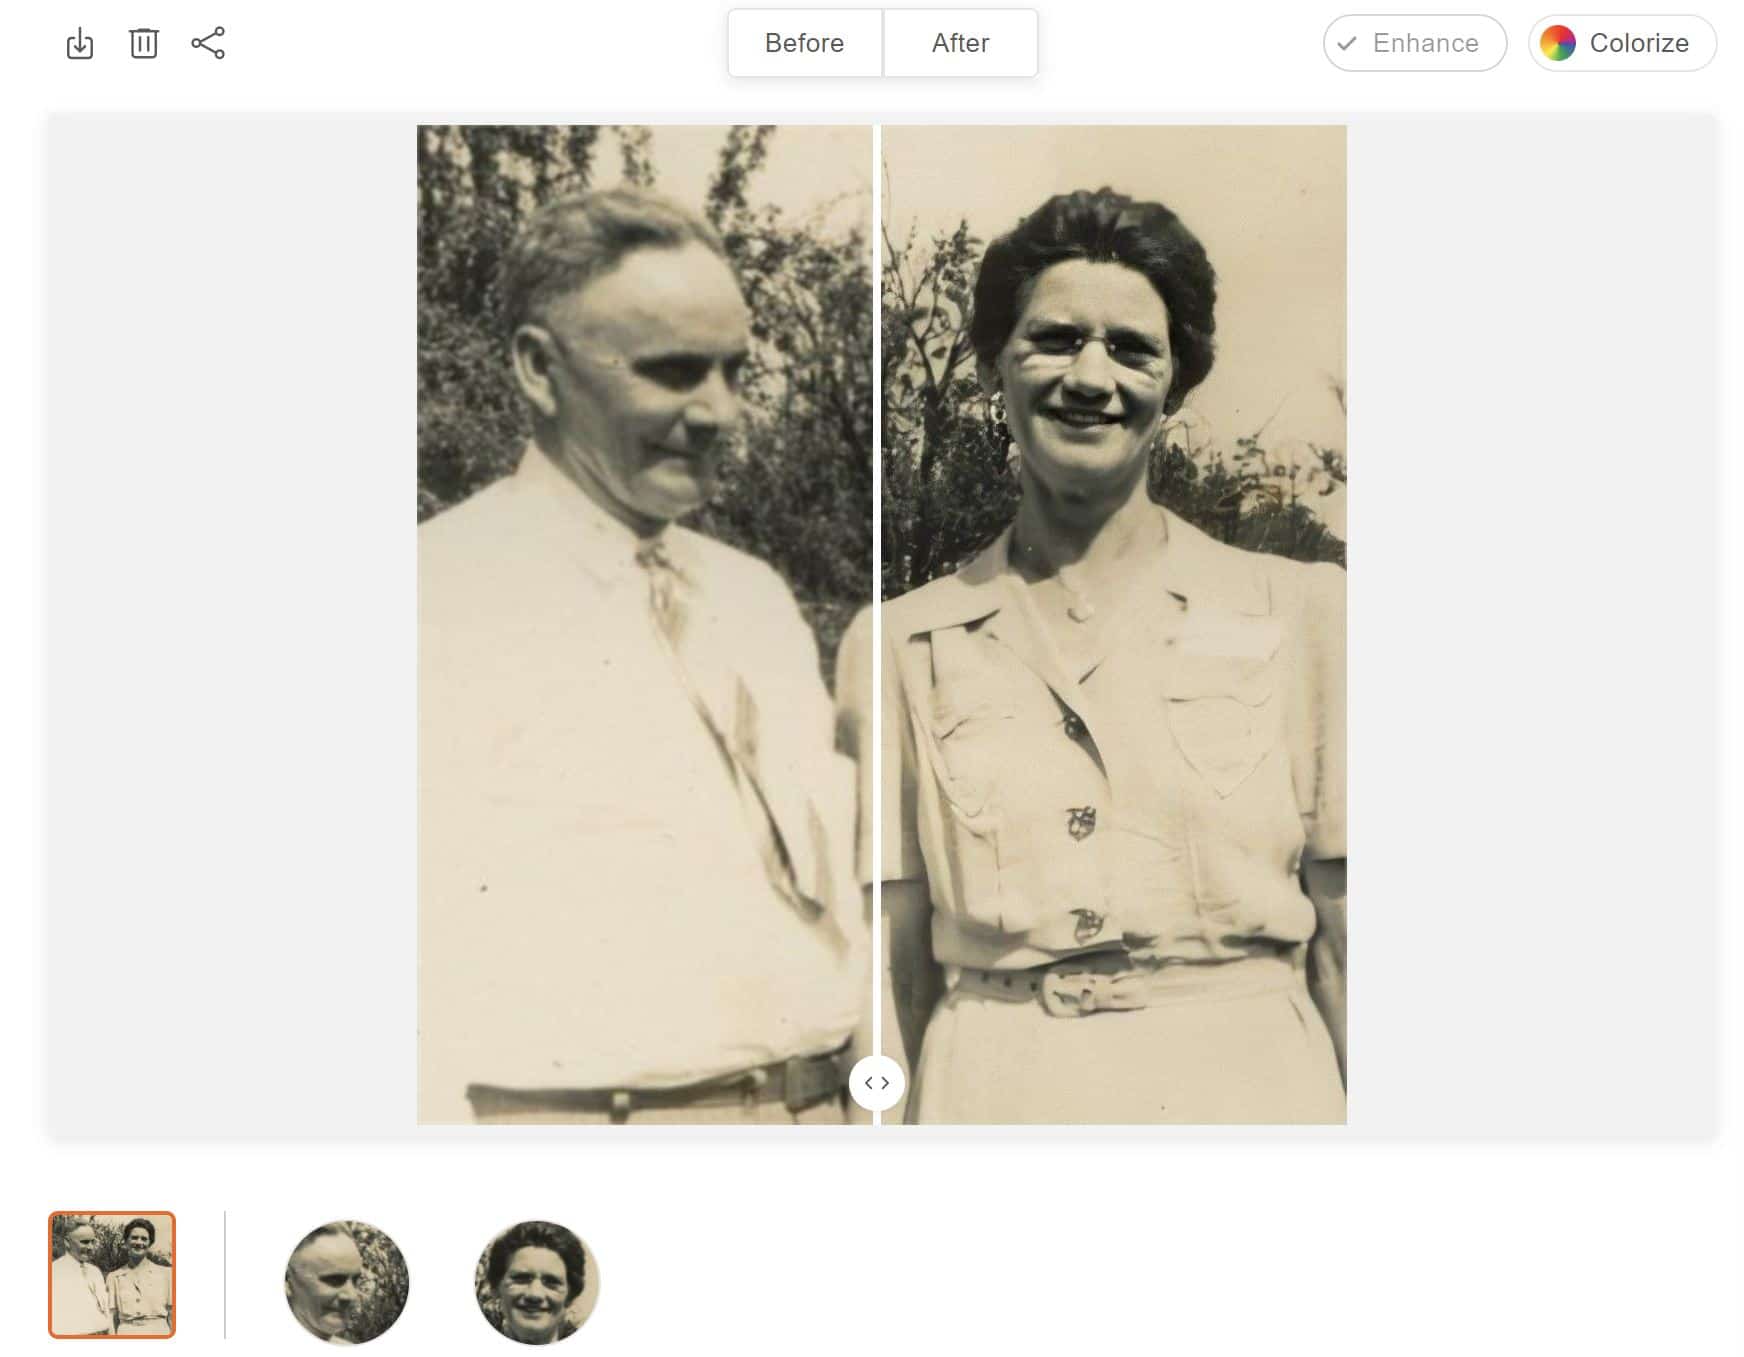
When your photo has been enhanced, you can use the slider on the image to reveal side-by-side results.
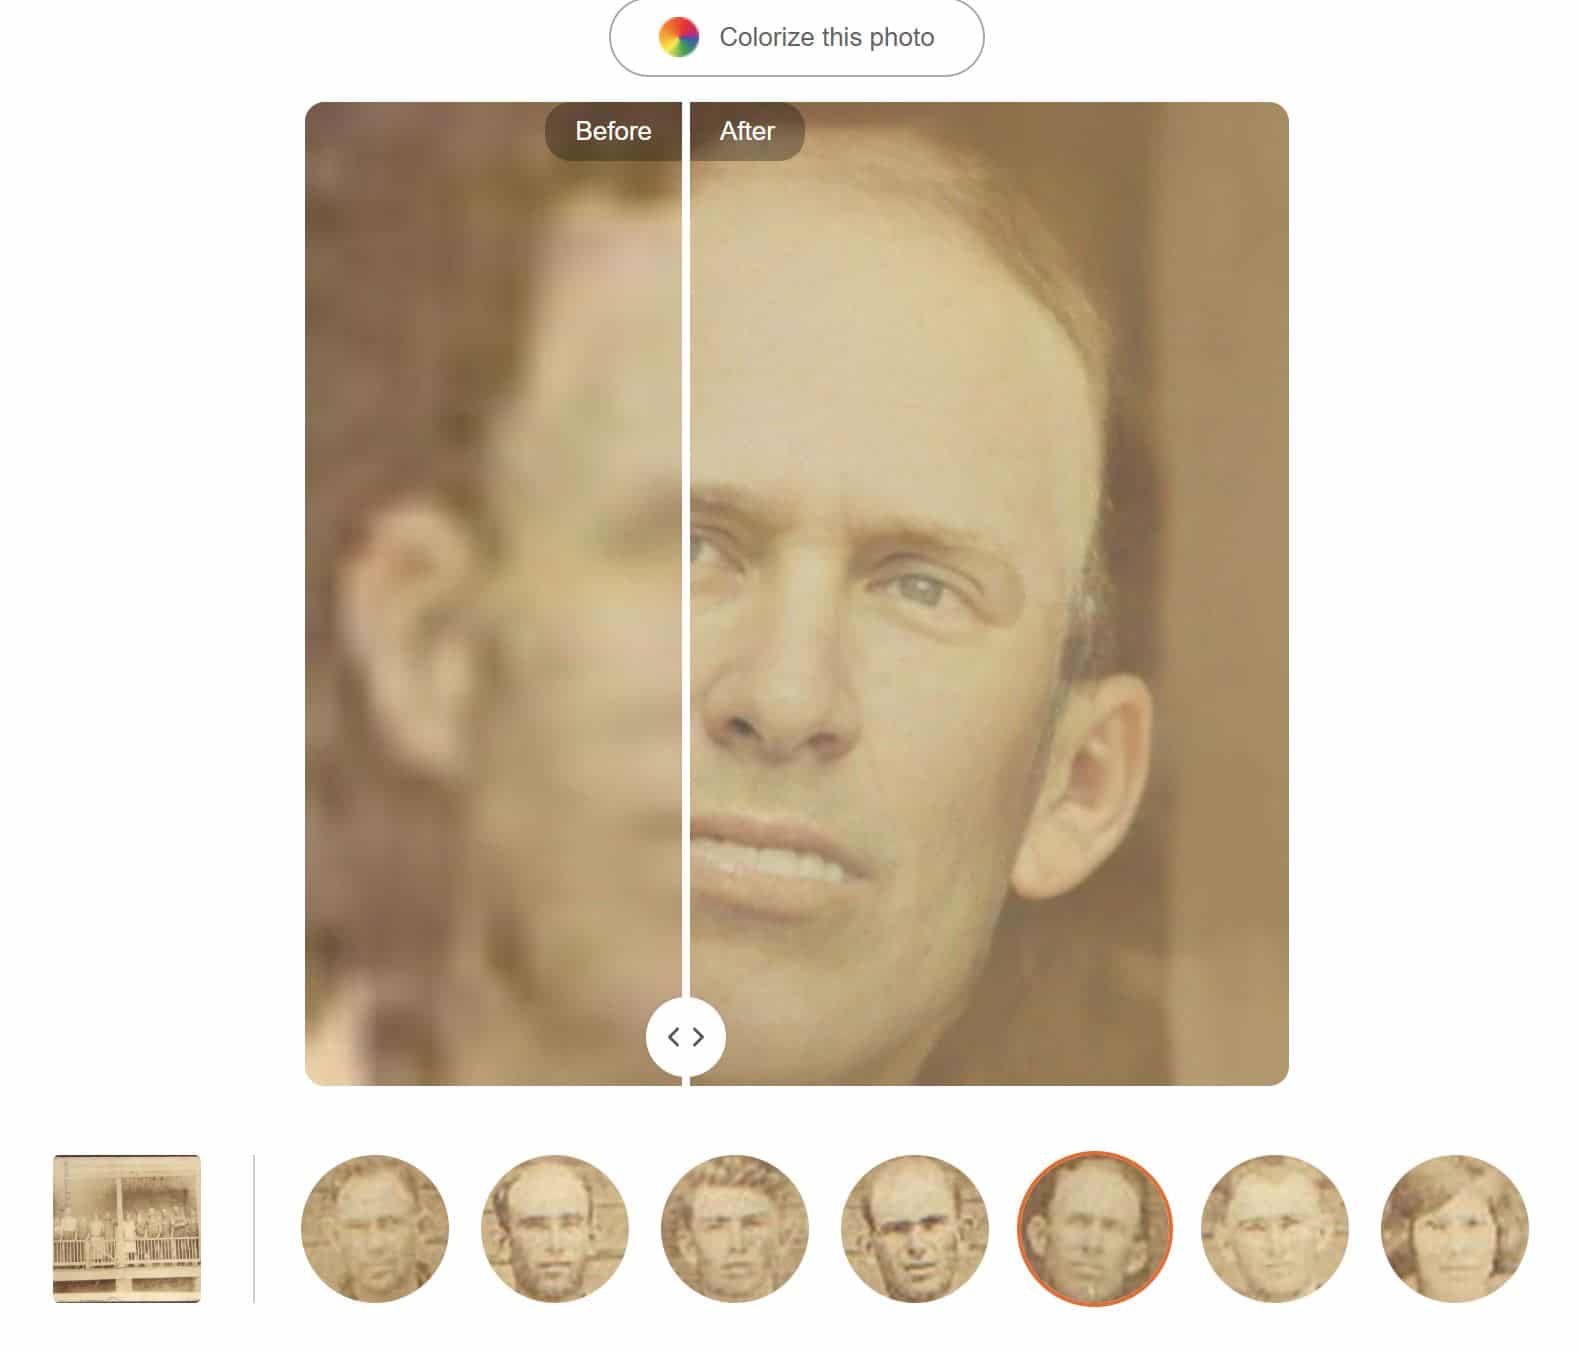
Under your enhanced photo, you’ll see smaller images of some of the individual faces MyHeritage has enhanced. Clicking on a face presents a new, close-up before/after option. This is a great way to pull out face-only images for your tree.
Isn’t this detail incredible? With this enhancement I can see my great uncle’s teeth and light-colored eyes, which weren’t visible in the tiny group photo.
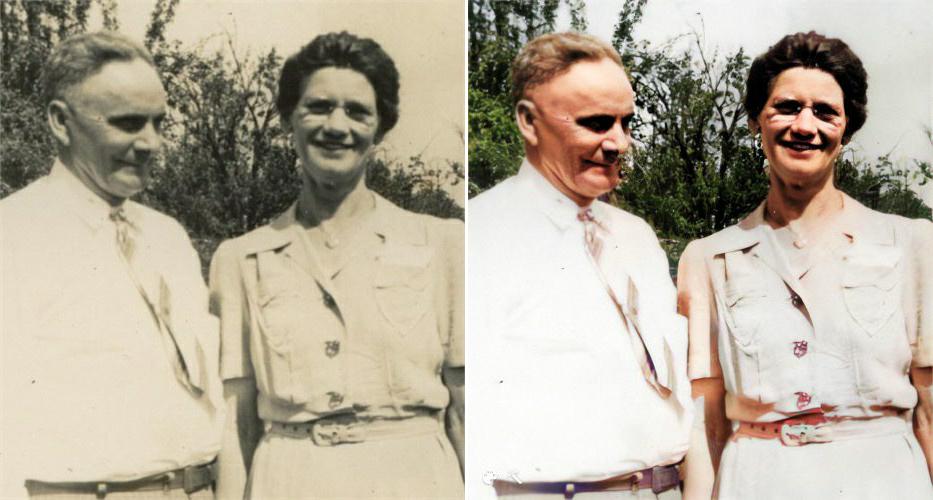
Next, I wanted to see the results of enhancing a photo of fewer people, so I chose a photo of my grandparents.
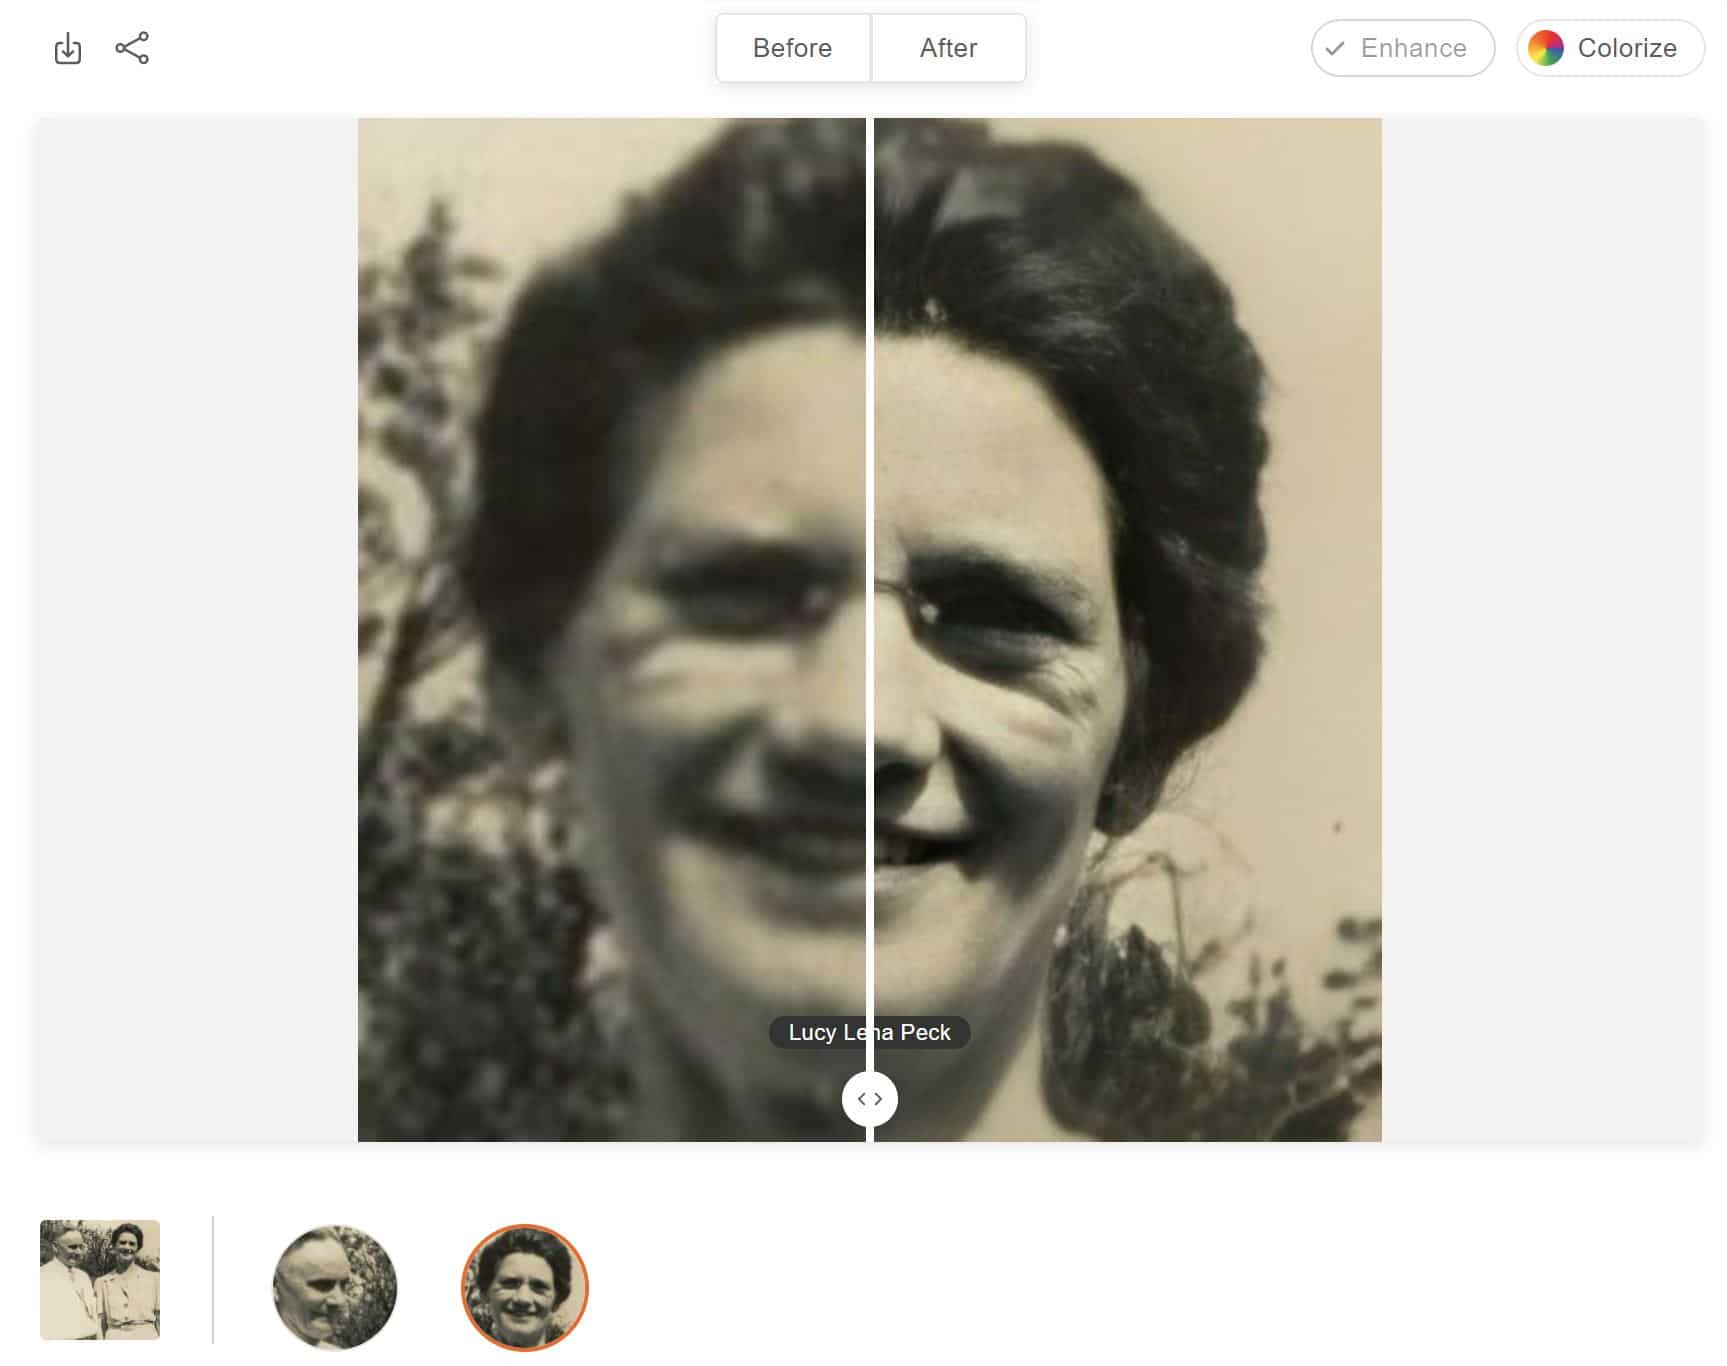
The enhanced image is indeed sharper. And clicking on the individual image of my grandmother reveals details like the laugh lines around her eyes.
If you look closely at the two photos, my grandmother’s eyeglass lenses and the reflection from the glass appear more clearly in the large photo than in the individual one, although the nose piece from her eyeglasses is evident in the smaller image.
Honestly, this doesn’t bother me much. Seeing those laugh lines is more important to me on a personal level because they reveal a part of my grandmother’s character that isn’t shown in all the other pictures, where she’s always stern and unsmiling. Also, we have to remember that the enhancement technology is still developing, and any picture could possibly have minor flaws.
Now Let’s Colorize!
My next step was to colorize each photo that I had just enhanced. As mentioned earlier, there’s no certain order to follow – you can colorize first then enhance, if you’d like, or just use one of the two tools.
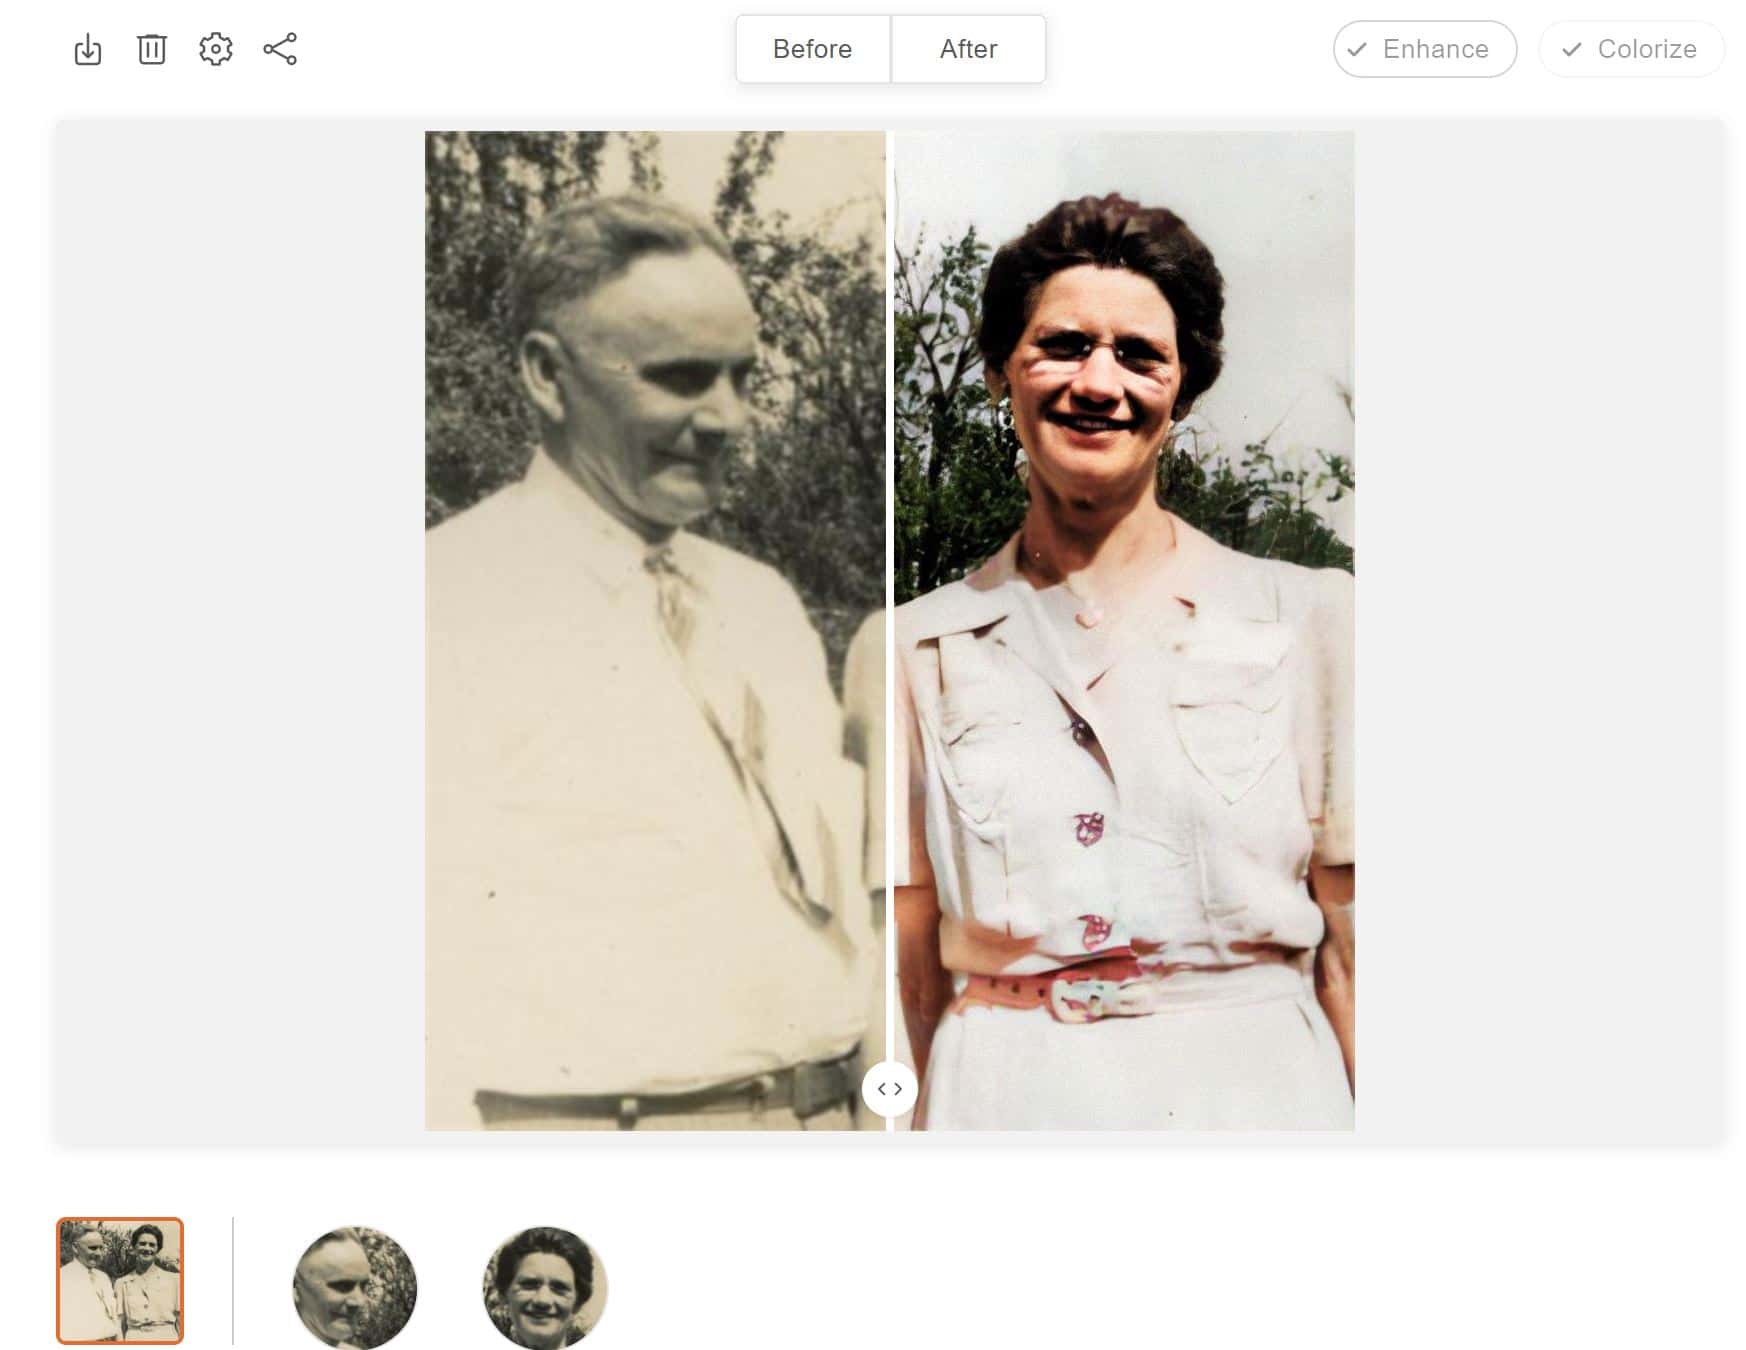
I started with the photo of my grandparents that I had just enhanced.
Again, the results were astounding! I can see the green of the shrubs and the rosiness of my grandmother’s smile.
New Settings in MyHeritage in Color
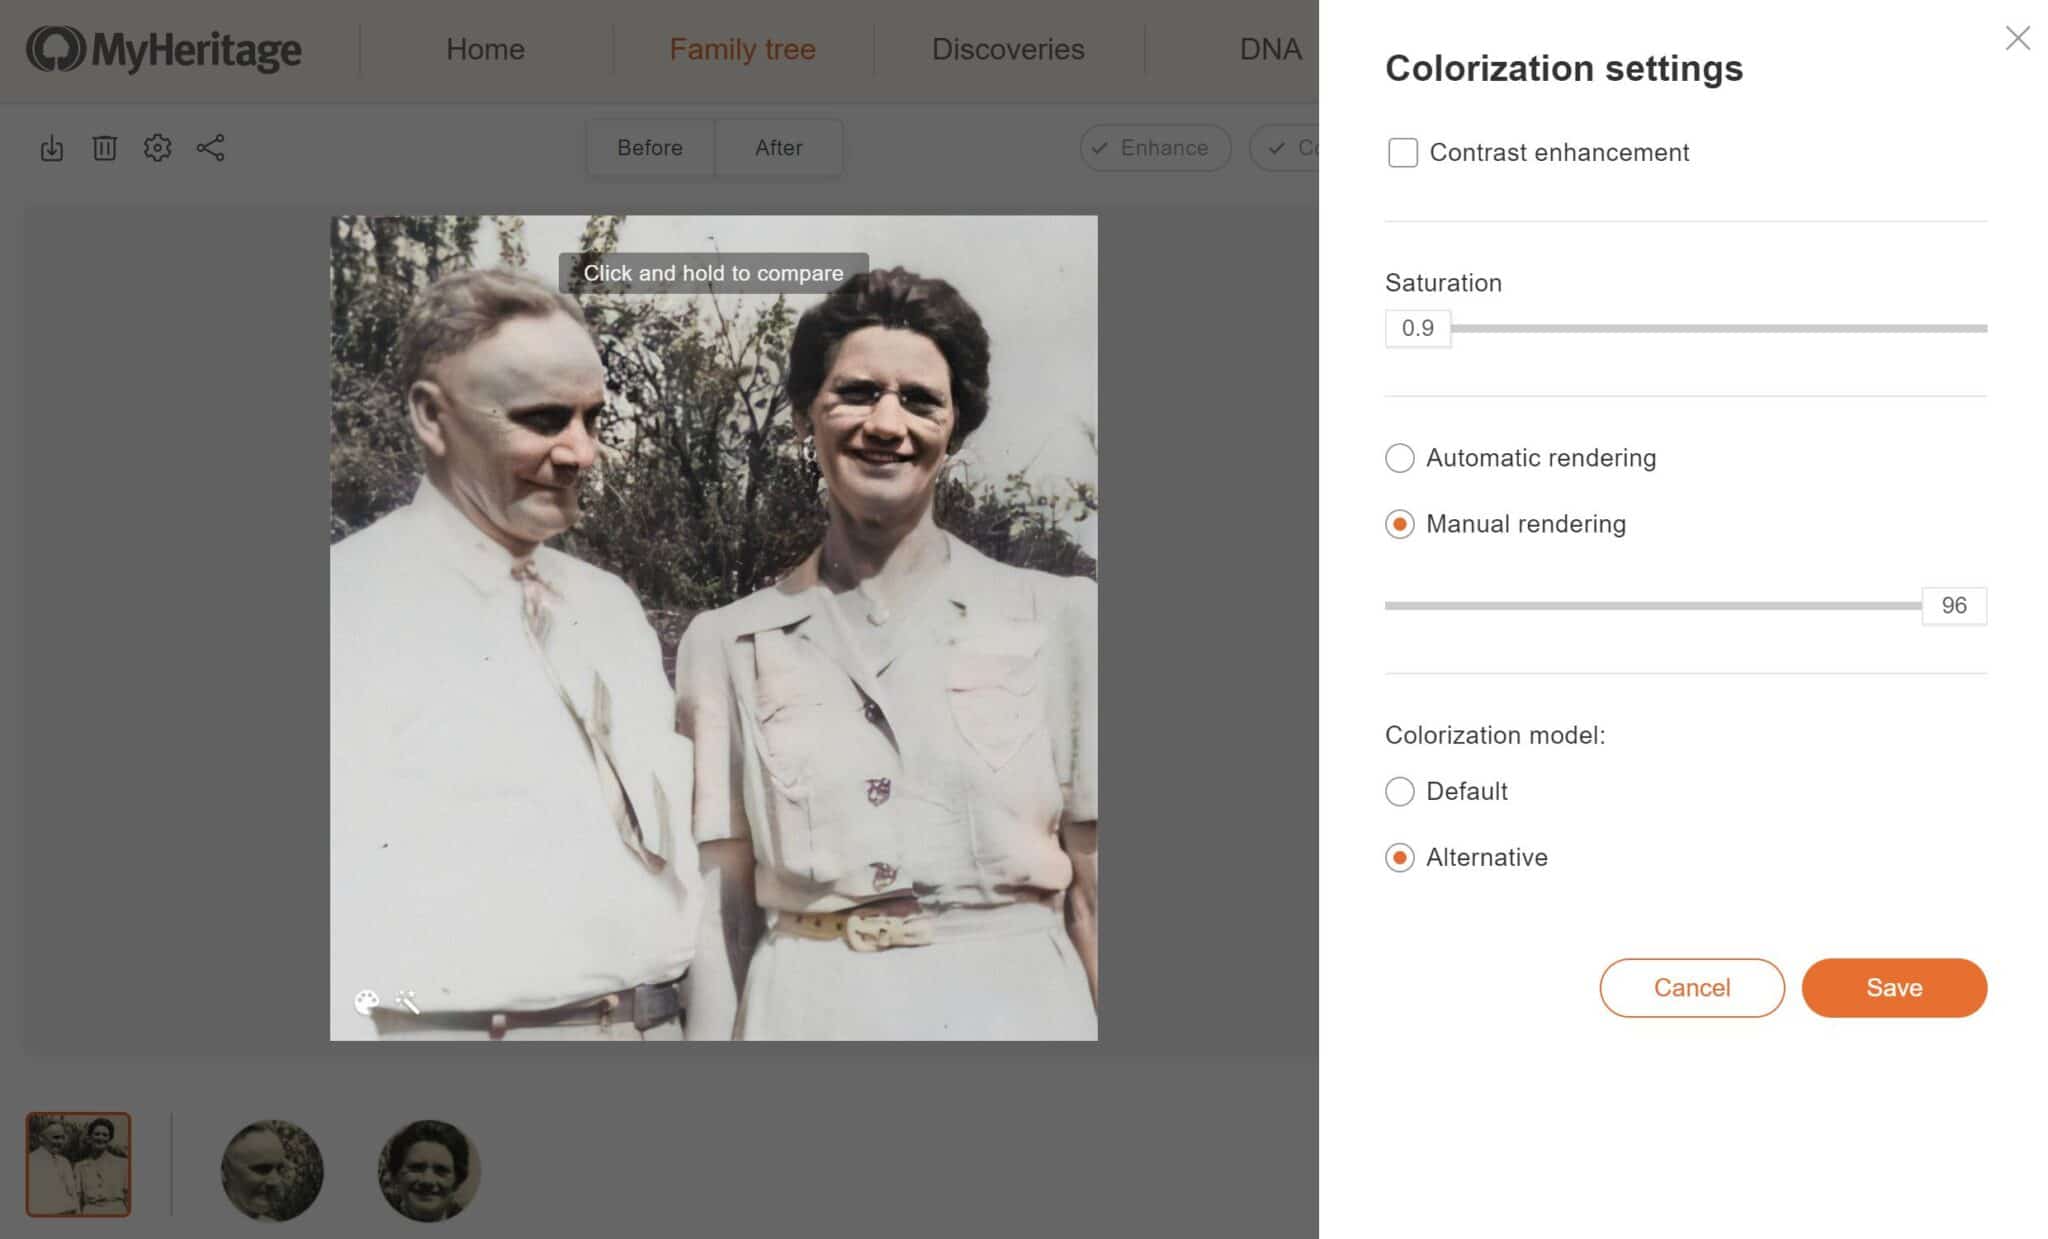
In May 2020, MyHeritage announced new colorization settings that allow you to further customize your colorized photo. The new settings let you adjust contrast, color saturation, rendering, and colorization model. Here’s a summary of how MyHeritage explains each option:
Contrast: If you feel the MyHeritage in Color algorithm has over-exaggerated the contrast that makes some features stand out more clearly, you can deselect the “contrast enhancement” option.
Saturation: This feature adjusts the intensity of the colors in your photo. If you find the colors are too bright, you can decrease the saturation, or vice versa.
Rendering: According to MyHeritage, rendering is “the process of generating your colorized image,” which the algorithm performs automatically. Choosing to manually render your image using the slide will produce slightly different results.
Colorization model: Although most photos will look amazing with the program’s default colorization settings, some might look better using the alternative colorization model, especially those that appear to have problems, like “dead-looking” skin or parts of the photo that remain in the original state.
To access the new Colorization settings, click the “gear” icon to above and to the left of your colorized photo. In this picture of my grandparents, I chose the most extreme of each of these settings. The result wasn’t terrible, but obviously spending some time trying to find a happy medium would have produced better results.
As you try out each of these settings you’ll see the changes appear in your photo, and you can click and hold the image to compare the differences side-by-side.
Saving and Sharing your Photos
When you enhance or colorize a photo in MyHeritage, the new version is saved within MyHeritage as a “piggybacked” image. In other words, the enhanced and/or colorized image doesn’t show up in your My Photos gallery as an individual image. Instead, images you’ve enhanced will display a magic wand icon in the bottom right corner, while those you’ve colorized will sport a color palette icon.
Clicking on one of these photos in your gallery takes you back to the screen with the before/after slider image you saw when your results first appeared.
You can also download a copy of your enhanced or colorized image to your computer. Clicking the “Download photo” button that appears immediately after your photo is transformed, or the download icon (the first icon above and to the left of your image when you click into an already-transformed photo) gives you three options. You can download the original photo, the enhanced or colorized photo, or a comparison.
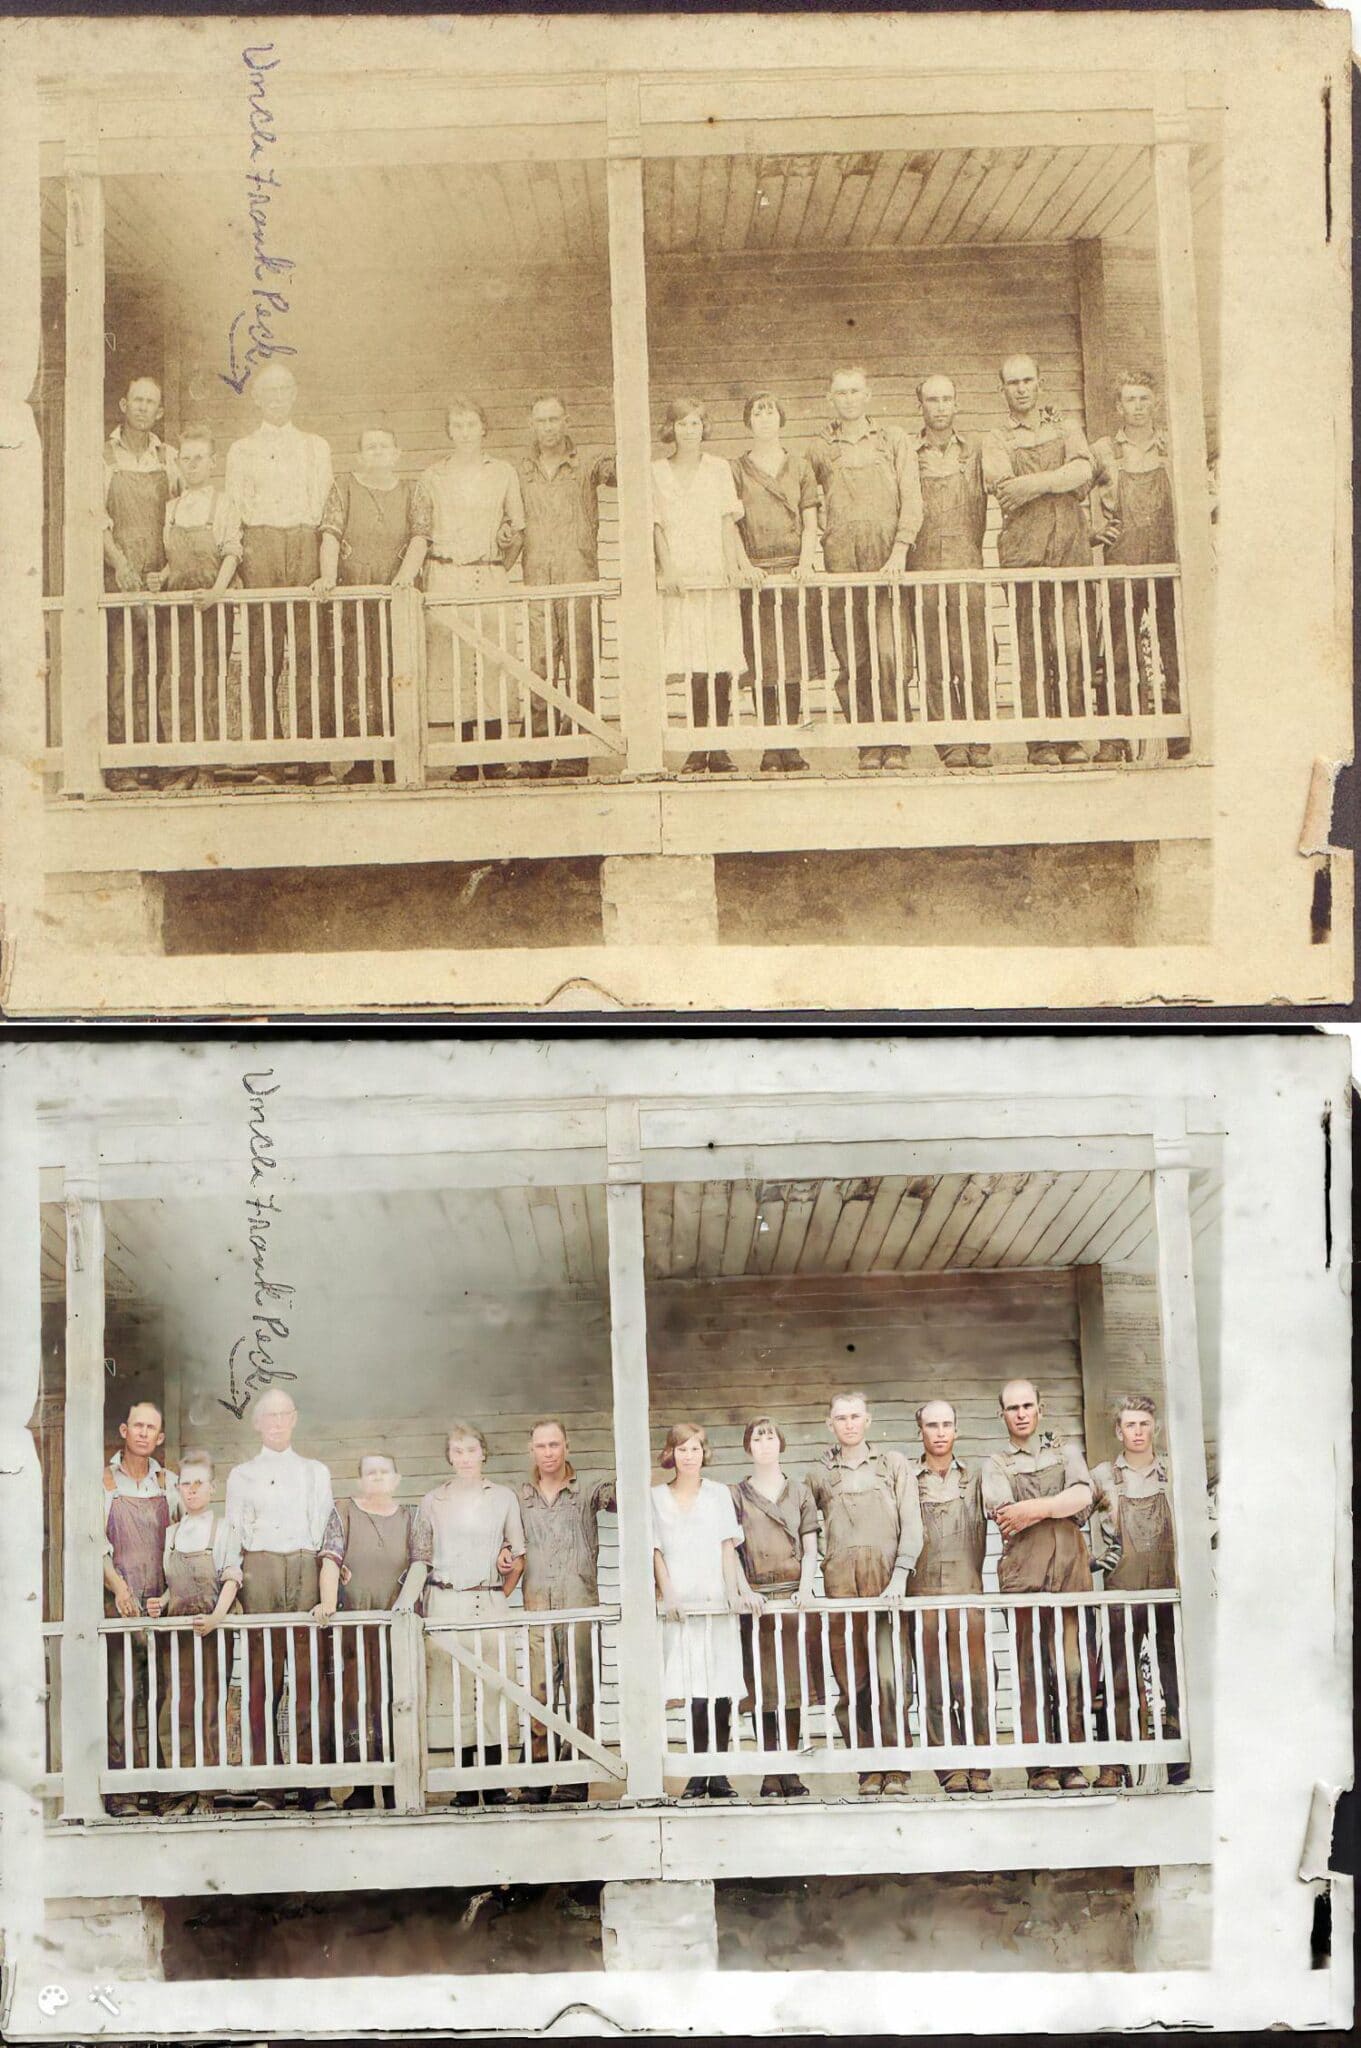
The comparison download is pretty neat. It’s just what it sounds like — a side-by-side or top-and-bottom comparison of the original and new photos. Here are some examples:
Downloading the newly improved image will allow you to view it in its full size on your computer so that you can see all the enhancements as well.
Naturally, when you discover something new and incredible, you want to share it with your family and friends. These MyHeritage photo tools are certainly no exception. Thankfully, MyHeritage has made it incredibly simple to share your photos directly from the program.
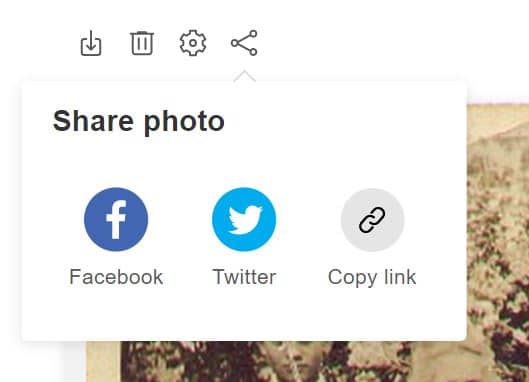
To open the sharing options, click the last icon in the icon bar above and to the left of your finished photos. You’ll see the Facebook and Twitter social media sharing icons as well as “Copy Link” option to share a link to the photos.
For the family historian, MyHeritage in Color and MyHeritage Photo Enhancer are amazing developments. If you’ve ever needed a good reason to get your historical photos together, digitize them, and add them to your family tree in sharp, vivid color, this is it!
Remember, if you want to colorize or enhance more than a few images, or don’t want them watermarked, you’ll need a subscription. A free trial is available here.
For nearly 30 years Patricia Hartley has researched and written about the ancestry of her personal family lines, those of her extended family and friends and of historical figures in her community. She has a B.S. in Professional Writing and English and an M.A. in English from the University of North Alabama and a M.A. in Public Relations/Mass Communications from Kent State University.
7,373shares
3 thoughts on “New Tool is Changing the Way We See Old Photos: Here’s How to Use It”
Ed W Ridenour
I have My Heritage and pay a lot. I have a large family tree. How can I share my colorized, repaired and enhance photos with my siblings and children. I only find to Facebook Twitter and Copy Link. I don’t see email, etc.
Diane Krastel-Knoedler
Why can’t I upload this app on my sony laptop. It sure would be easier!! hank you!
C. Resident
During the free period from mid-Aug. to Sept. 10, I tried the Photo Enhancer on >100 photos, most in B&W. It worked best on those which already had clear faces, usually full-face to the camera, not in shadow, but might have a bit of fuzziness due to less than sharp focus. The better the photo, the better it turned out in sharpening facial features to actually resemble the person in the photo. It does NOT seem to sharpen the whole photo.
Enhancements didn’t work as well on photos with faces having more fuzziness, or some shadow; those gave distorted eyes, lips, etc. Some seemed to work well, but if you knew the person (such as your own mother), the improvement just didn’t translate the right curve of chin, shape of nose, eyes, etc. Men at times looked like they hadn’t shaved, and there were even some women with a 5 o’clock shadow! Some people in B&W photos, known to have had medium or dark brown eyes, showed a light eye color like a known blue-eyed person’s eyes. Teeth were perfected, even if the person had a gap or crooked teeth in the original.
When the original is not clear and fairly sharp, the Enhancer yields versions of photos with nice looking faces in sharp focus, but they do not look like the people I knew. I think, for individuals in our photos who we did not know in life, we may accept the enhancement as looking great, but it may not actually resemble the person well. So, please do not assume you are seeing an accurate representation of what a person’s face really looked like, just because it is sharp and clear.
All in all, the enhancements seem to give that extra sharpness to faces in a photo that was already pretty good. Otherwise, you’ll get a nice sharp version that isn’t quite right. I am not a particular fan of the colorization tool, but I know it satisfies many people. I have not found a way to “undo” the colorization, and I don’t think you can download an enhanced version in original black and white if you’ve colorized it.
Leave a Comment
We use cookies to bring you the best experience, record visits, serve ads, provide signup forms and deliver other essential functions.
This website uses cookies to improve your experience while you navigate through the website. Out of these, the cookies that are categorized as necessary are stored on your browser as they are essential for the working of basic functionalities of the website. We also use third-party cookies that help us analyze and understand how you use this website. These cookies will be stored in your browser only with your consent. You also have the option to opt-out of these cookies. But opting out of some of these cookies may affect your browsing experience.
Necessary cookies are absolutely essential for the website to function properly. This category only includes cookies that ensures basic functionalities and security features of the website. These cookies do not store any personal information.
Any cookies that may not be necessary for the website to function and are used specifically to collect user personal data via analytics, ads and other embedded contents.


I have My Heritage and pay a lot. I have a large family tree. How can I share my colorized, repaired and enhance photos with my siblings and children. I only find to Facebook Twitter and Copy Link. I don’t see email, etc.
Why can’t I upload this app on my sony laptop. It sure would be easier!! hank you!
During the free period from mid-Aug. to Sept. 10, I tried the Photo Enhancer on >100 photos, most in B&W. It worked best on those which already had clear faces, usually full-face to the camera, not in shadow, but might have a bit of fuzziness due to less than sharp focus. The better the photo, the better it turned out in sharpening facial features to actually resemble the person in the photo. It does NOT seem to sharpen the whole photo.
Enhancements didn’t work as well on photos with faces having more fuzziness, or some shadow; those gave distorted eyes, lips, etc. Some seemed to work well, but if you knew the person (such as your own mother), the improvement just didn’t translate the right curve of chin, shape of nose, eyes, etc. Men at times looked like they hadn’t shaved, and there were even some women with a 5 o’clock shadow! Some people in B&W photos, known to have had medium or dark brown eyes, showed a light eye color like a known blue-eyed person’s eyes. Teeth were perfected, even if the person had a gap or crooked teeth in the original.
When the original is not clear and fairly sharp, the Enhancer yields versions of photos with nice looking faces in sharp focus, but they do not look like the people I knew. I think, for individuals in our photos who we did not know in life, we may accept the enhancement as looking great, but it may not actually resemble the person well. So, please do not assume you are seeing an accurate representation of what a person’s face really looked like, just because it is sharp and clear.
All in all, the enhancements seem to give that extra sharpness to faces in a photo that was already pretty good. Otherwise, you’ll get a nice sharp version that isn’t quite right. I am not a particular fan of the colorization tool, but I know it satisfies many people. I have not found a way to “undo” the colorization, and I don’t think you can download an enhanced version in original black and white if you’ve colorized it.