This article is an excerpt from Family History Daily’s Unofficial Ancestry.com Crash Course. It covers the main Ancestry search page (All Collections) to help you use this feature to its full potential. It is also discusses some of the limitations of searching this way. For lessons that go beyond the main search to help you uncover your family’s history on Ancestry consider registering for the online course.
Please note that Family History Daily is an affiliate partner of Ancestry and may receive a referral fee to support our work if you follow links to their site from ours and take advantage of a service.
Before we begin, we want to remind you that Ancestry is a paid site. If you do not have an active subscription, you will not be able to access most of their records (they do offer some for free). You can take advantage of a free trial if you like, but if you’re not interested in paying for access after that time you may want to consider taking advantage of the many free genealogy sites available on the web instead.
Easy Techniques for Mastering the Main Ancestry Search Area
Ancestry’s default search area, providing access to all of its collections at one time, is the easiest and fastest way to look for your ancestors in Ancestry’s billions of searchable records. While it is often not the best way to find records for your ancestors (see lesson 4 for why), it is the most commonly used search page and it can be a very effective tool when used correctly.
How to Find and Use the Main Ancestry Search Page
You will find the main search form listed as “All Collections” under the “Search” menu item in the top menu bar on Ancestry.com, and in many other locations on their site. Ancestry also defaults to this search form for many search requests.
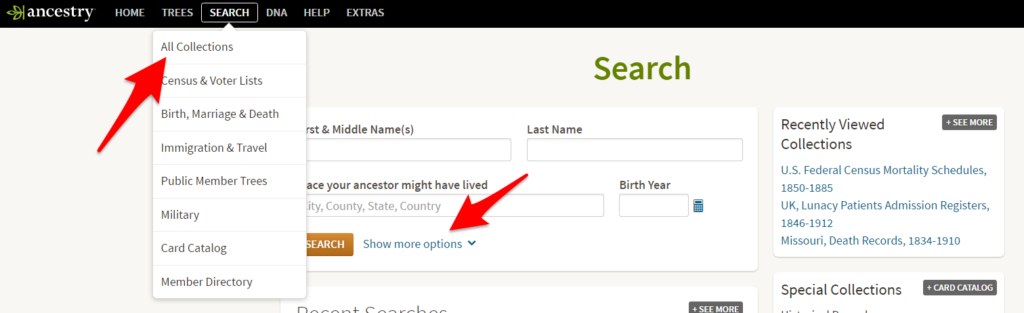
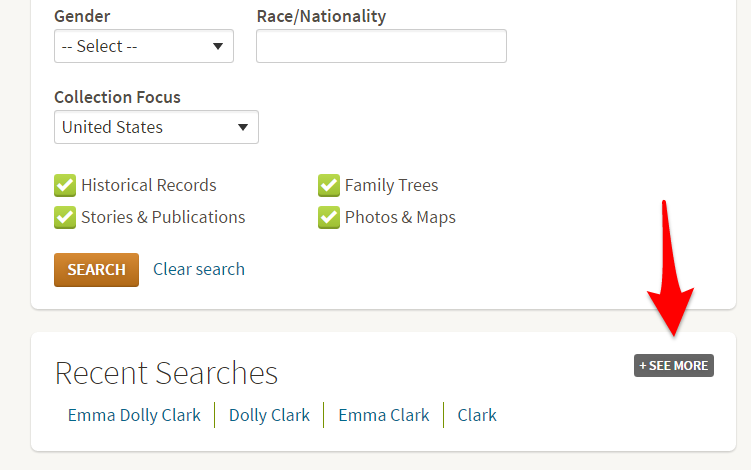
Once on the Ancestry search page make sure to select the “Show More Options” link next to the orange Search button to see all available detail boxes (this is shown with the red arrow in above screen capture).
As mentioned, while Ancestry’s main search form is not always the best way to find individual records, it can be very helpful in certain situations – mainly when you are just starting your research on a person and want to grab the low hanging fruit, or when you have gathered new details (such as a birth or death date) and want to do a quick general sweep to make sure you are not missing anything. There are also some nice, unique features built into the Ancestry search area that we will discuss below.
Let’s explore what this search box is good for, and when it should be avoided.
If you have just added a person to your tree you most likely want to quickly see what information is available for this individual. The first thing you might do is check the “hints” Ancestry provides (which is covered in later lessons), and then you might head to the main search form to grab additional records.
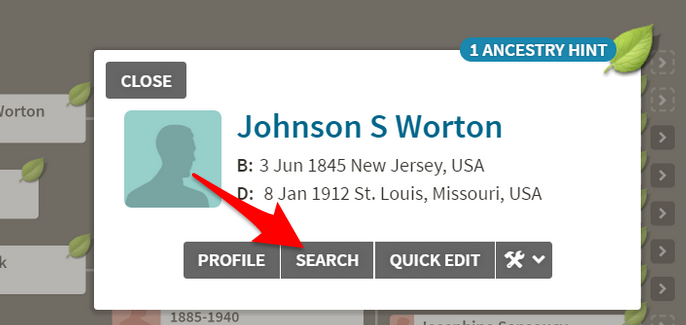
You can do this by visiting the All Collections option in the main menu bar (as explained above) or you can simply click the Search box on any individual in your tree (in the tree view or when in their profile.)
Ancestry Search in Tree View:
Search Option Shown in Individual Profile:

Either one of the above search options will default to the main search function on Ancestry with pre-filled information about your ancestor.
Using these options, or manually entering your search terms in the main search yourself, is particularly useful when:
- You have just added someone to your tree for the first time.
- You have just added some new information about a person in your tree and you want to see what new records may be available.
- You have removed information from an individual, or corrected information, and want to run a quick search for new records.
- You have not searched for new records about a particular ancestor for many months and want to see if anything new is available.
It should also be noted that many of the “hints” suggested by Ancestry correlate with the information that will be turned up in an All Collections search. This is not always true but, often, if no hints are coming up for a person you may find that some focused digging will be required in the All Collections main search to turn up new records that fit your needs. This is because the hints feature replicates (to a degree) an All Collections search, using special parameters to obtain the best results.
You’ll find this to be less true when dealing with records in languages other than English or for those people with long or complex names. In these cases a knowledgeable search of All Collections can usually turn up numerous additional records.
The main search form is designed to pull information from a huge number of collections. To do this it must search billions of records to find a match for your ancestors. Ancestry search does a very good job – considering the amount of information it must sift through – but all search algorithms are limited and Ancestry’s is no different.
Generally, a search in All Collections, even with filters applied, will only be able to identify the most obvious records that very closely match the terms you have entered. These relevant records will often be mixed in with hundreds or thousands of irrelevant results that you must sift through – and unless relevant records appear on the first few pages of results you are likely to miss them.
Of course, the form provides a good deal of filtering options to help you refine your searches but these pose a problem too. The more you refine, the more records are removed. And just as Ancestry’s search cannot always identify relevant records to display it can’t always identify which records it should remove either. So, when it can’t match one or more of your terms it cuts a record completely and you never see it. This record is then completely overlooked.
The sheer number of records you are sifting through in a main Ancestry search means that you have less opportunity for creative searches that allow for name misspellings, variations in dates and locations, mismatched data and outright mistakes. All of these things occur in records quite commonly and seasoned researchers spend a good deal of time working to find records despite these errors. The more general and varied the collections you are searching, and the more records that are included, the harder this refined search becomes.
We discuss this in our article This May Be the Most Important Genealogy Research Trick You’ll Ever Learn.
Now that we have gone over when to use this form, and why the option is often not the best bet for detailed research, let’s take a look at how we can more easily find relevant records when we do decide to use it.
Create Multiple Search Combinations
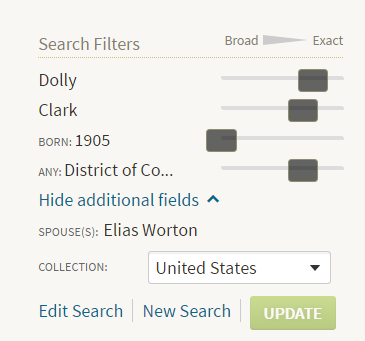
The first thing you will notice when you look at the main search form, as you no doubt often have, is that there are many possible filtering options. Generally the more data you place in these fields, and the more “exact” you choose to make this data, the less records will be returned.
A general technique is to start searching for an individual with a medium amount of data, such as a first name and surname, a birth date and a location. Then, many researchers remove or add data to increase or decrease and refine results as needed. This is all pretty self-explanatory and you have likely done this many times.
However, it is important to remember that any data that is added or removed, and any changes to the amount of “exactness” of each field in your search form, can radically change the results. One of the most effective ways to use this form is to refine your search multiple times to turn up new results. You can do this by adding or removing part of a name, a date, or a location, adding or removing relatives, adding only parts of relatives’ names, using the “similar,” “sounds like” and “soundex” options individually or together, making various boxes “exact” and by searching date ranges instead of exact years.
Always take the time to create multiple Ancestry search combinations so that you have the best chance of getting good results. Do not count on one combination to return the results you need.
Don’t Forget to Start from Scratch Every Now and Then
Once you have spent some time searching for an individual you will often find that the same records or collections seem to appear over and over again despite changes. If you make too many changes by using Ancestry’s scroll bars (filters on the left of search results) you may even find that you start to get zero results. In this case it may be a good idea to start your search over again.
Filter by Category
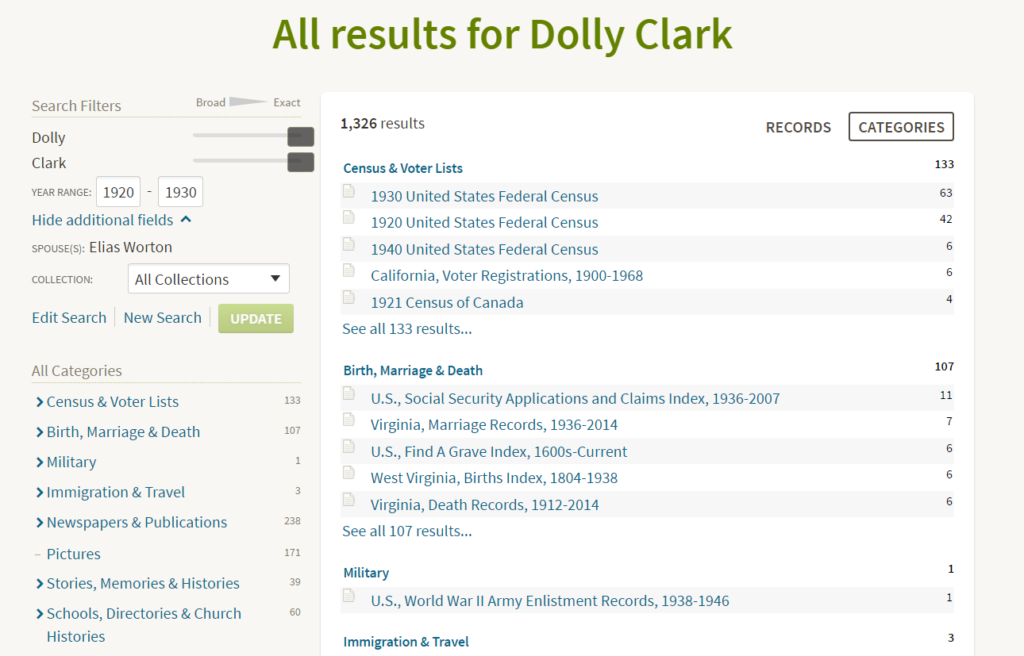
Here is an example search we have done using All Collections. Although we’re interested in what new records might be available for this ancestor in general, because we haven’t searched for her in a while, we’re primarily hoping to find a marriage record. After trying varying types of data we have settled on a few key terms that seem to be bringing up the most relevant results.
Here’s our search:
And our top results:
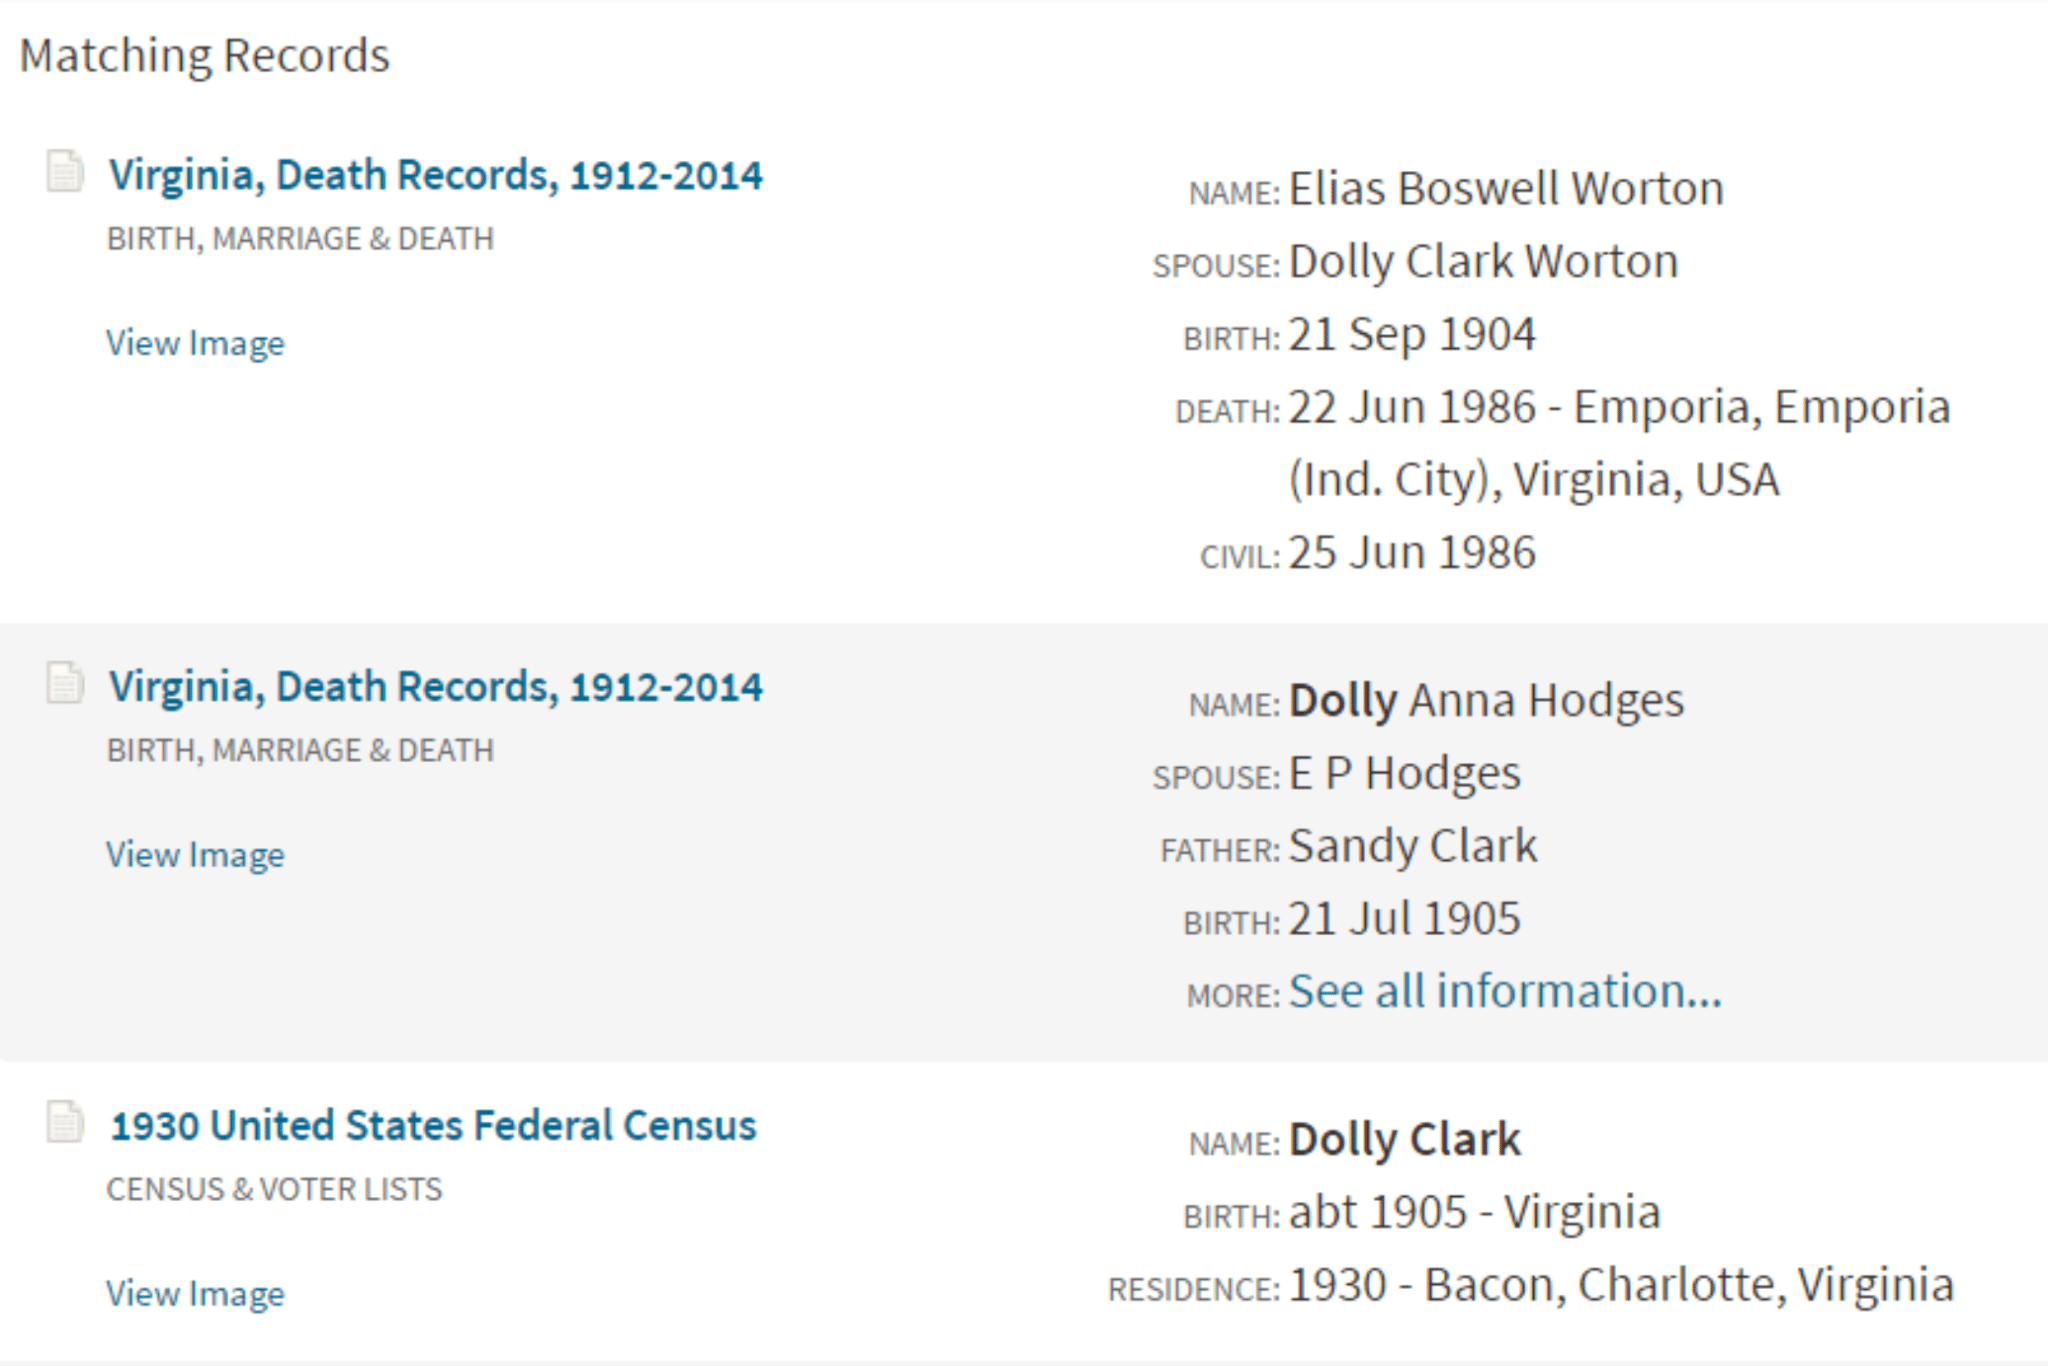
Adding less data than this provides matches that are much too broad, and adding more eliminates too many records and does not turn up a marriage record. After going through several pages of results, out of the 300+ that are suggested, we have still not turned up the record we need or any new information. Many of the suggested records provide such minimal identifying information that reviewing each one starts to become a very time-consuming task.
No doubt you have encountered similar situations.
To avoid this problem, we are going to look for the record we need by specific category. To make sure you are finding as many records as possible about your ancestors when using the All Collections search you need to view records by category individually. Whether you are looking for something specific, or are just hoping to uncover as much information as possible, this is critical. Viewing by category will give you a chance to see a wide variety of additional records easily.
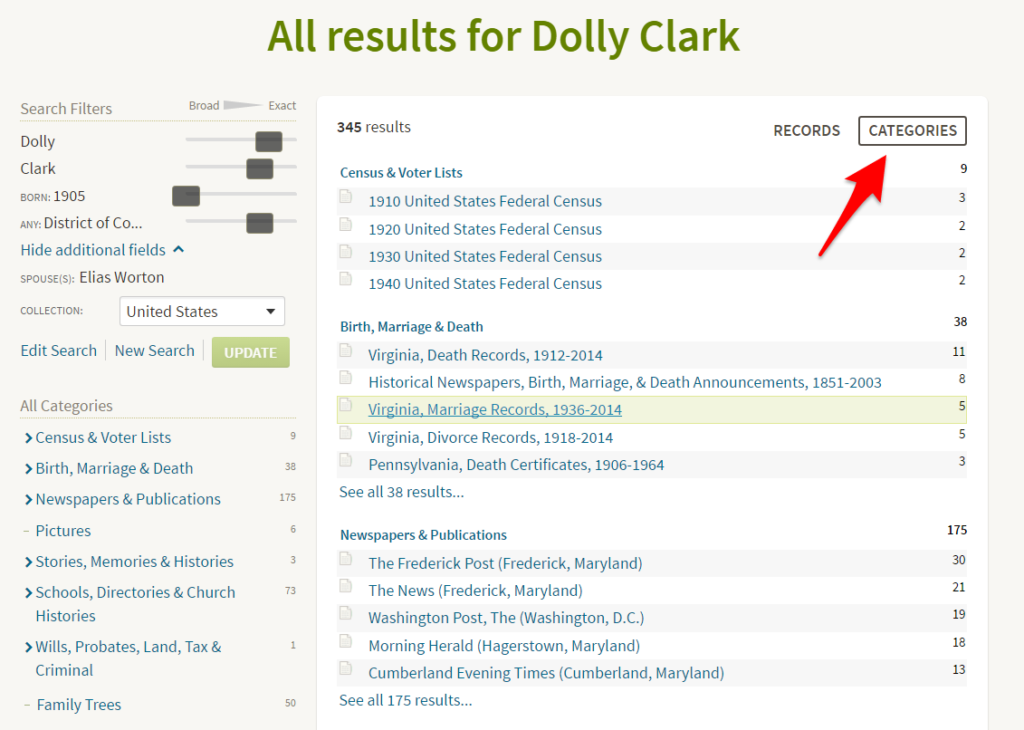
To do this, start by choosing a country of interest from the search filtering area after completing a search. It appears under the scroll bars for filtering. You can see that we have already done this in the search images above and below. In our case we have chosen the United States.
Now we are going to sort by category. Since we are mostly interested in a marriage record we are going to choose Birth, Marriage and Death.
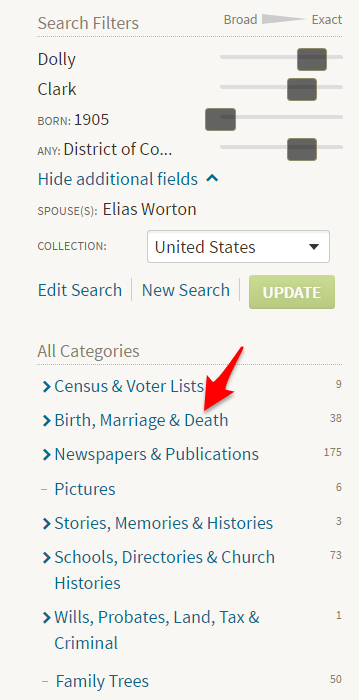
This offers us only 38 results to search through and, when we further filter down to marriage, we have only 20 results. This is a much more manageable number to review and within a few minutes we have identified our record.
You can see by looking at the record entry above that no name information is given to help us narrow our search further, we must check each entry individually. This simply would not be possible with hundreds of results from the All Collections main results page. Only having to review this smaller number of records in the Marriage category, however, gives us the space we need to look at each record.
If we had not turned up the record we needed so quickly we could have kept tweaking our search and restricting ourselves to the Marriage category for an increased chance of locating the needed record. Of course, this tactic is a fairly obvious one for those who regularly implement it – but many people overlook this simple step in their searches and miss a great deal of information.
In addition to filtering on the left sidebar, you can also view records by individual category on the top of any search results area.
After having luck finding our marriage mention we decided to keep searching. Further category filtering (changing and refining categories) turned up additional records that did not show up in the first several pages of our general results at all. These records may easily have been missed had we stayed in the main search and not sorted by category.
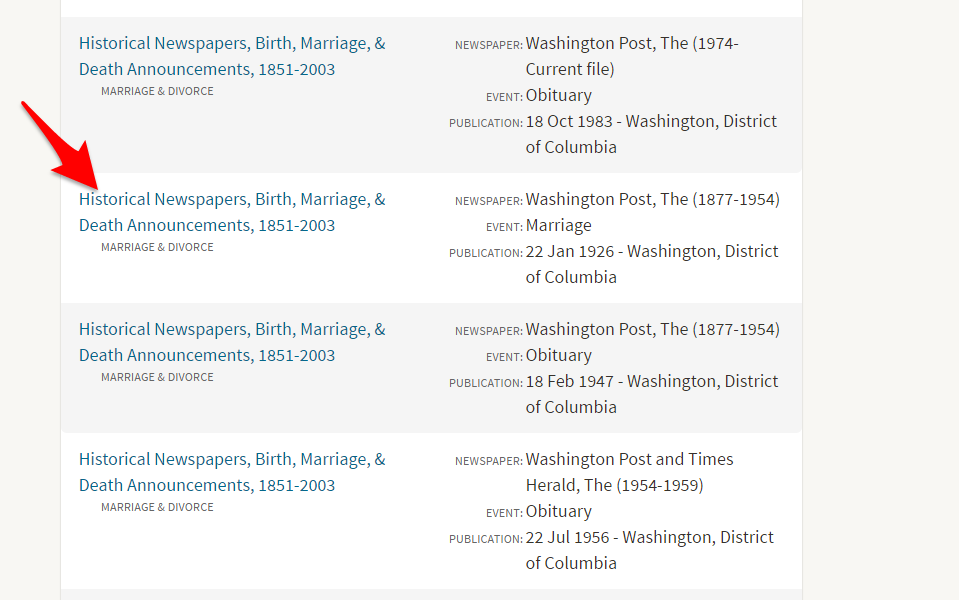
Don’t forget that when you are flipping through categories to take the time to look for clues that may help you locate the record you need. In our case, we kept seeing Historical Newspaper Archives coming up, especially The Washington Post.
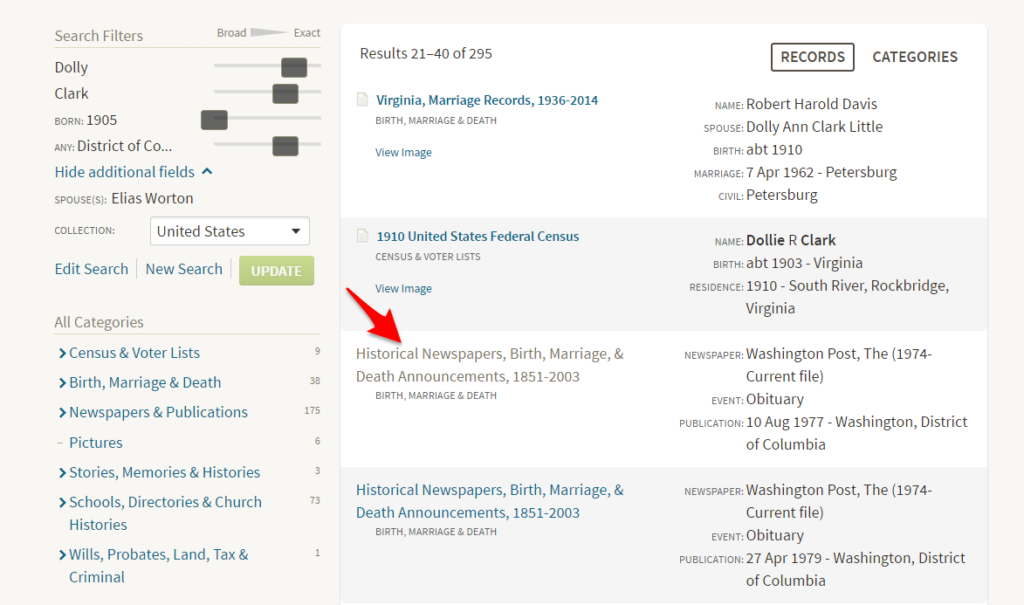
Although these specific entries did not contain the record we needed, we later discovered that our marriage notice was contained in the same paper. These clues can be invaluable when trying to pinpoint relevant collections in the thousands of options on Ancestry.com, and is a good example of why it is important to keep good research notes so that you can remember what you have looked at, what you have not, and what needs to be examined or verified later.
Tip: Did you know that Ancestry provides a tool for note taking? We’ll talk about that in another lesson.
Make Use of the Keyword Search Box
Another highly overlooked strategy for turning up new records when using the main search is the keyword search box. We tend to want to use the fields provided by Ancestry for names, dates and locations, but this one simple little field can completely transform a search to provide more relevant results. You will see this illustrated a few different ways in the course.
The most effective way to use this field is to limit potential search results by including a specific term and making it exact by checking the “exact” box.
Think creatively, this could be any term that may appear in your record of interest – a name of a person you might find on the record, the type of document (birth, baptism, marriage, death, will), an occupation, a location, a house number, a publication name or even a specific phrase that often appears in a document of interest (ie Registration Date).
Even if there is a spot for this information in the search form the keyword tool can often provide better results. Just make sure that the information you search for is searchable – meaning it has been indexed.
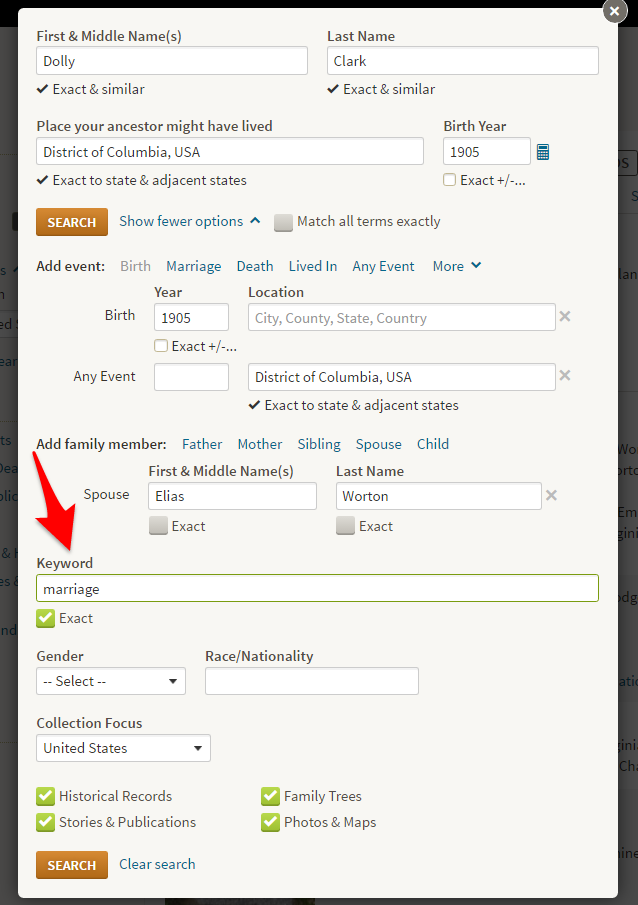
Let’s go back to our marriage search and pretend that we haven’t already found what we were looking for. In this new example we have gone back to the main All Collections search (rather than the Marriage category), added the simple term marriage to the keyword box, made it exact, and viola…our record of interest appears on the first page of results. Much more simple even than sorting by category.
This method for finding records can be highly effective and is one of the best ways you have for filtering searches on your own terms. If you are having trouble finding an ancestor (whether because you have hit a brick wall or have a person with a very common name) try adding keywords.
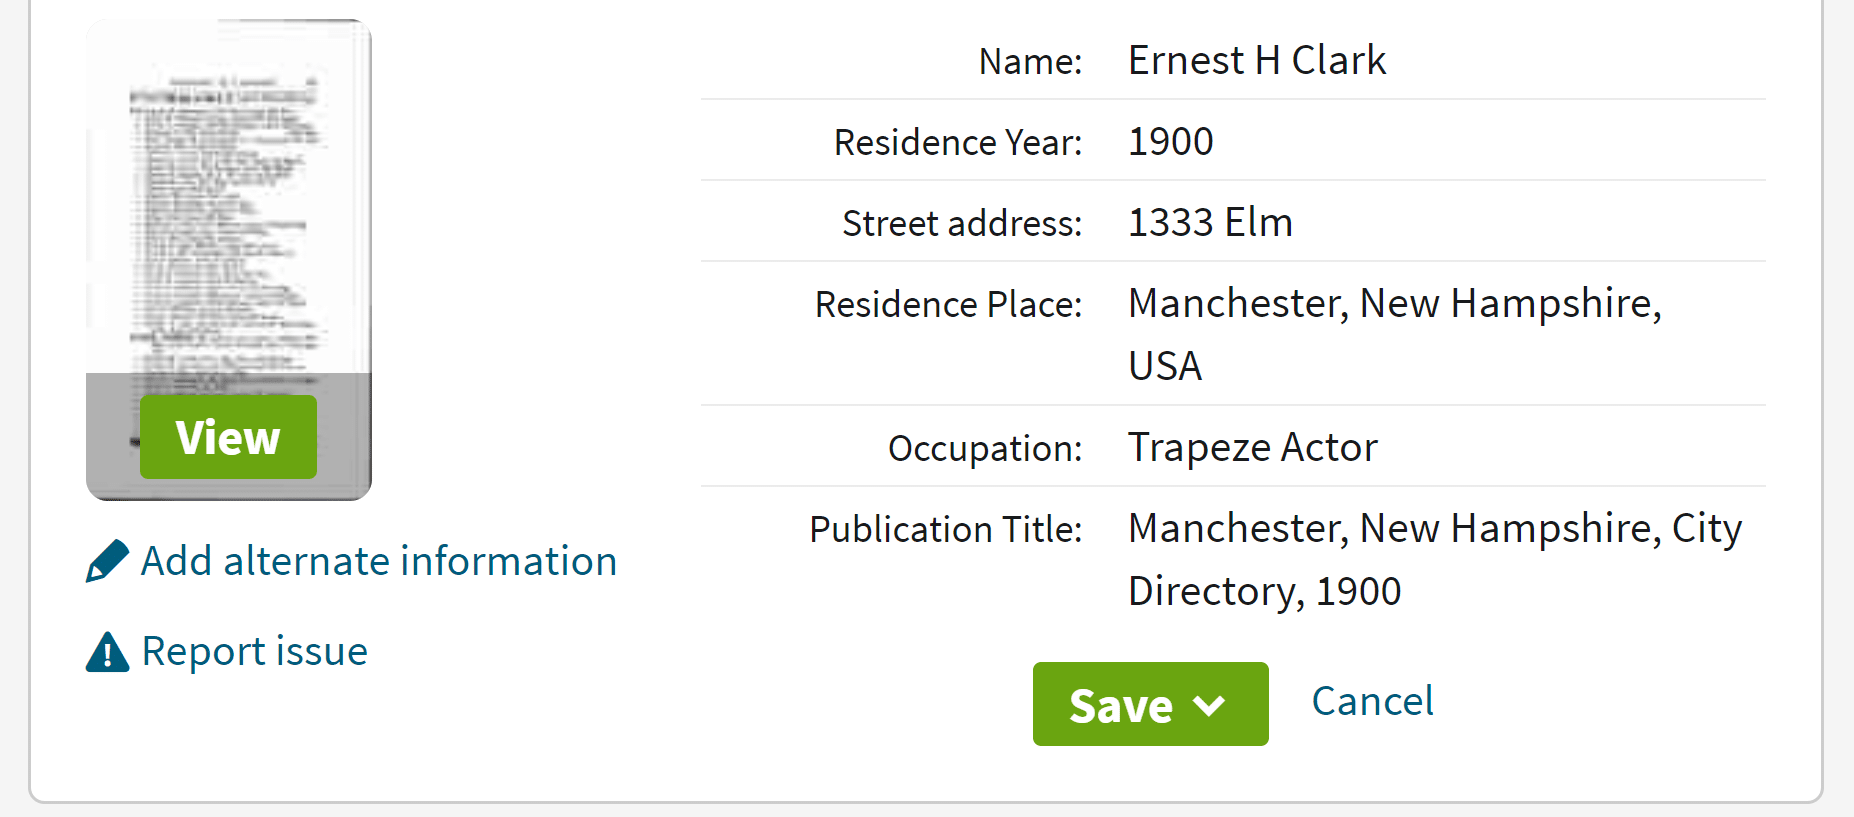
This tactic also helped us prove an old family story about a person who was a trapeze artist. Because the ancestor of interest has such a common name, and he happens to share it with a famous trapeze performer, it had proved to be very hard to find what we needed.
A simple keyword search on Ancestry turned up a record for this ancestor that matched the story. Some additional research then allowed us to prove that the record was, in fact, for our Earnest Clark (see this article for help differentiating people with the same name from one another).
Simple Search with Keyword:

Record with Matching Keyword:
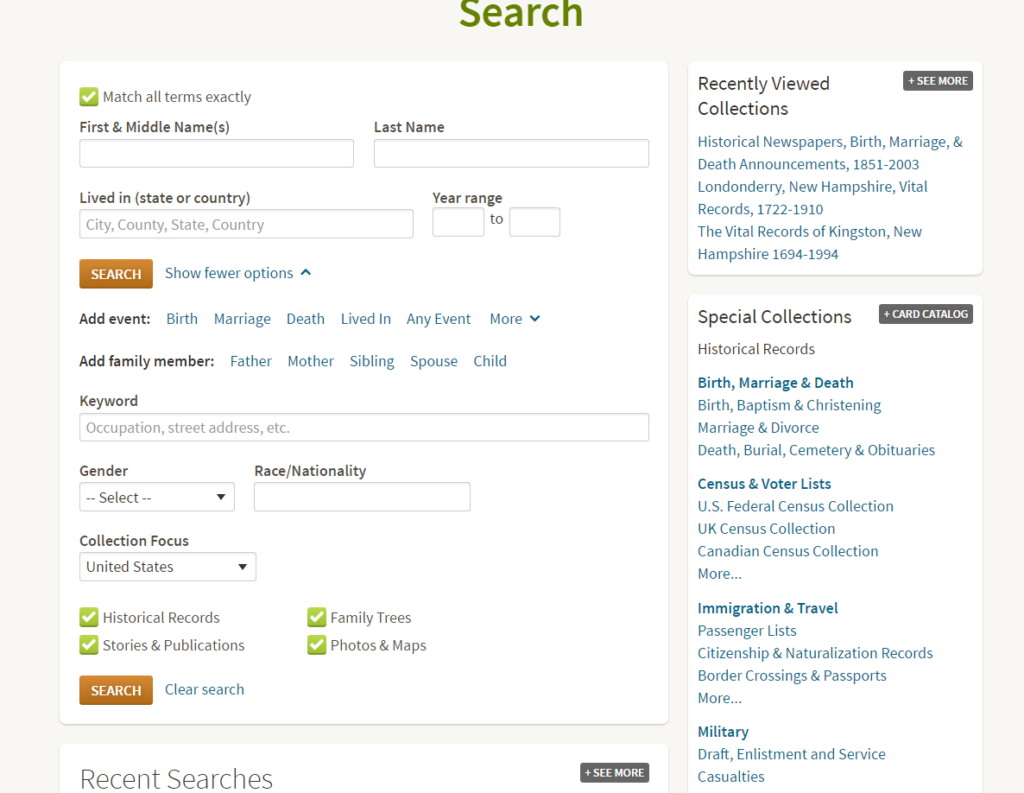
Make Use of the “Other” Ancestry Search Form
If you’ve been using Ancestry for some time you might remember that they changed their main search form some years ago. There were some improvements with this change, but there were also some changes many people didn’t care for. The good news is that you can still simulate this old search (in part) by changing your search preferences. The classic search provides a bit of a different system for searching, bringing back an option that has been cut from the new form – search by date range.
Here is what the classic form looks like:
The classic search will return the same results as the new search if used in the same exact manner (ie you conduct two identical searches with identical settings).
But the default settings for the classic search are different and, therefore, the presentation of results is often different.
Using the classic search form, versus the new one, will automatically mark certain fields as “exact” and will show results by category instead of by record (you can still flip back to record view on the top). We love this. It forces the researcher to think more critically about what they need and where that information is coming from by presenting categories and their collections first. It feels more organized and allows us to sift through categories more quickly, potentially opening our eyes to new possibilities and trends.
You should be cautious though, that auto “exact” feature will seriously limit results and you will likely need to loosen up your searches after an initial search. If you uncheck any of the “exact” boxes before conducting your initial search the results will be presented by record, essentially replicating the new search.
The classic search also includes a date range feature that allows you to set a general date range of interest for all results. You can accomplish this date range effect by choosing a loose date range in the new search form as well (such as +/- 5 years in the Any Event box), but this can be a bit more confusing because the Any Event box can conflict with other suggested fields that allow dates.
To try out classic search simply click on your name in the upper right hand corner of your screen when logged in and select “Site Preferences.” Now, scroll down the preferences page until you see the “Search Preferences” box below.

Select the box and save. When you load a new All Collections search, you will now use the classic search form. Conversely, if you already have this selected you can uncheck it to try out the modern search. You might be surprised by how this change influences your results and research patterns. Sometimes all we need is a little change to help us see things in a new way, and make new progress.
Easily Repeat Your Searches or Find Recently Viewed Records
Whether you are using the new search or the classic version, you will likely find yourself completing the same searches over and over again – with various tweaks. You may even wish that you could go back in time to repeat a search you did in the past if it provided better results. But, after many tweaks, it can be easy to forget what data you entered in each search.
Ancestry makes it pretty easy to review and repeat searches. To do this look to the bottom of the search form for the term “Recent Searches.” You can click any one of the four searches presented, or select “See More” to see all of your recent searches. Click on any one of the past searches to repeat that search.
Unfortunately, Ancestry only stores the last 100 searches, so if you’ve been on a roll lately, you may not find what you need. The recent searches page also allows you to view recent records and data collections you’ve used, which can be incredibly helpful if you forgot to save a record to your shoebox or tree or you need to quickly find a helpful collection again.
Helpful Keyboard Commands
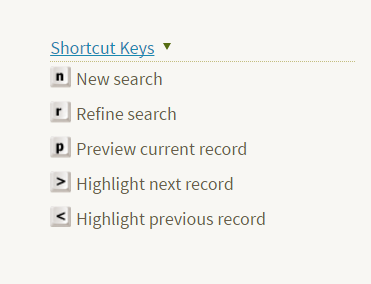
One final quick tip. Ancestry offers some simple keyboard shortcut keys to help you speed up the process of reviewing records. They’re listed below and at the bottom of the left sidebar on search result pages. We suggest that you take the time to learn these as they can make a big difference in how quickly you are able to go through records when looking for a match (if you’re on a desktop or laptop).
That completes our lesson on the All Collections Ancestry search form. We hope that these tips will help you improve your searches and make new discoveries. Try each of them out and see what happens.
We will cover many other techniques as we progress through the course and, in a coming lesson, we will be discussing alternatives to this search form that will help you uncover even more information about your ancestors, including those that have been hard to find in the past.
Register for the online Ancestry Crash Course here and get immediate access to all lessons.
You might also like:
- Ancestry vs MyHeritage vs Findmypast: What’s the Difference and Which One is Best?
- Ancestry Has Thousands of “Invisible” Records You Can’t Find With a Search
- 7 Ancestry Hacks You Need to Try Now
Image: Old Family Photograph, Possibly from England, Late 19th or Early 20th Century, Posted By Adrian Black on Flickr Creative Commons
I have used ancestry many times to search but one comment I would make is that it is very frustrating that no matter how many times I change the search title to .co.uk it still reverts back to USA and then I have to go back to the beginning and start again. Very time consuming !