This post is Step 4 of a 5 part tutorial on creating your own family history blog. Find the first post in this tutorial here, Intro and Step 1 — or quick jump to Step 2, Step 3, or Step 5.
Now, let’s set up some important plugins before you create your first post.
-Privacy
Important question…do you want a private or public blog? If the answer is public you can skip this plugin. If the answer is private, or semi-private (you will share with only certain people) continue on.
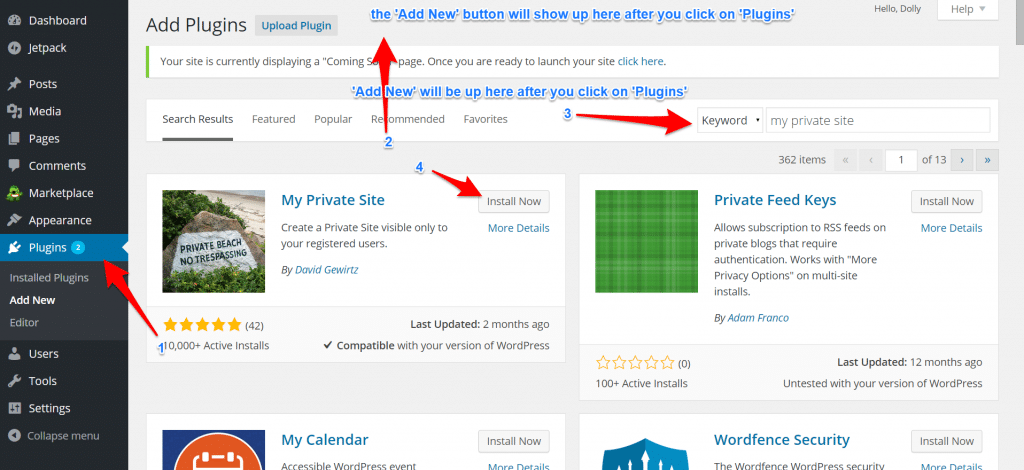
For a private blog we are going to install a plugin — this is an addition to your blog. Look at the left sidebar and click on ‘Plugins.’ On the new page, look way at the top and find ‘Add New’ in blue. Click on that and type ‘My Private Site’ into the search box. Now hit ‘Install Now.’
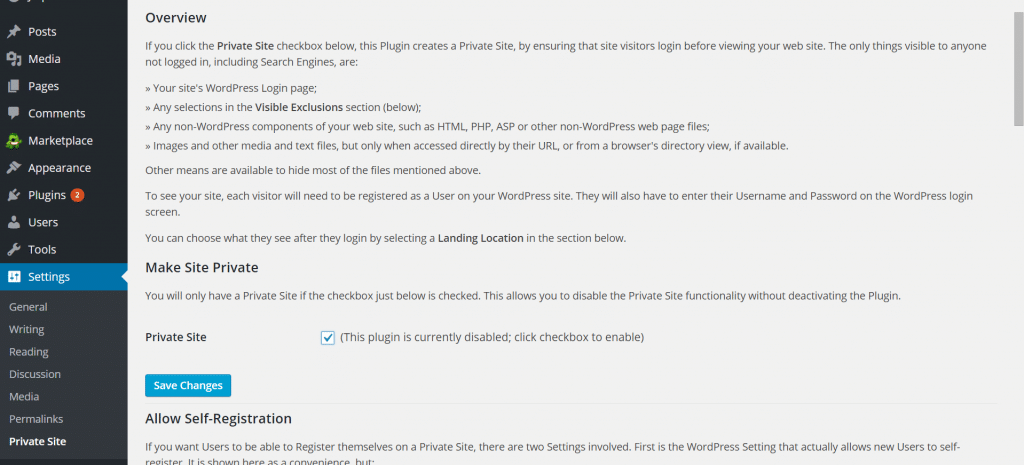
Once you select ‘Install Now’ you’ll be taken to a page that asks you to activate the plugin, do this. Now roll over ‘Settings’ in the left sidebar near the bottom and hit the last option ‘Private Site.’ Once you land on the next page, select the ‘Private Site’ checkbox and hit ‘Save Changes.’
Once you do that your site will be private. Only those people who have an account can login and view it. Anyone else who tries will see the default page we looked at earlier.
Try it by logging out and viewing your domain to make sure it is working (log out in the upper right hand corner of your admin panel — roll over your email/username). Make sure to log back in when you are done at http://www.yourdomainname.com/wp-admin.
You can now choose to access your blog only yourself or create user accounts (or an account) for family members or other special visitors. To do this head over to ‘Users’ and then ‘Add New’ in the left sidebar and set up a new account that is set to ‘Subscriber’ with a password and username. You can now safely share this username and password with your family. They will login at yourdomain.com/wp-admin like you do. They will only be able to read, not edit, your site. If you want them to be able to edit or add posts choose ‘Author’ when setting up the account.
You can set up one account that everyone can share or an account for each person. Do not give anyone you do not completely trust YOUR username and password. Anyone who has your username and password will be able to add posts, or change or delete your site.
– Spam
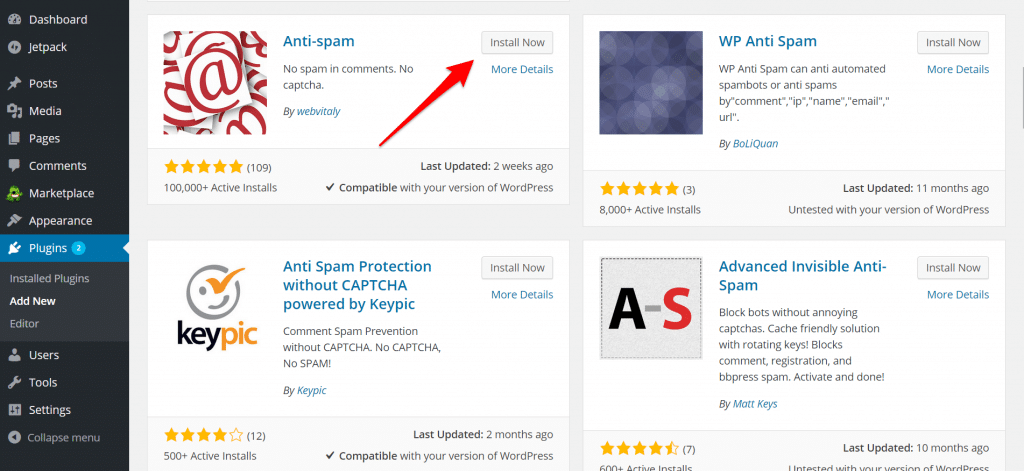
If your site will be public, you will need to set up a spam filter since spammers love to leave icky comments on blog posts. We recommend Anti-Spam since it is free and works well. To install it, select ‘Plugins’ from the left sidebar, hit the blue ‘Add New’ button at top (see the image under the privacy section above for clues to where these buttons are) and then type in Anti-Spam into the plugin search. You’ll need to scroll down a bit to find it.
Select ‘Install Now’ and then ‘Activate’ and you’re good to go.
Now go to the plugins section again (left sidebar), find Akismet and deactivate it. Just roll over the name and click ‘Deactivate.’ This is a great plugin, but requires a fee so we’re not going to use it.
You should be all set for a spam free site now. However, this plugin may catch some comments you do want, so head to the left sidebar (under ‘Comments’) and view, manage and approve or delete comments regularly. You have that power, since you’re the admin.
– Backup
One of the most important things you should do is make sure and back up your site regularly. There are two main ways to do this. One is free and fairly simple, the other costs $5 per month and is a ‘set it and forget it’ option. We have used both and they are wonderful ways to ensure your data is safe.
The Free Option: Install the plugin ‘UpdraftPlus – Backup/Restore.’ Use the steps above to access Plugins > Add New and then type in the name and install. Once you do you will find a new section under ‘Settings’ when you roll over it called ‘Updraft Plus Backups.’ Click on this and then hit ‘Backup Now.’ Leave all boxes unchecked in the popup and click on ‘Backup Now’ again. The plugin will create a series of files that you will download to your computer. You can then upload these later to a WordPress installation by installing this same plugin if you ever lose your site. We recommend you backup every time you add a new post, or at least weekly. More information on this plugin can be found here.
The $5 Per Month Option: The second option costs $5 per month, but once you set it up you almost never need to worry about it again. Plus, your files are saved securely online so even if your computer crashes they are safe. To install this option, go again to ‘Plugins,’ select the ‘Add New’ button at the very top, search for ‘VaultPress’ and ‘Install Now.’ Activate and then you will see a large “VaultPress Needs Your Attention’ box at top. Follow the link and instructions to activate and pay for the service. At some point in the registration they will ask you if you want to provide login credentials or FTP access. You DO NOT need to do this. As long as the plugin is installed the backup will work fine. VaultPress is a very trusted option run by WordPress.com so you can feel good using it and backup will be easy via the plugin if you ever need it. More information can be found here.
Once you have the required plugins set up you are ready to start blogging!
Head Over to Step 5 – Create Your First Blog Post!
Go Back to the Main Post – Step 1
Disclosure: Family History Daily receives payment when you sign up for web hosting with BlueHost. This helps us support the site and keep it running. However, all of our opinions here are our own. BlueHost is known to be a very reliable service, has been around for many years and is trusted by many small, medium and large websites. Plus, they have great rates.


