If you have done family history research for any length of time, you are most likely familiar with Ancestry’s amazing hints tool – which allows users to harness the research they have already done to make new discoveries more easily. But Ancestry is not the only site that offers this service to its members. There are a number of genealogy services that offer a similar tool and MyHeritage is one of our favorites.
The MyHeritage Discoveries engine, as it is called, does a brilliant job of connecting researchers with new records in a way that will actually help you grow your tree – it even helped a member of our team overcome a brick wall that had persisted for more than a decade.
How to Discover New Information About Your Ancestors with MyHeritage
In this article we will take you step by step through this service, showing you how to secure a free trial (so that you can try it without risk) and how to quickly gain access to new records that will help you discover more about your ancestors. In no time, you will have likely added dozens of new facts to your tree. It is recommended that you follow along with the steps to get the most from this resource.
Before we begin you should know that we have a partnership with many genealogy sites, including Ancestry and MyHeritage, and may receive a referral fee to support our site if you choose to subscribe to their services.
Although we prefer free research options here at Family History Daily, and have focused most of our main Genealogy Research Course on helping you discover no-cost resources, sites like MyHeritage provide uniquely valuable records and tools that simply cannot be found for free. And MyHeritage offers some of the most reasonable fees of any family history research site.
First, to try out the Discoveries engine from MyHeritage you will need a subscription. Luckily, MyHeritage offers two free weeks to all new users so you can try out the service and have plenty of time to explore new records.
After your trial period you can choose to continue to subscribe for a very affordable fee (as compared to many other sites). It is a good idea to mark your calendar to remind yourself to review your subscription at the end of the trial, since it will continue automatically if you do not cancel.
Starting a free trial with MyHeritage is very easy and grants you access to everything they have to offer. No records or tools are limited or held back. Simply click here to find the free trial page, enter some information, and get started, or go ahead and follow the step-by-step below for instructions.
After that we will take a close look at the Discoveries engine and how to find new details about your ancestors in just a few steps.
How to Get a Free Trial on MyHeritage
If you already have a MyHeritage subscription you can skip this step. If you have previously had a subscription or account you may need to log out before signing up with a new free trial account.
To start your MyHeritage free trial, visit this page and click the “Start free trial” button. Here is what you will see.
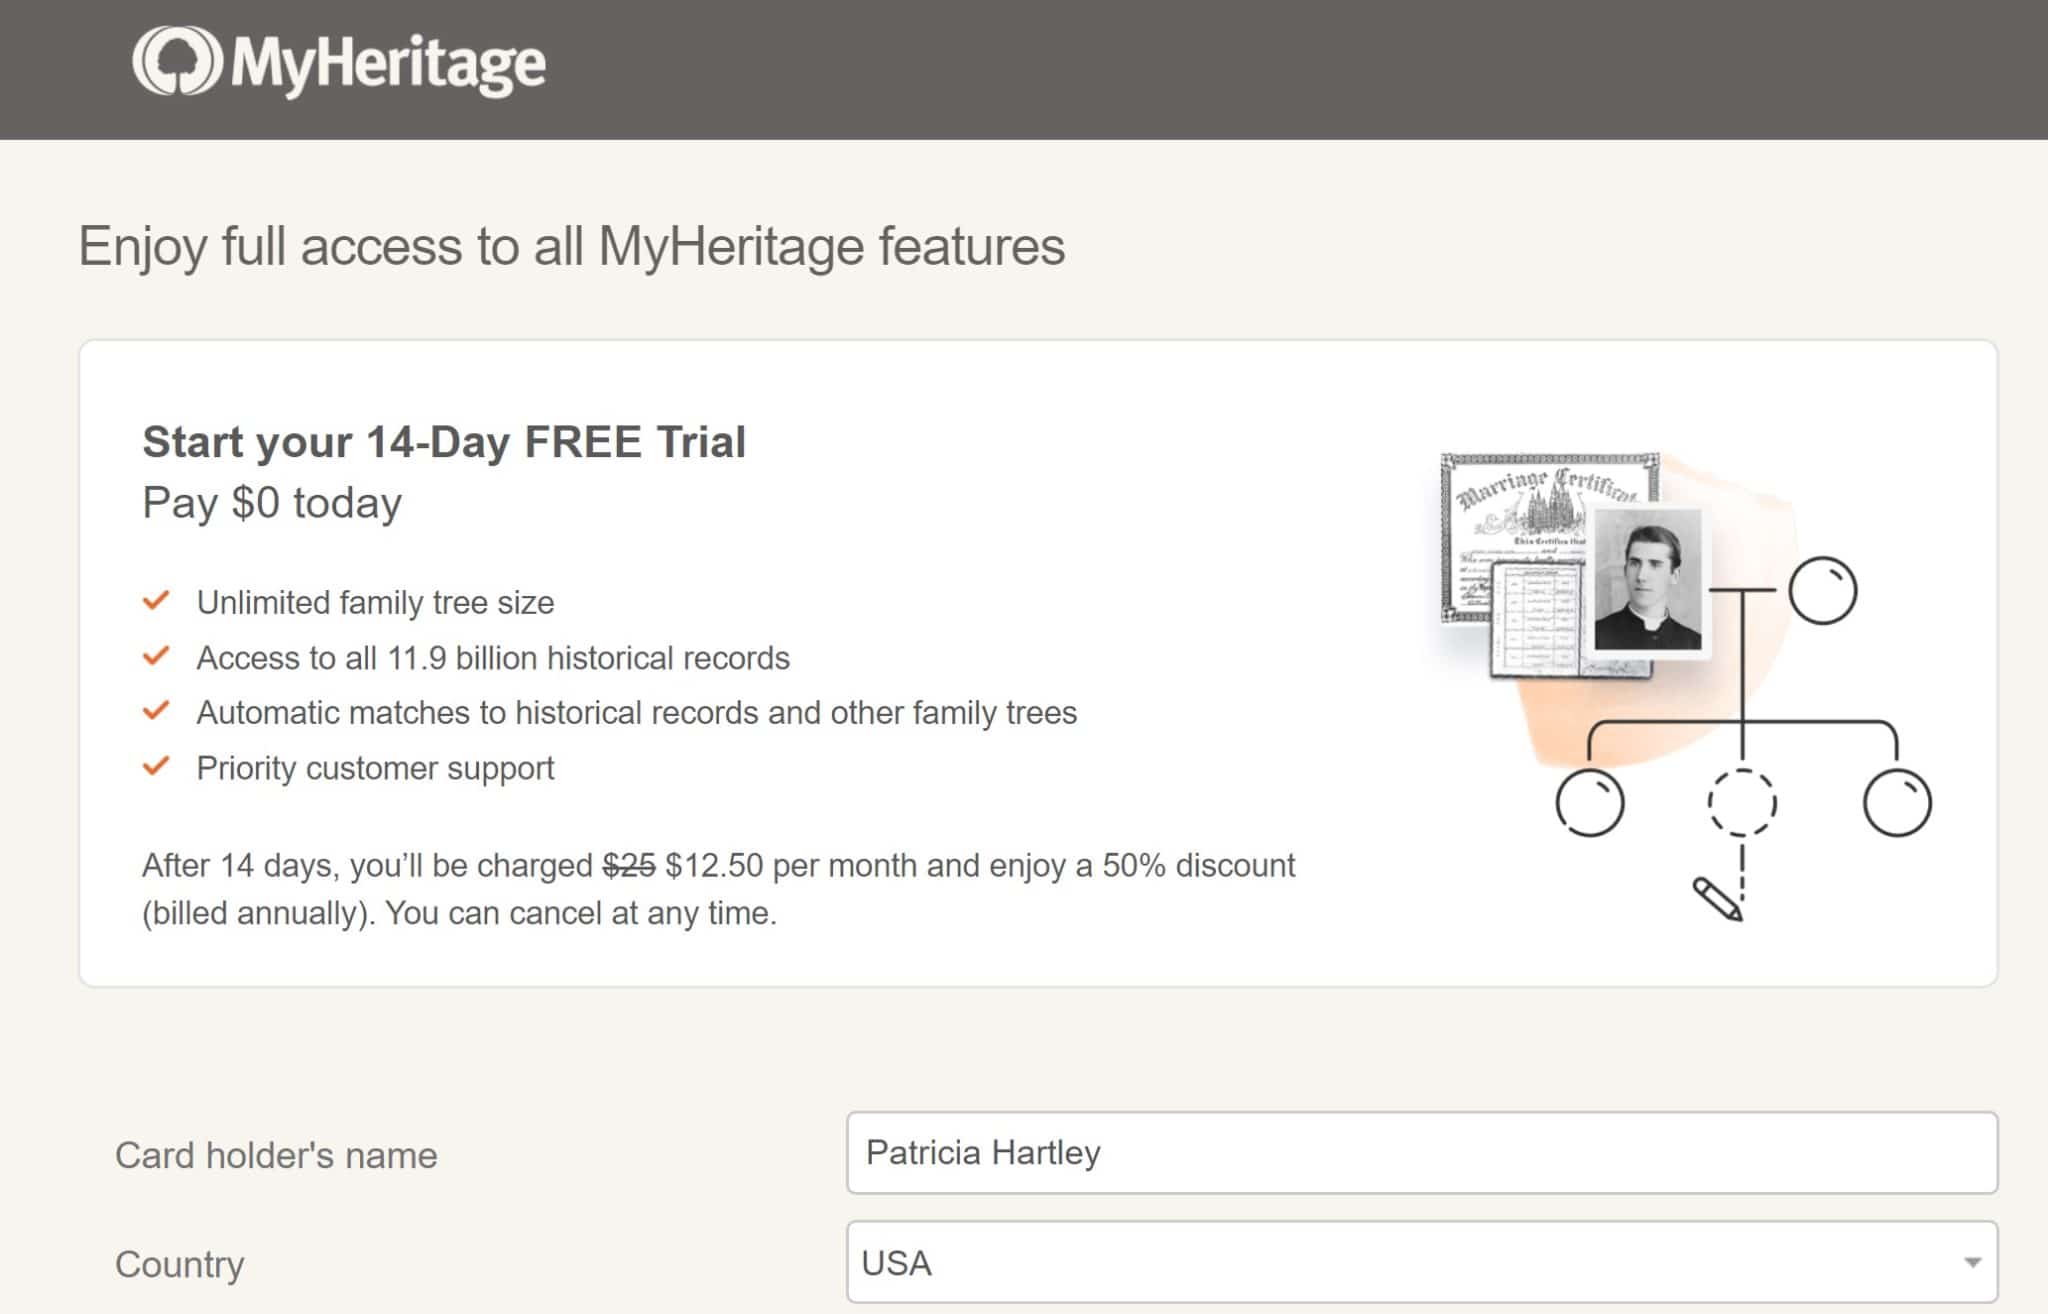
The next screen will explain what’s included in your 14-day free trial of the Complete Plan and show what you will be billed if you do not cancel your trial subscription at the end of the 14 days.
TIP: If you are a female, you may want to enter your maiden name as “Last Name” when enrolling because when you begin building your family tree, MyHeritage will use the first and last name you enter here as a basis for your profile. Of course, you can always edit this information later, but entering your maiden name now will save a you a little time later.
You will be asked to enter payment information so, if you choose to keep your subscription, your preferred payment method will be billed the cost of a year’s plan. Click the “Start free trial” button after completing the requested payment information.
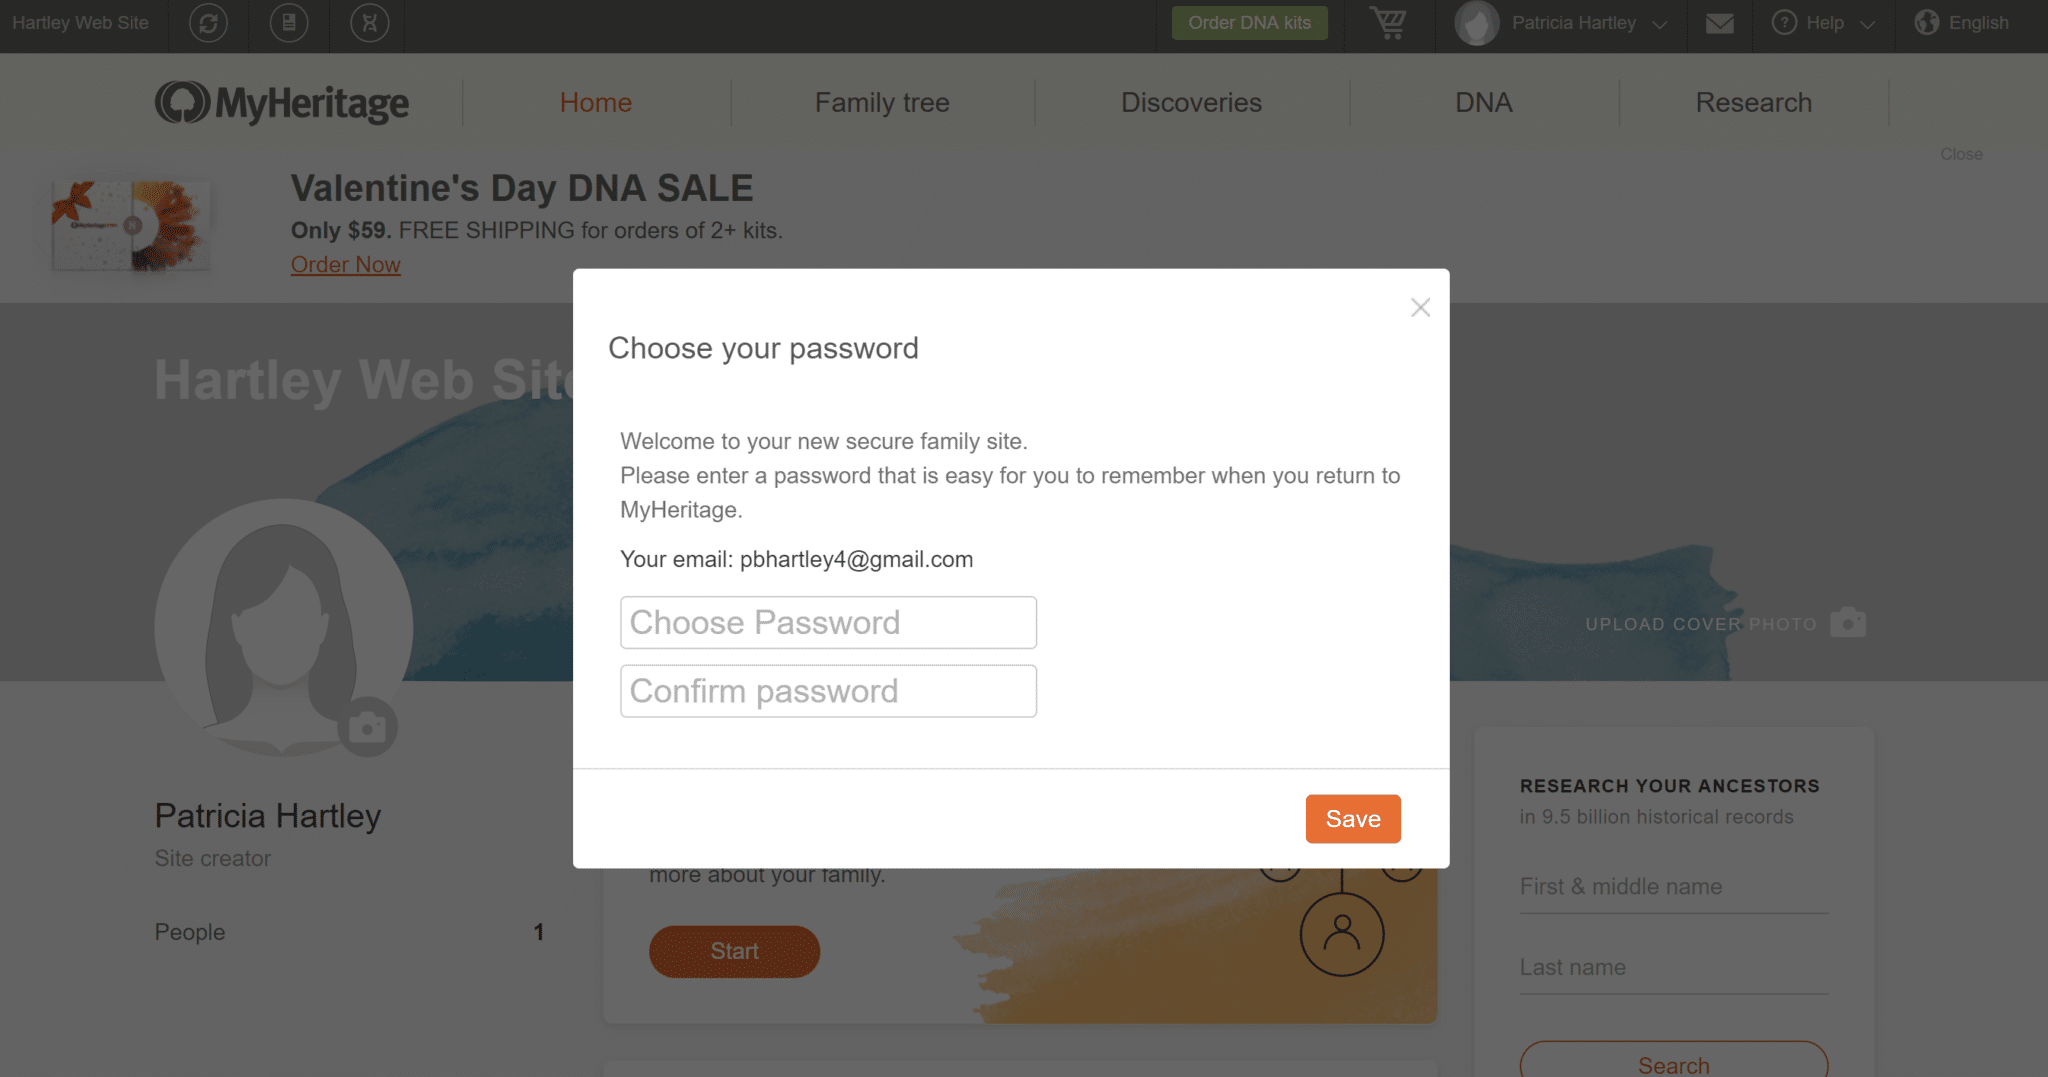
Next, you’ll be prompted to create and confirm a strong, unique password for your account. Write this down somewhere too. When you’re done, click the “Save” button.
After completing this screen you will be asked to answer questions about your family. Here’s what to do.
How to Add Family Tree Information to MyHeritage
With your new free trial, you have the option of building your family tree from scratch on the MyHeritage site, or importing a tree from another program – which will be the easiest route for most. Once you do, you can also download the free Family Tree Builder, which will allow you to work offline (if you choose).
Although it is certainly possible to use MyHeritage without adding your family information to their site, doing so will allow you to take advantage of the many tools they have available – including the Discoveries engine.
When you complete your enrollment for a free trial, the next screen will prompt you to start creating a new tree. If you would prefer to upload your current tree instead, click the “X” in the top right corner of the orange box. We’ll cover how to upload your existing tree to MyHeritage in just a minute and you can jump to that section below if you like.
Here’s What to Do if You Prefer to Start a New Tree
If you want to start from scratch, begin building your tree on MyHeritage by answering each question as they prompt you to.
The first question is “Do you have a spouse?” Click either the “Yes” or the “No” button to enter your spouse’s information, or click “Skip” to ignore this question and go to the next. You can always go back and add your spouse’s information later.
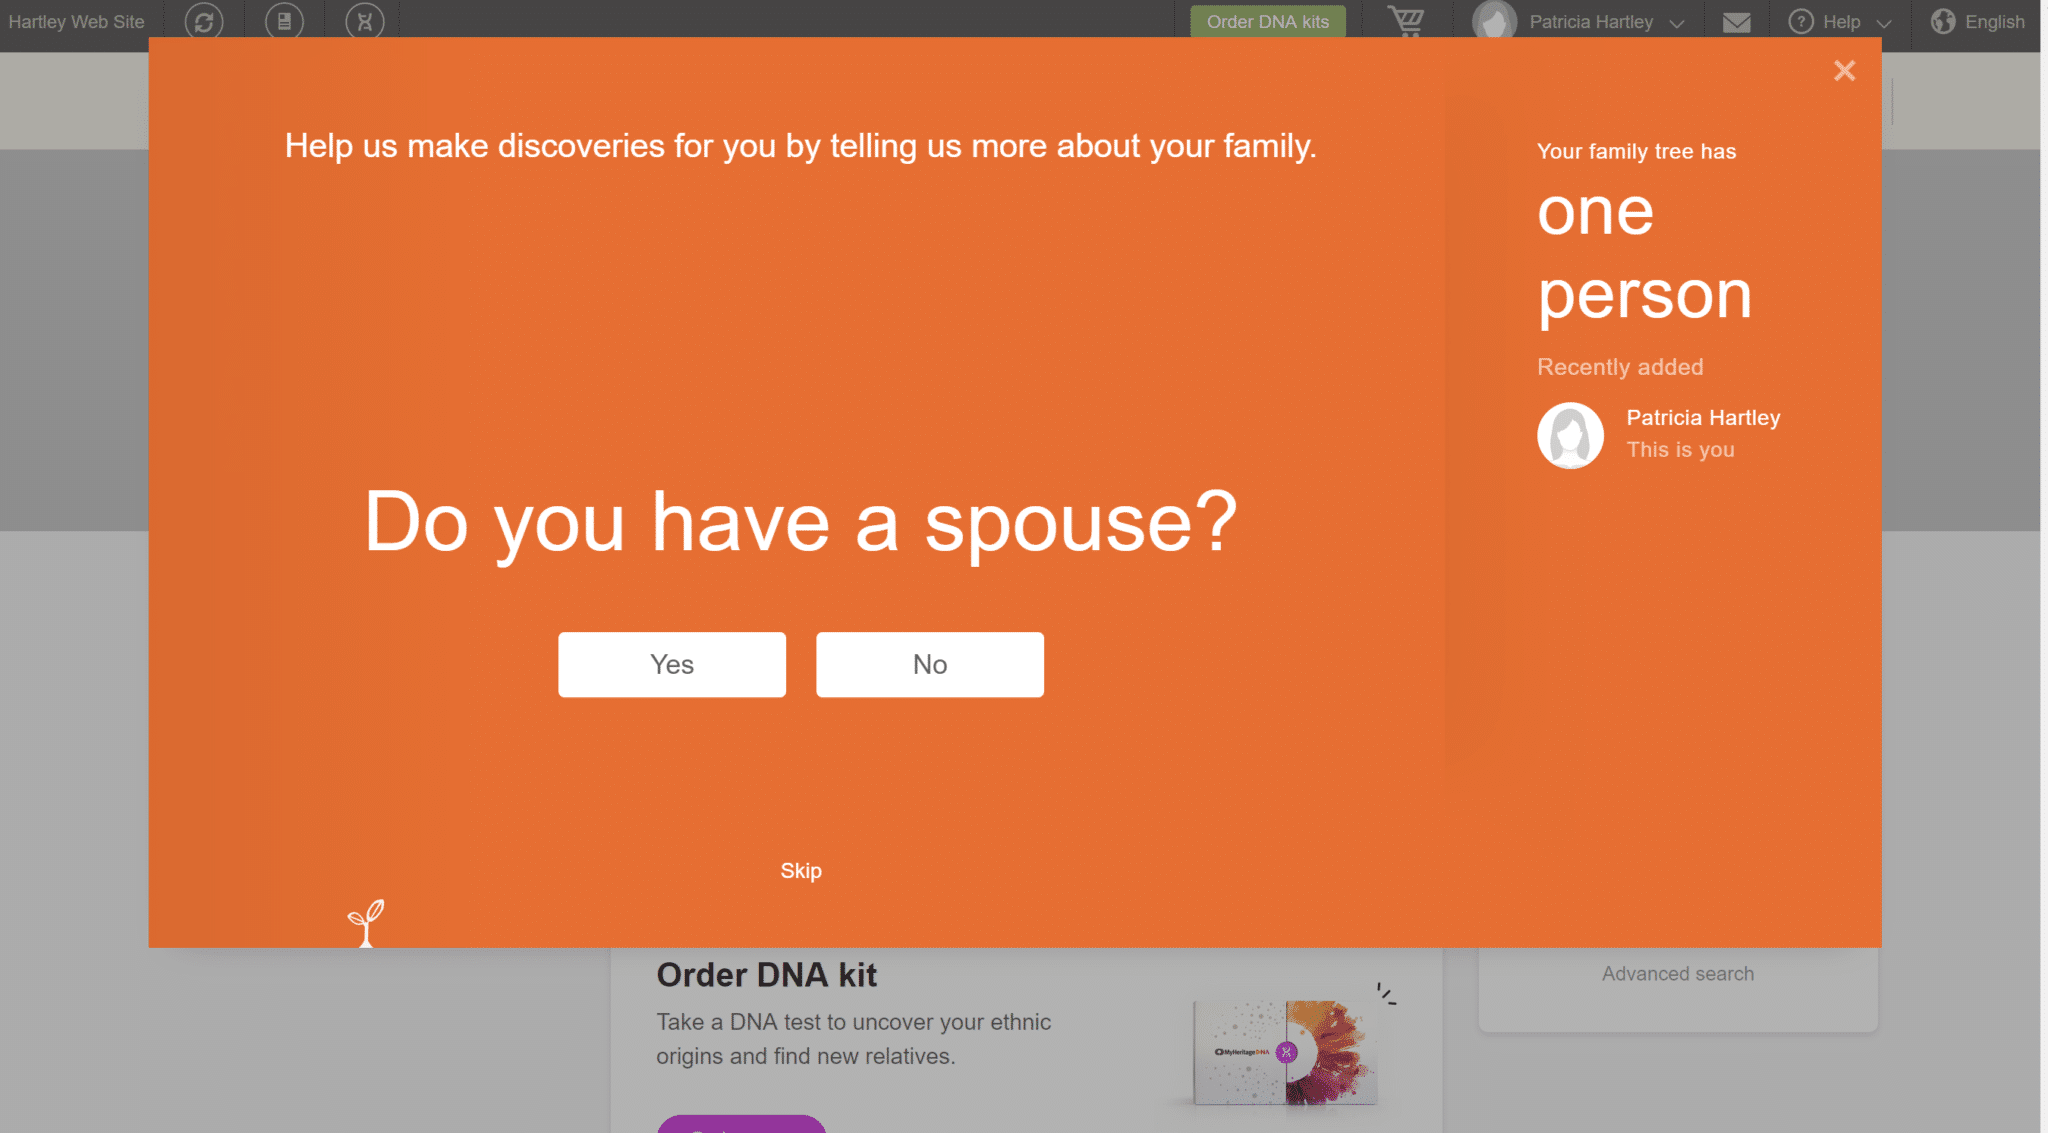
If you click “Yes” you will have the option to add basic information about your spouse, including name, year of birth, email address, and whether he/she is living or deceased. When you’ve completed the entries, click the “Done” button.

NOTE: You’ll notice as you explore MyHeritage that several options are geared toward connecting you with your living relatives. These include fields for email addresses and event calendars reminding you of upcoming family birthdays and anniversaries. This is because MyHeritage started as a site dedicated to helping families connect with one another, in addition to genealogical research. You can easily skip over these items or use them as you see fit.
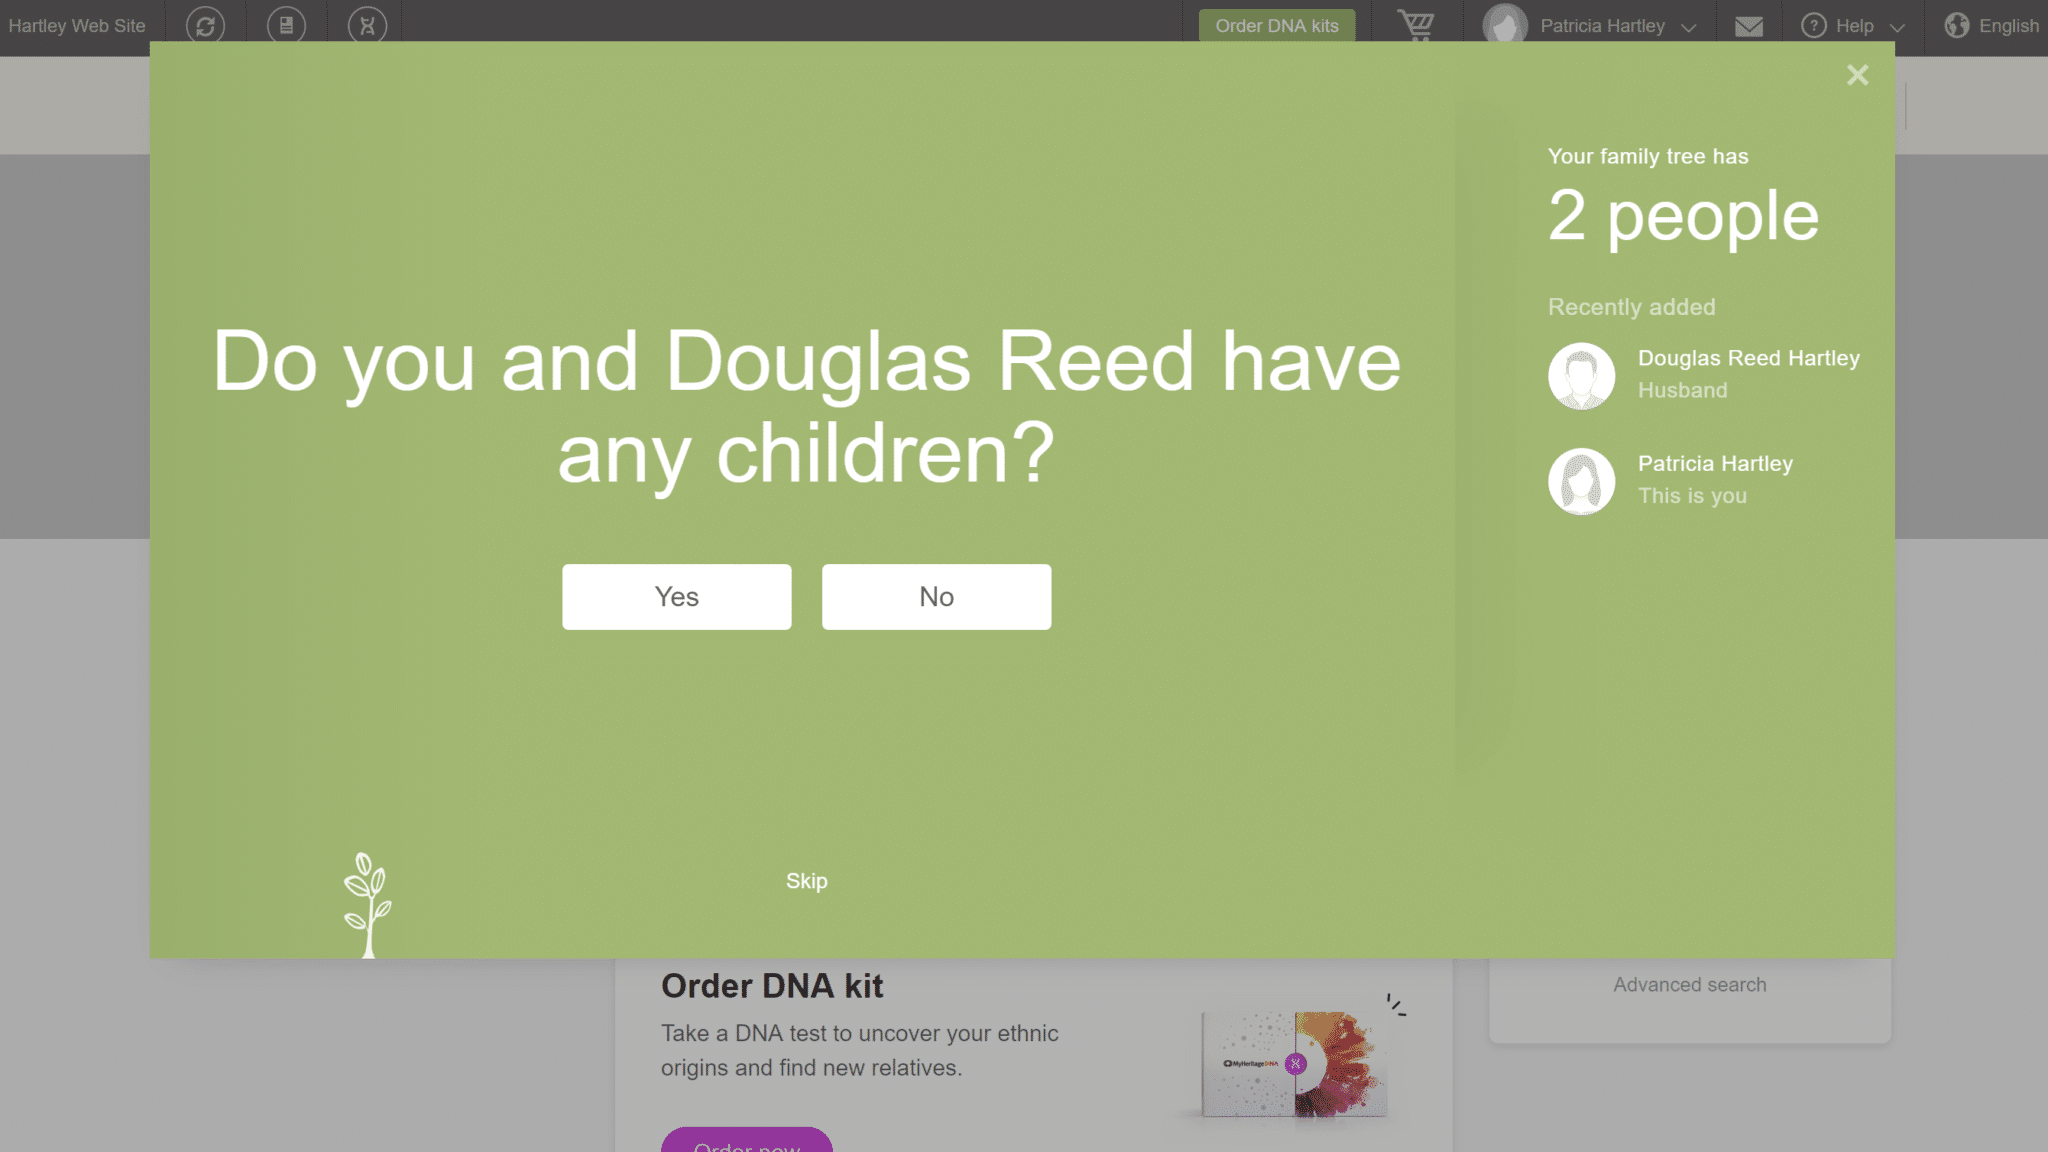
After entering your spouse’s information you’ll be prompted to enter basic information about any children you may have, your siblings, your parents, and your parents’ brothers and sisters. Feel free to skip any of these questions by clicking “Skip” if you’d like; you can always add the information later.
Remember, even if you choose to make your site/tree public (see the setting in your account for this), the information on all living individuals is always kept secret from others.
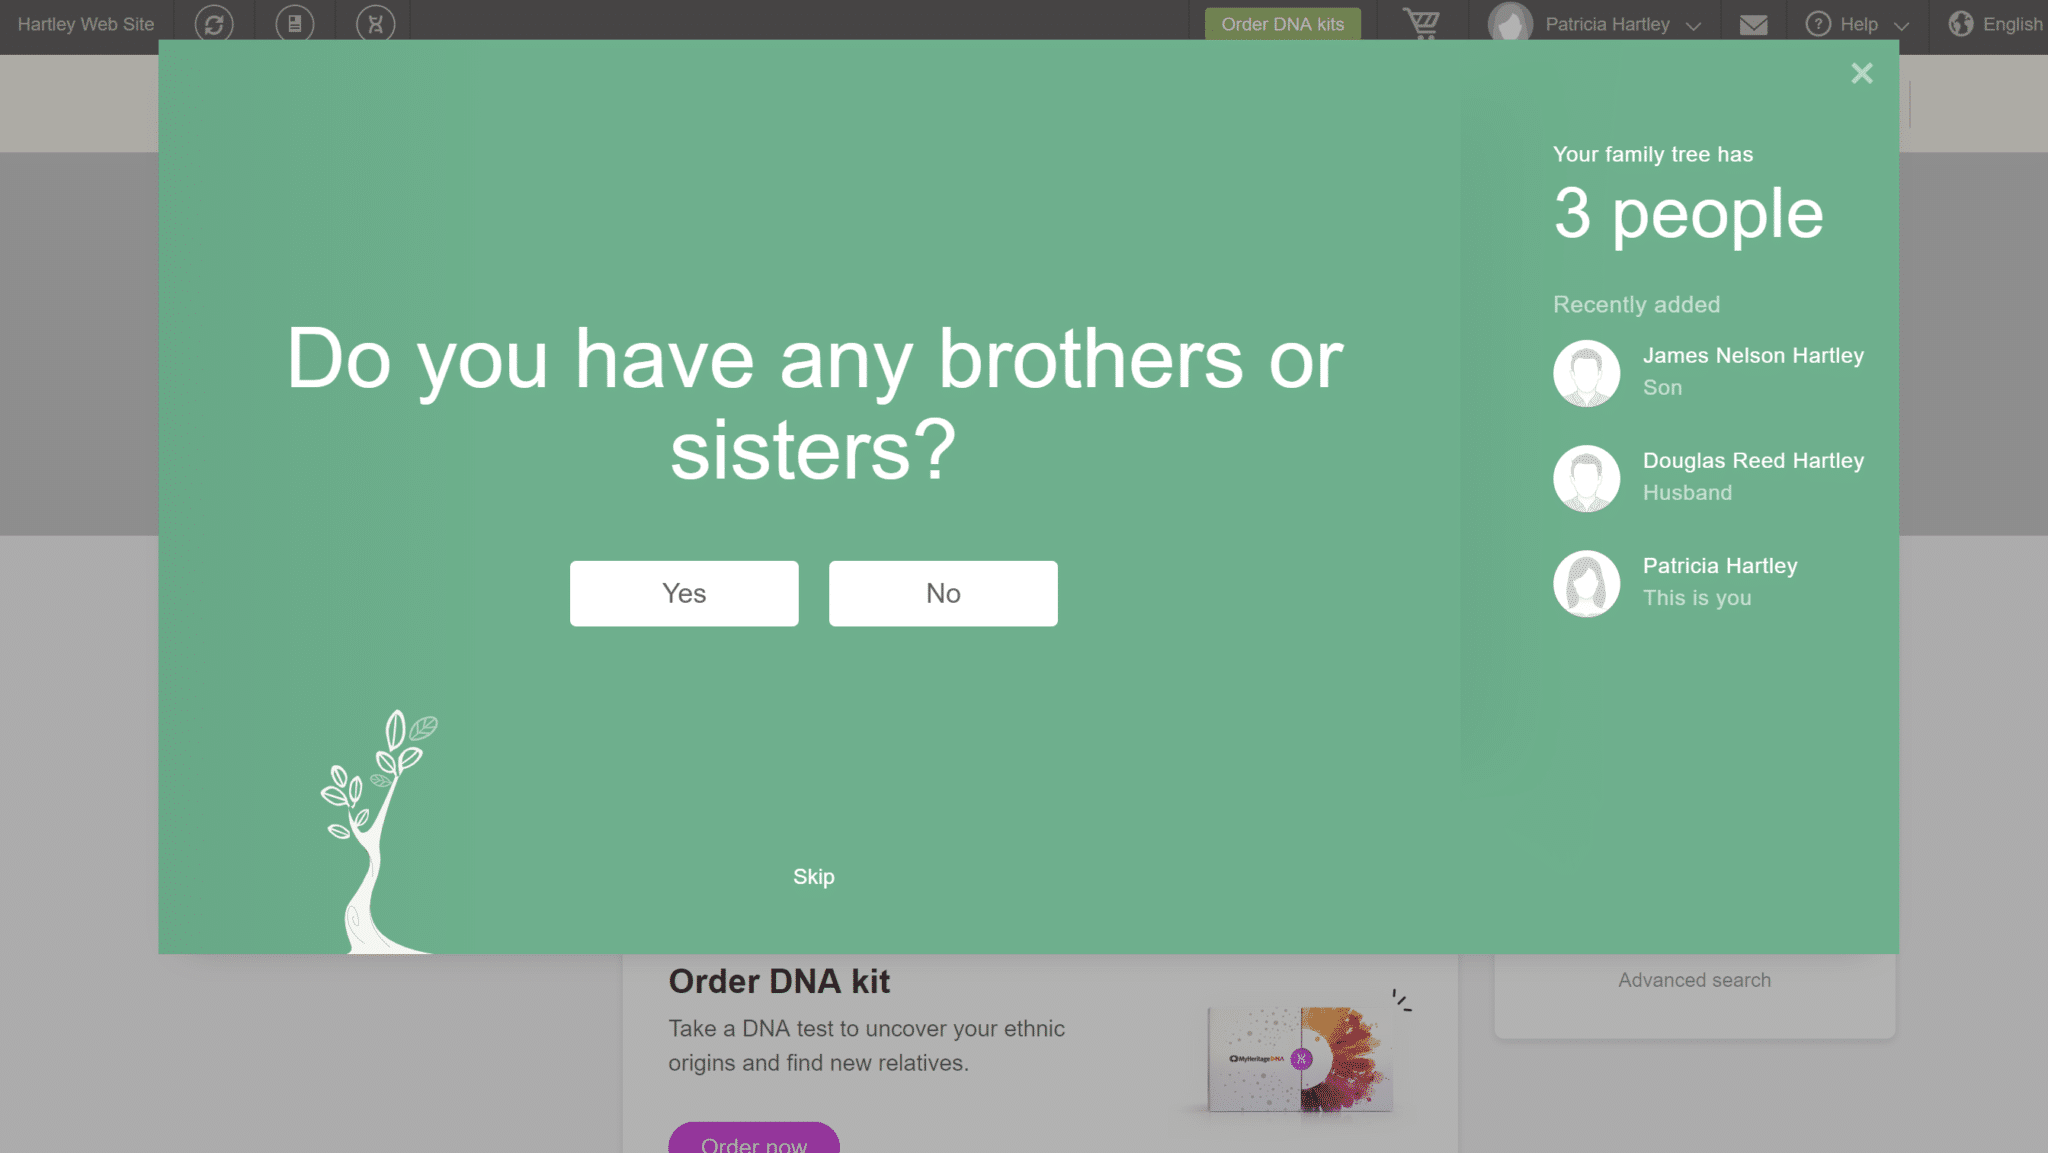
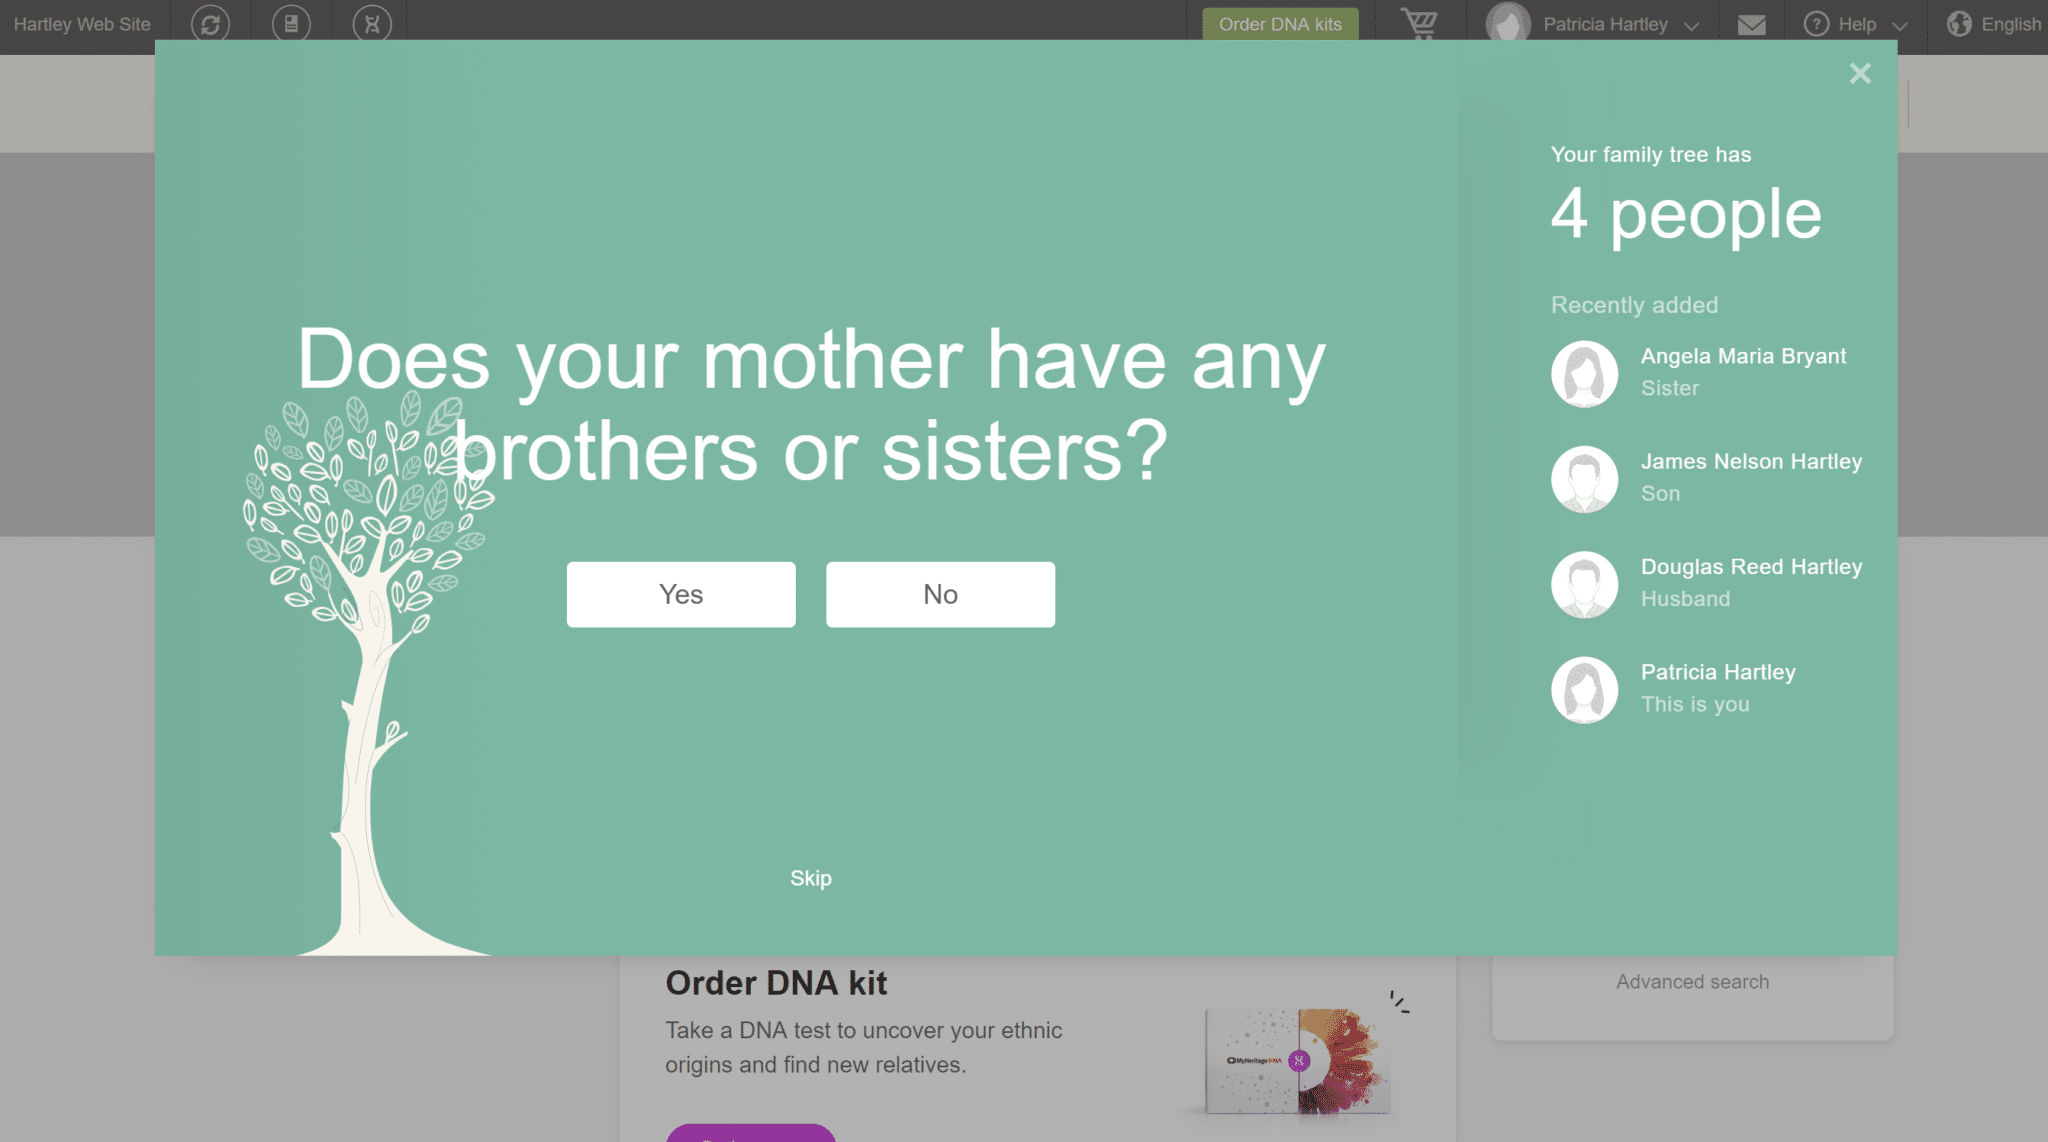
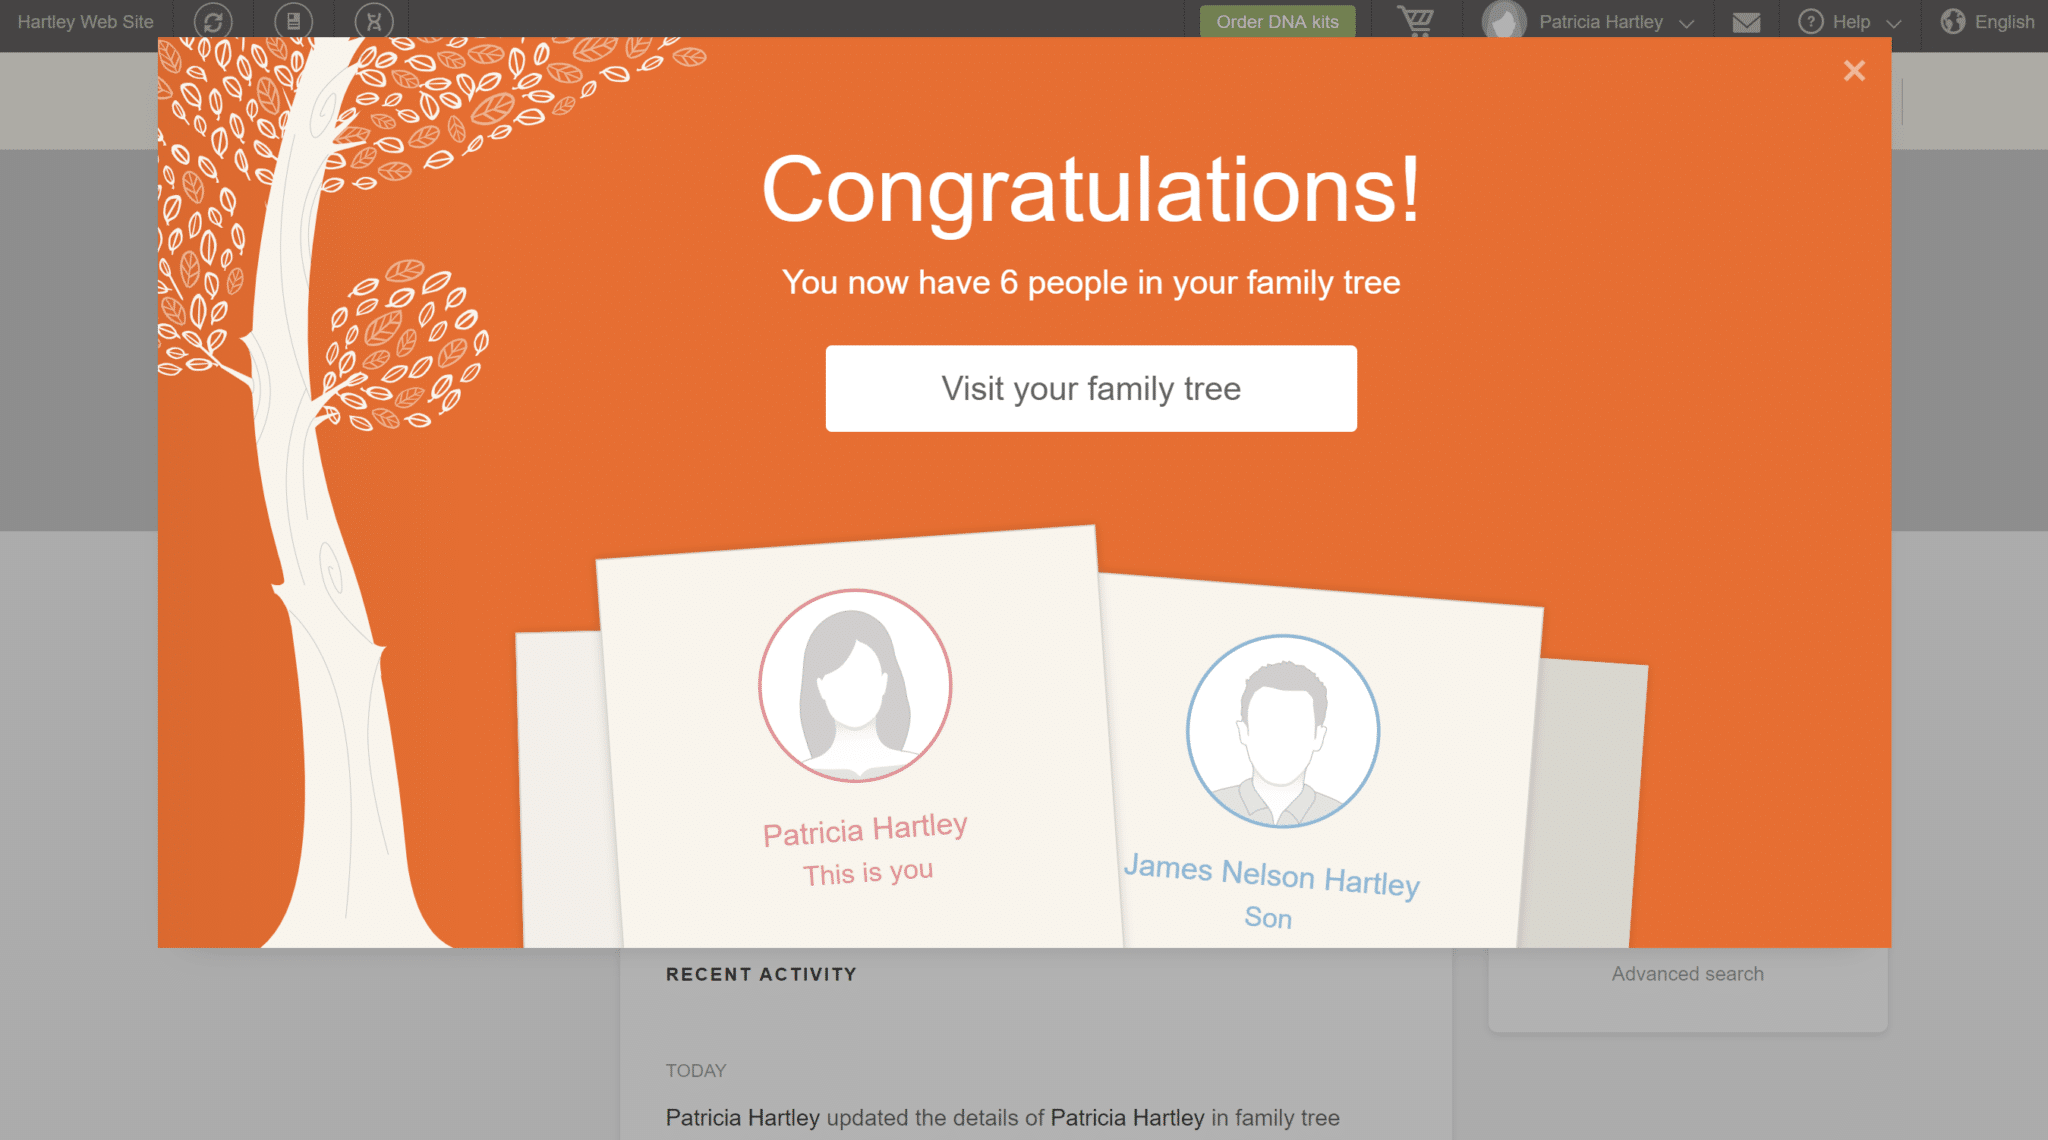
With each screen, you’ll see the figurative tree image on the right grow! Once you’re done entering your immediate family, MyHeritage presents you with a Congratulations screen. Click “Visit your family tree” to proceed.
At this point, you will now need to add additional information you may have about your family. The more information you add, the more likely you are to get Discoveries and uncover new information about your family. Also, take a moment to visit the settings areas in your account to make choices about privacy.
How to Upload Your Tree from Another Site or Program to MyHeritage
If you’ve skipped the process of building a new tree in MyHeritage, or prefer to add a second existing tree, here’s how to upload from another program.
Your first step will be to create a GEDCOM file from whatever genealogical program you’ve used to store your family tree thus far. GEDCOM is short for Genealogical Data Communication, a file type created specifically for use with genealogical software. Most, if not all, genealogy programs are GEDCOM-friendly.
For this example, I’m creating a GEDCOM of my Ancestry.com family tree file, but the process should be very similar with other programs. Usually you will look for the option in the File > Export section in a downloadable program. Online sites usually offer this option in the Settings or Tree Setting area. Family History Daily has an article about moving family trees here that will be helpful.
If you use Ancestry, navigate to your family tree and click on the down arrow next to the name of your tree in the upper left corner of the screen. This will open a dropdown menu. Select “Tree Settings.”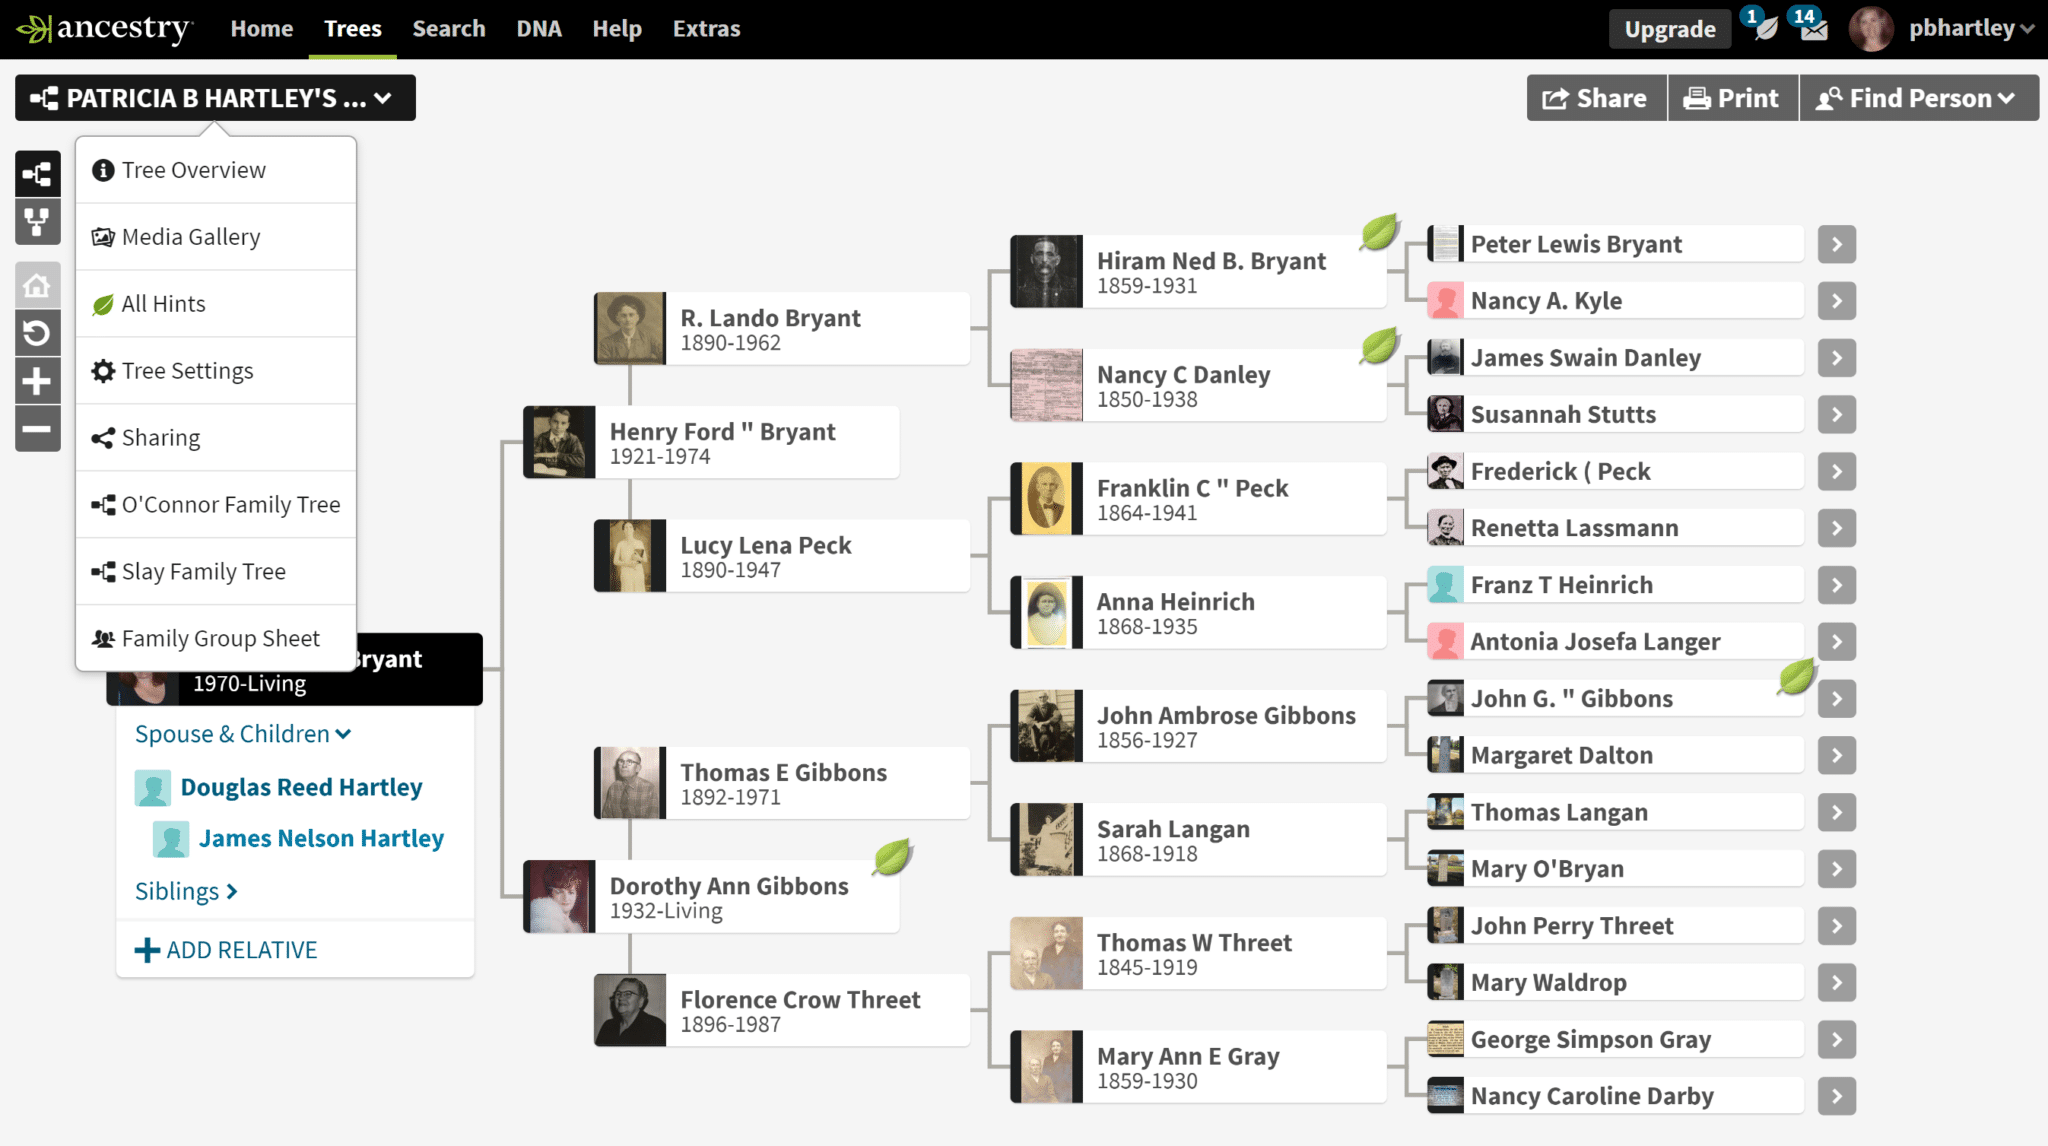
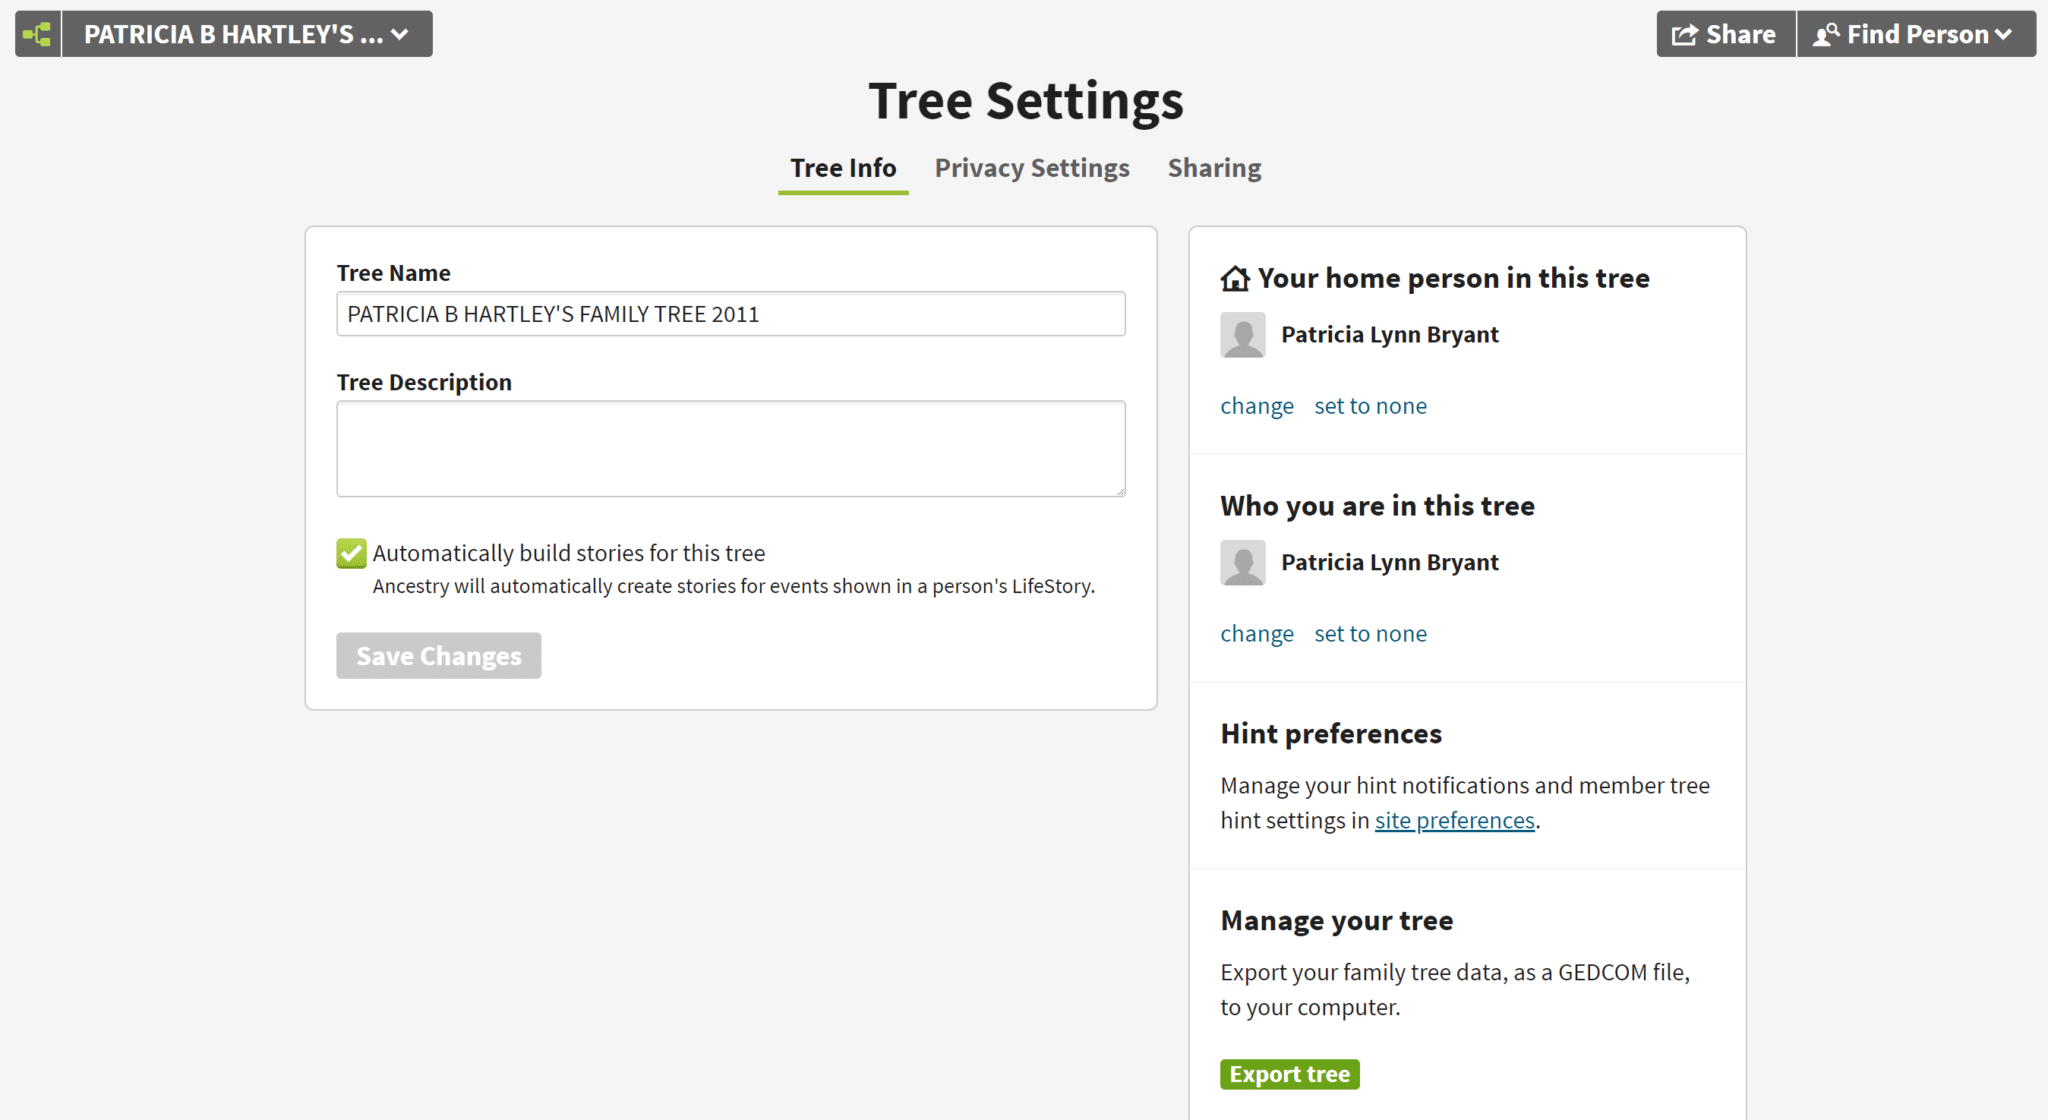
After opening the Tree Settings page, look to the “Manage Your Tree” section on the right side of your screen, then click the “Export tree” button.
Ancestry will begin the process of generating a GEDCOM file of your tree when you click this button. This may take several minutes if you have a large tree. Feel free to leave the page while your GEDCOM is being created.

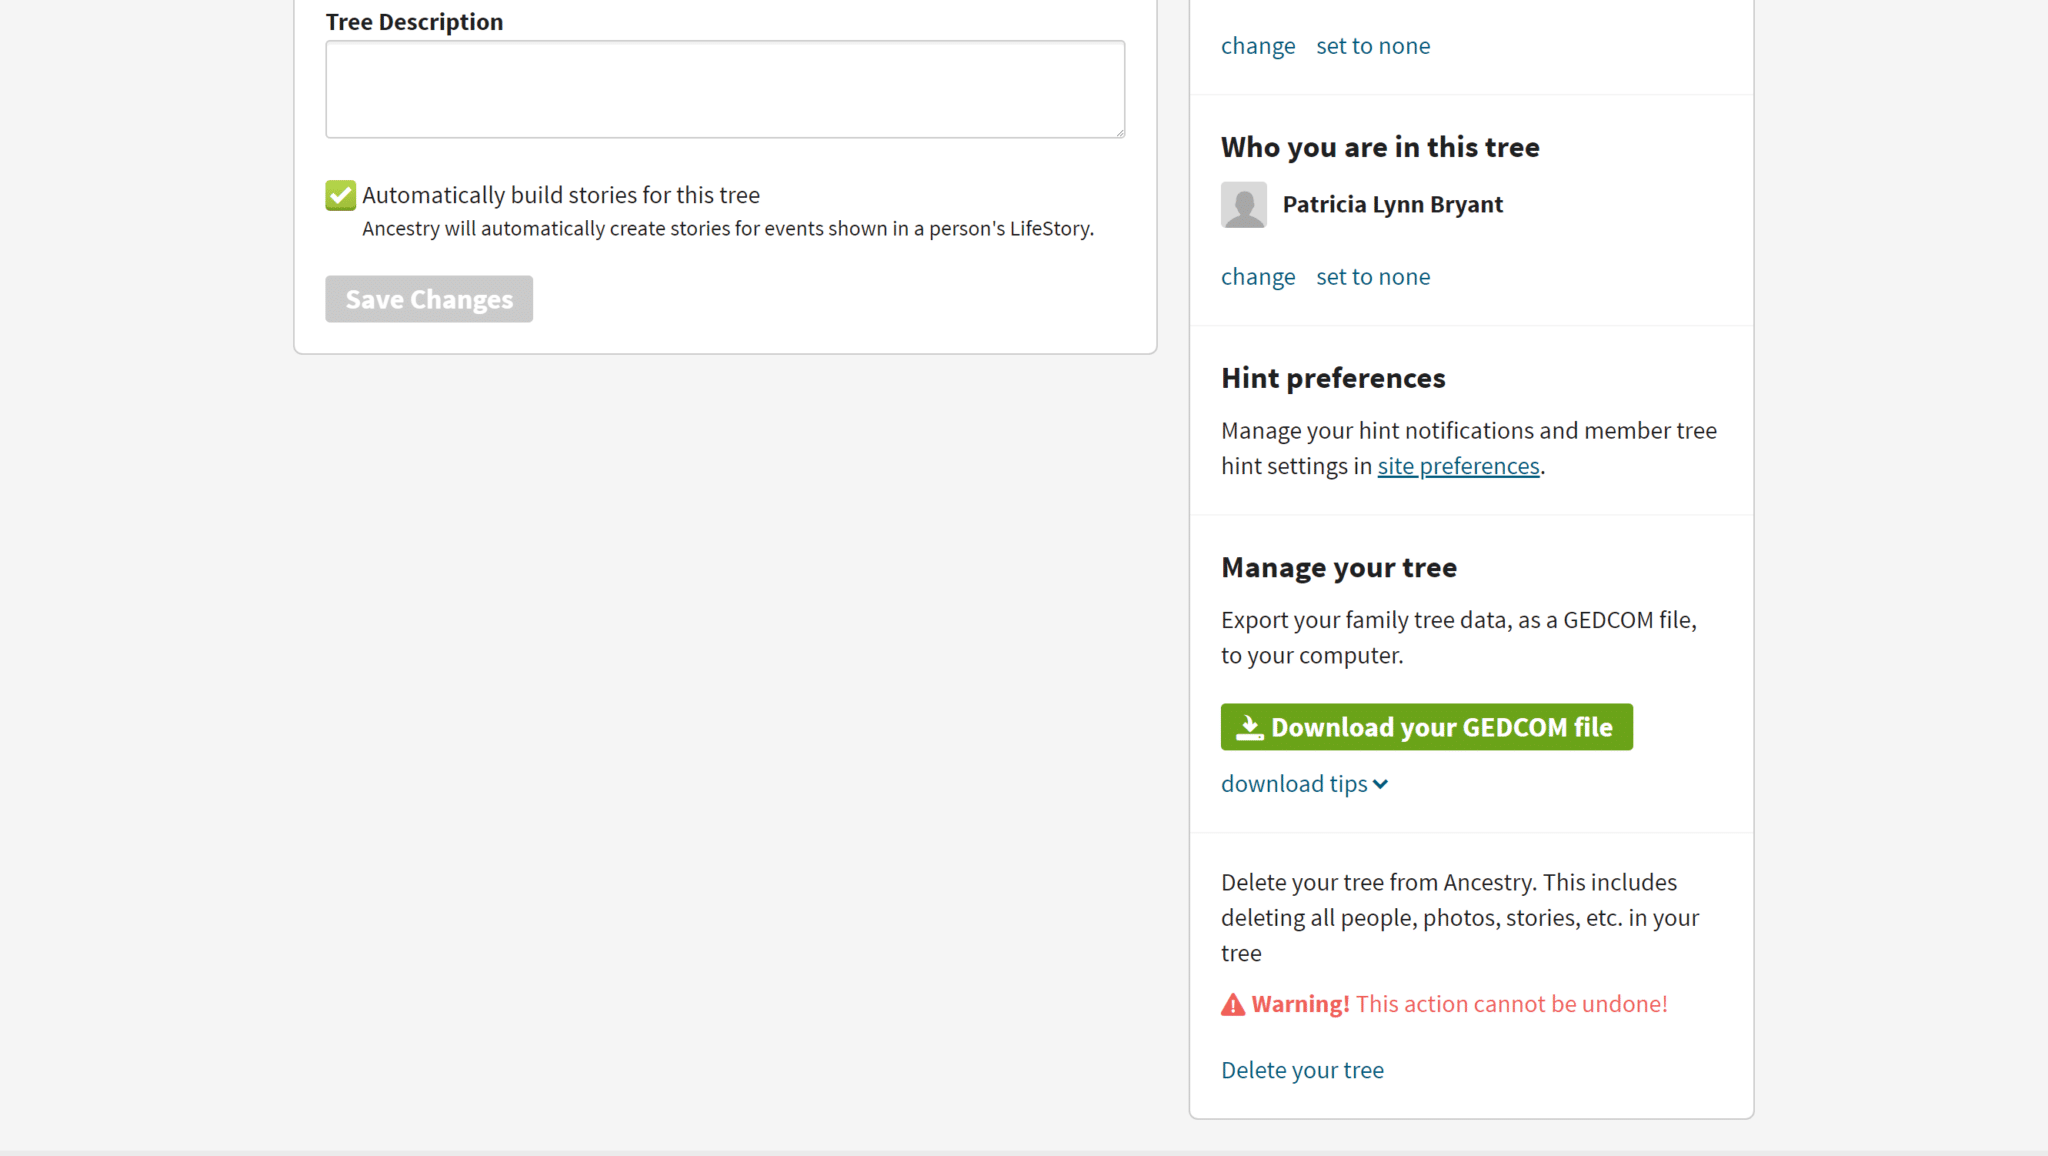
When your GEDCOM file has been generated, a green “Download your GEDCOM file” box will appear. Click that button to download your GEDCOM file to your computer.
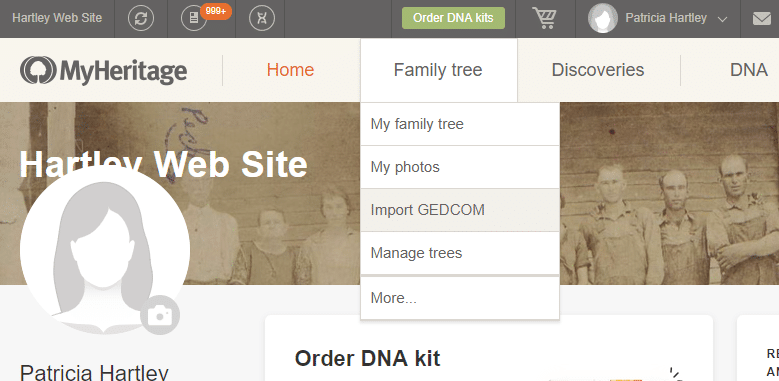
Now that you have a current GEDCOM of your family tree, it’s time to upload it to MyHeritage. Navigate back to the MyHeritage site. From your “Home” screen, hover over the “Family Tree” tab in the menu, and click on “Import GEDCOM” in the dropdown.
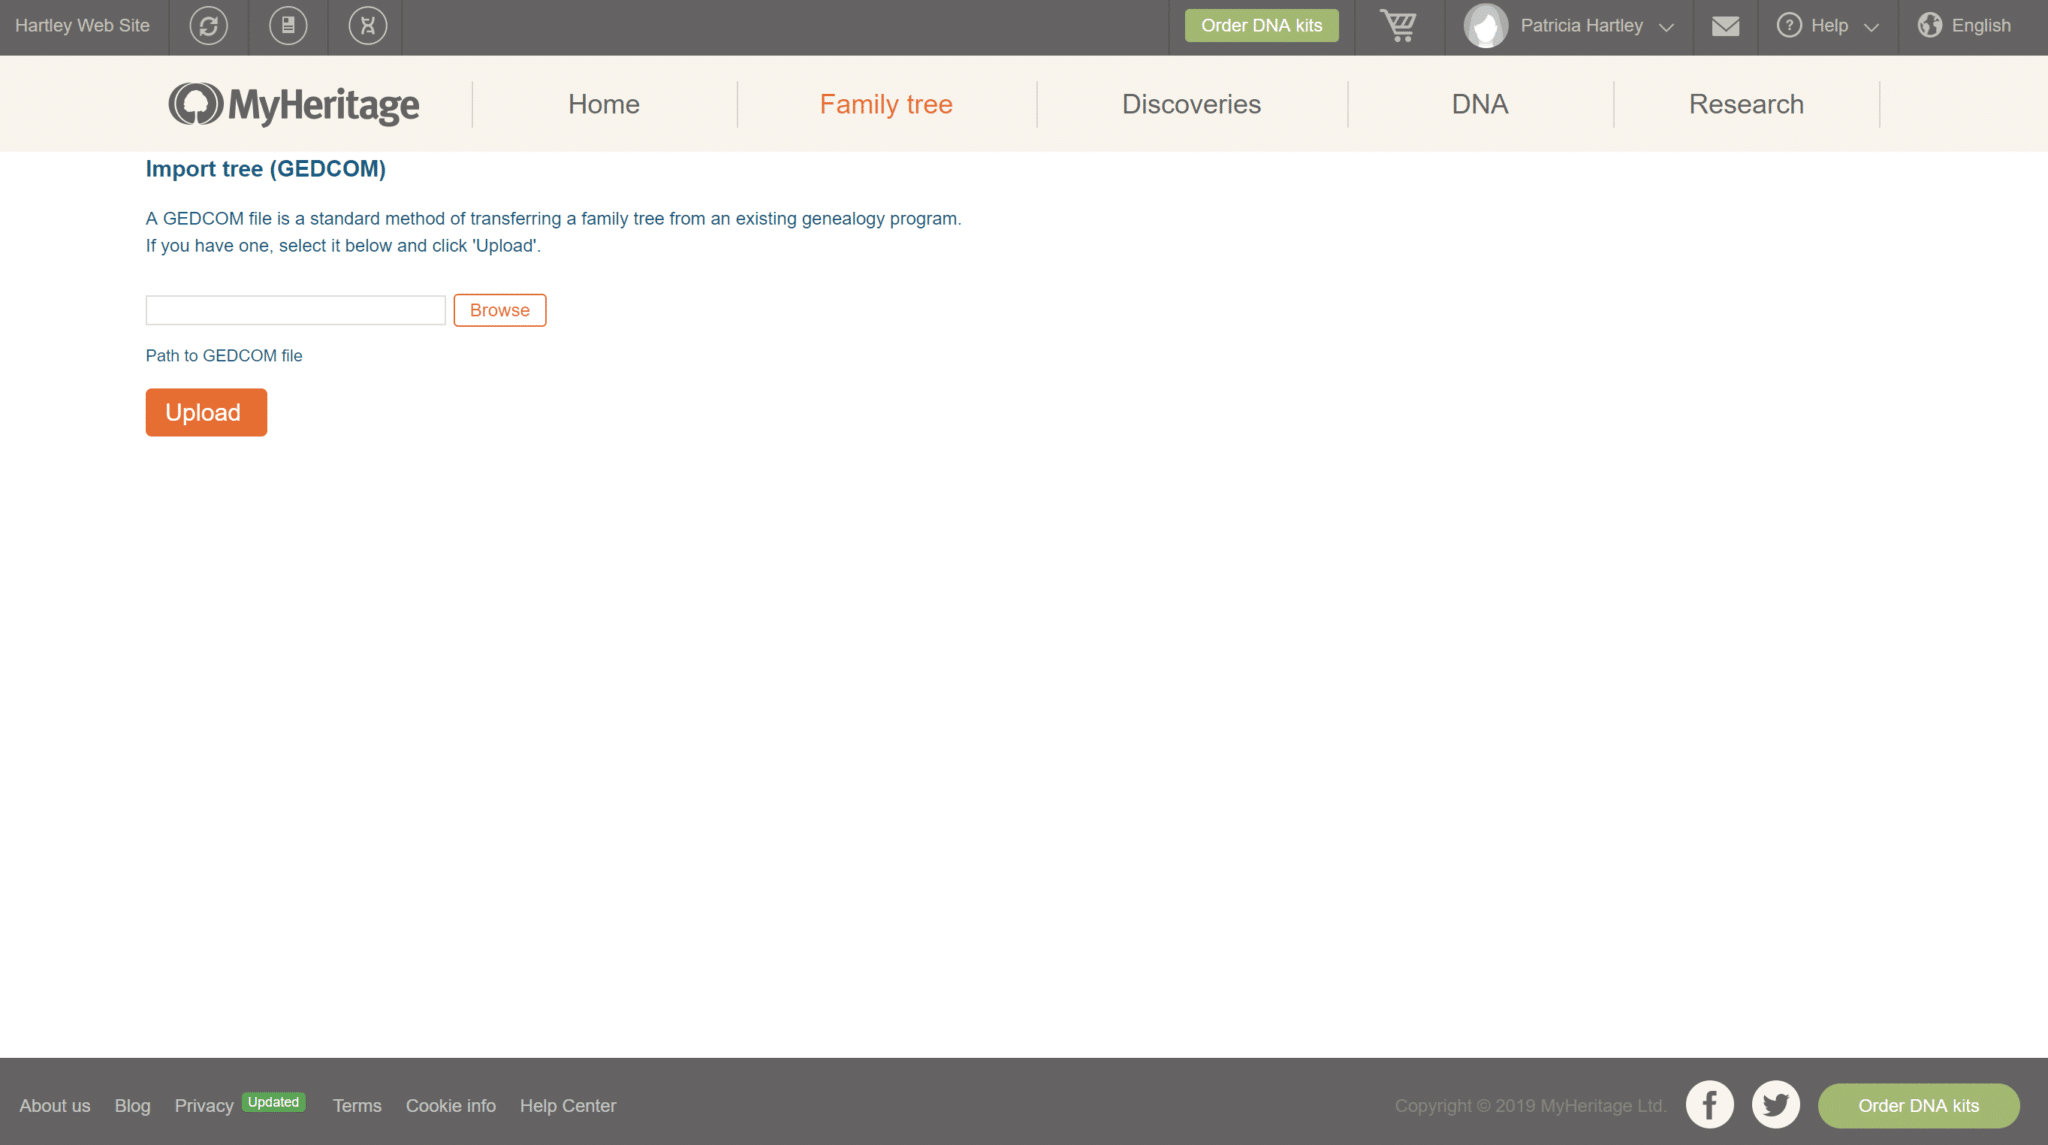
The next screen will prompt you to browse your computer for your GEDCOM file. Click the “Browse” button to open the files stored on your computer.
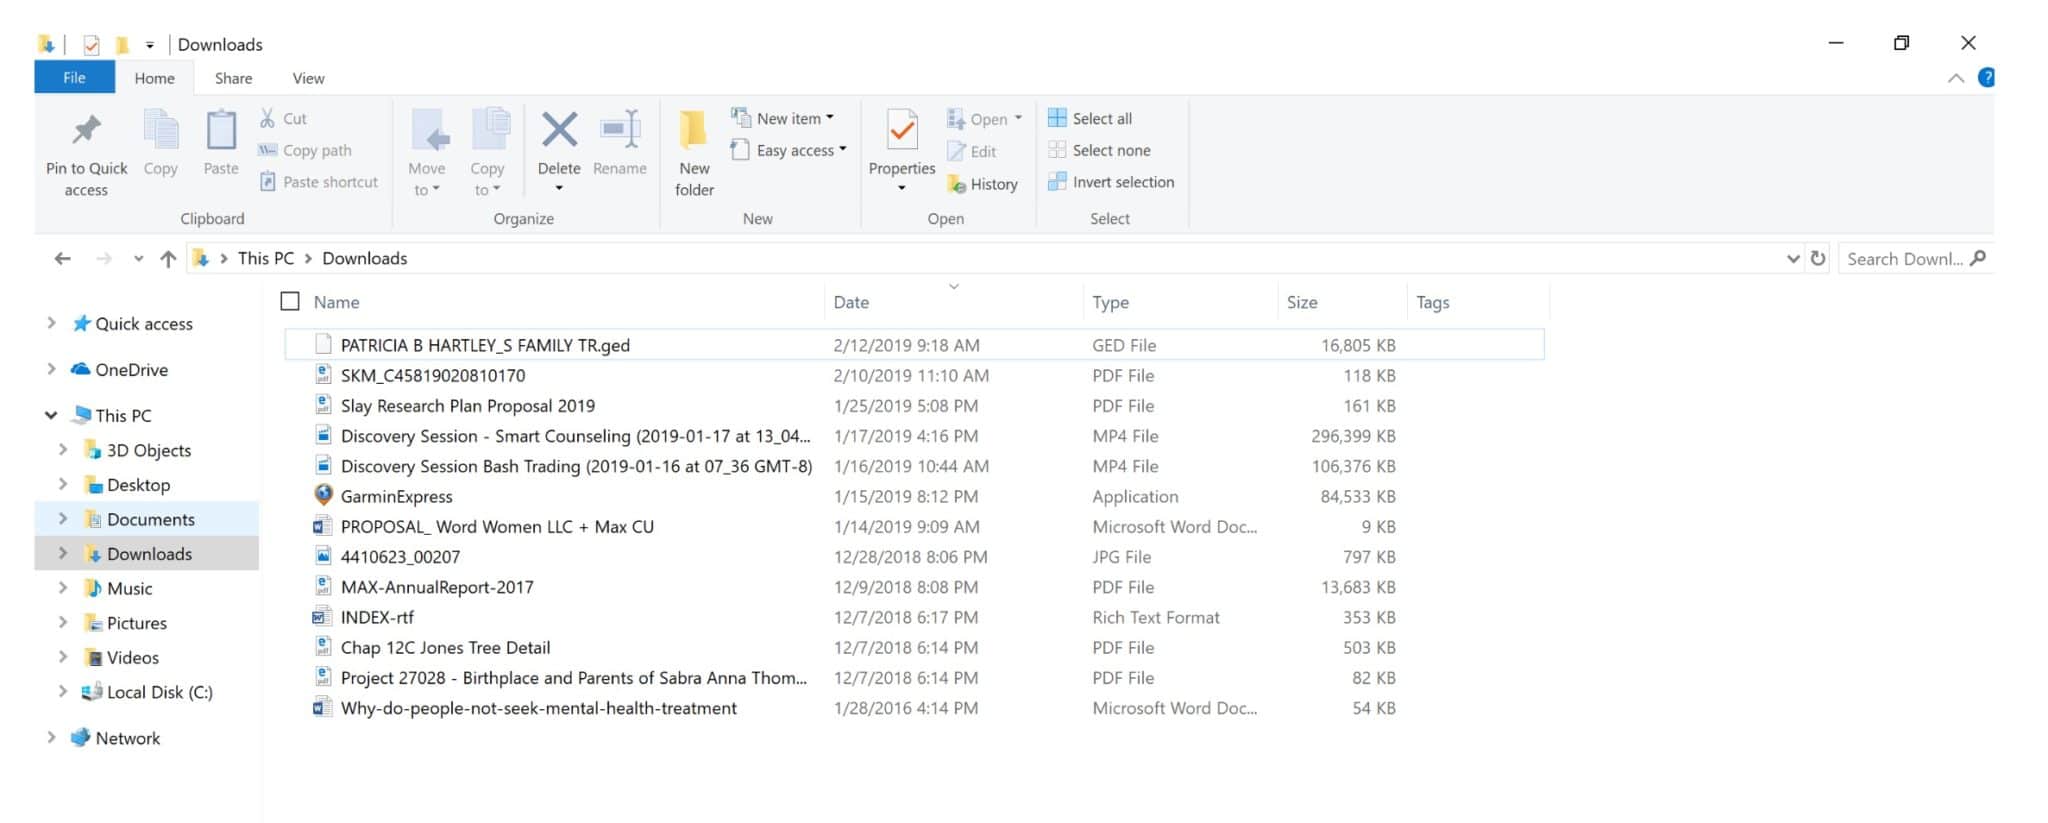
A new window will open showing your computer files. Your GEDCOM file should be in your Downloads folder, but downloads are sometimes stored elsewhere.
You should see a file with the name of your tree and ending in the “.ged” extension – a “GED File” file type. Click this file name to start the upload.
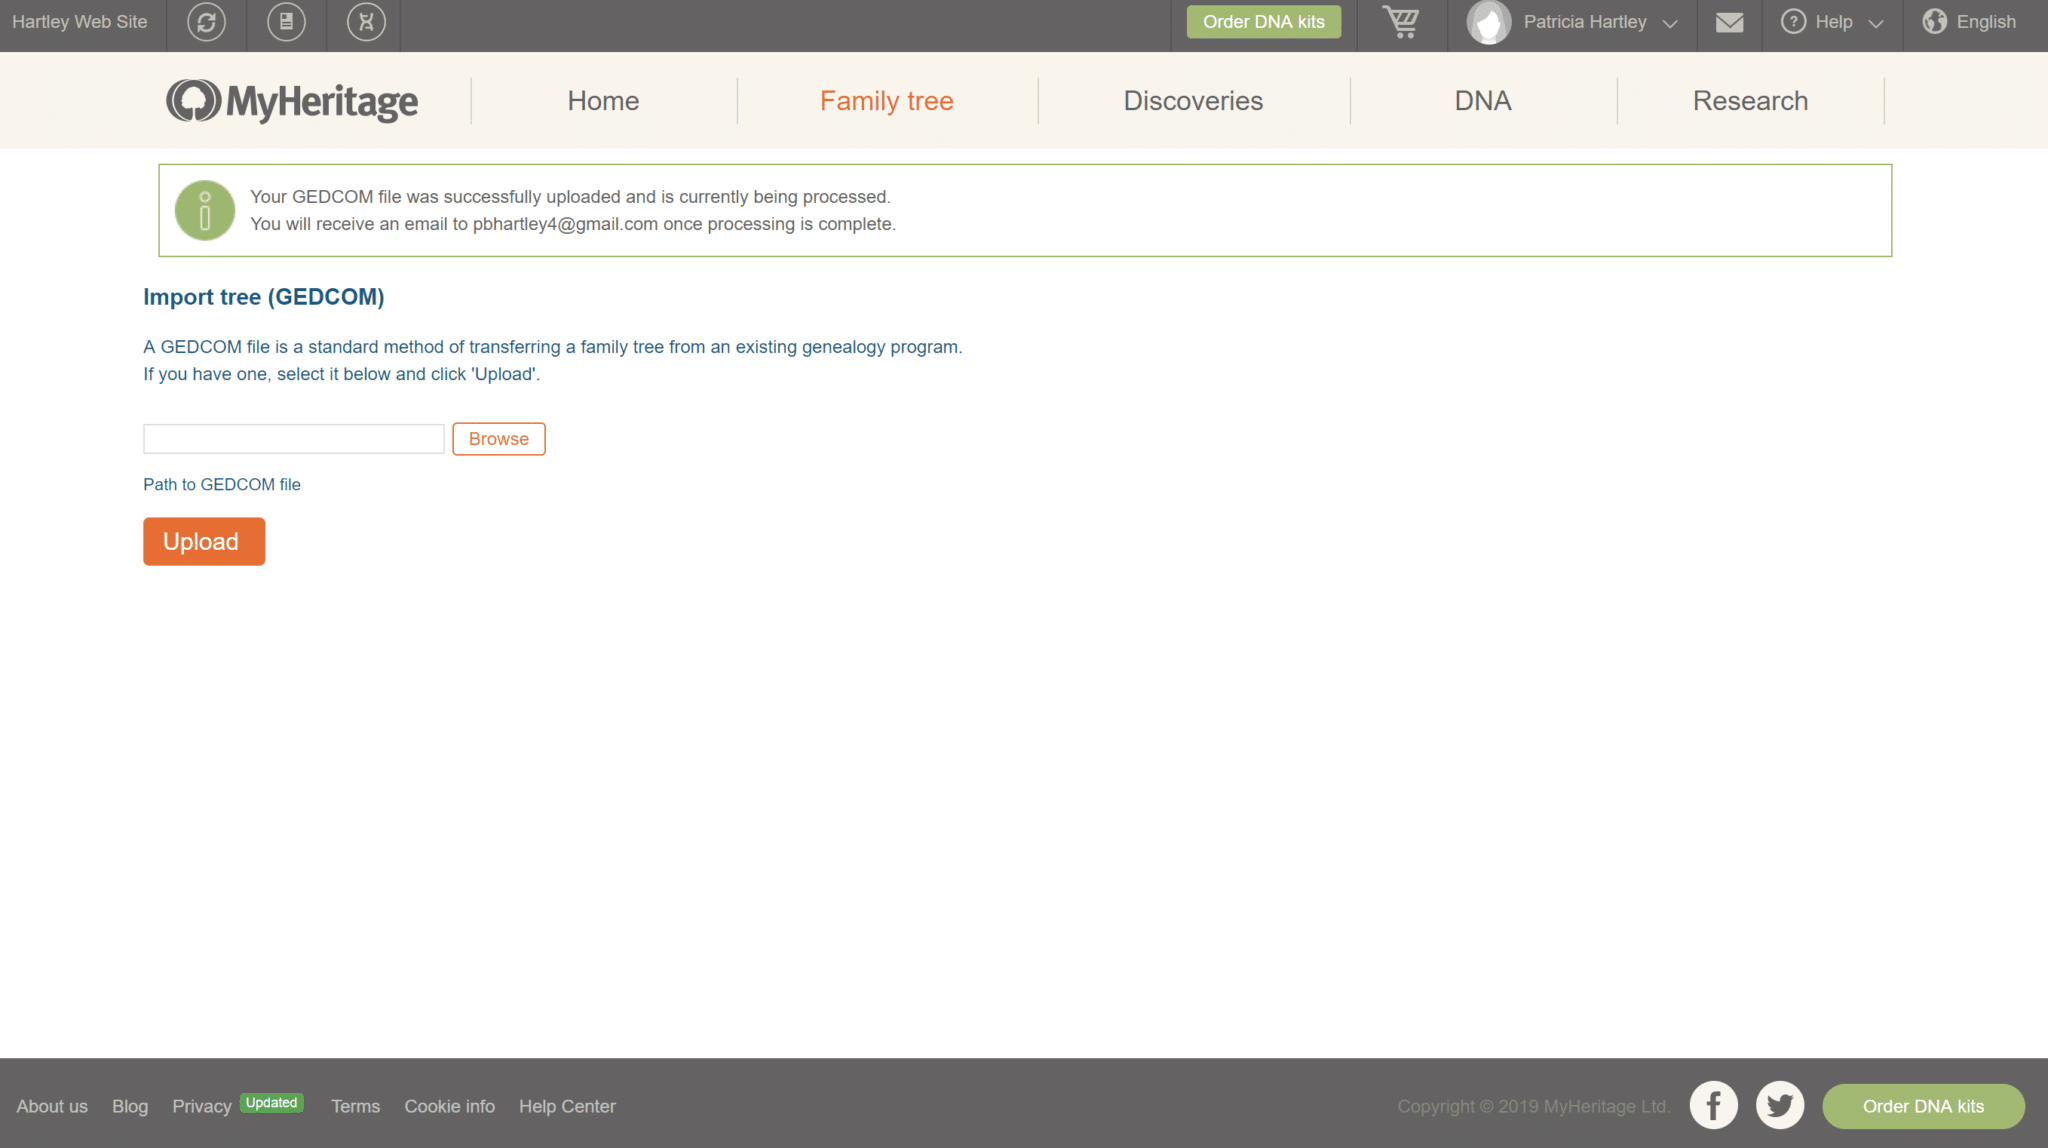
When you click on your GEDCOM file, the window will close and you’ll be directed back to MyHeritage. You should see your GEDCOM family tree file name in the “Browse” box now. To start the upload, click the orange “Upload” button.

MyHeritage will display an information box stating that your GEDCOM file was successfully uploaded and is being processed. Like your download, the upload may take a few minutes to process, so feel free to navigate away from the page.
MyHeritage will send an email to the address you entered during registration to notify you that your family tree has been fully processed and is available. You can click the link in the email to go directly to your new MyHeritage tree. You can also find your tree on MyHeritage when clicking on “My family tree” in the dropdown under “Family tree” in the main navigation.
As mentioned, MyHeritage also offers a free, downloadable family tree program called Family Tree Builder. This program syncs completely with your online tree and records, offers many additional tools and allows you to work offline. You can download it here.
You’ll notice as you explore your newly uploaded family tree that the images you’ve saved in your original program–Ancestry, for instance–are not present. GEDCOM files are text-only files, so your photos and record images will not be transferred and uploaded.
However, your new family tree file should show the source citations of your information, and in some cases, links to your photos. This means that you or anyone viewing your tree will still be able to tell where the information for each entry came from. If you want to add all of your records, you will have to do so manually.
For an interesting suggestion as to how to avoid problems like this in the future read: Why You Need to Quit Attaching Records to Your Family Tree, and What to Do Instead
Warning: It may take some time for your tree information to populate your entire MyHeritage family site–especially if you have a large tree. For example, immediately after receiving the email that my GEDCOM had been processed, I eagerly clicked the link to explore my tree and start searching records. However, only one of the 8000+ individuals in my tree showed any record matches or Smart Matches™. The next day, that figure had updated to 5,344 people with more than 12,000 matches! Sometimes, it can take only minutes, but be patient if you don’t see many suggestions right away.
How to Use MyHeritage Discoveries to Find More Records About Your Family
Now that you have uploaded your tree, we can begin the fun of finding new information about your ancestors. MyHeritage offers several different record-matching tools as part of their Discoveries engine – here are some details to help you understand their differences.
Record Matching: Similar to Ancestry.com’s “hints,” this feature compares the information in your family tree to historical records in the MyHeritage database and presents these sources as potential facts to add to a particular individual. One nice thing about MyHeritage is that all of its records are included when you have a paid subscription or free trial. Unlike some other sites that limit record access by location, you’ll be able to view all of the records associated with your ancestors’ discoveries without having to upgrade. We’ll focus on the Record Matching feature in this article.
Smart Matching™: This tool compares individuals in your tree to individuals in the family trees of other MyHeritage members and presents these as potential matches. As with any genealogical matching tool, it’s not recommended to accept these recommendations without thorough review. Other people’s trees may contain errors and unsourced information, so always proceed with caution.
Instant Discoveries™: Very much like Smart Matching, Instant Discoveries compares your tree with the trees of other MyHeritage members and presents potential matches. However, Instant Discoveries presents these matches in “packages” of Person Discoveries and Photo Discoveries, and suggests that you add the entire package to your tree all at once. This could add entire new branches to your tree with a single click, complete with new people, facts, events, photos, and source citations. While this seems like a convenient option, it is a bad idea to add this much information to your tree without the opportunity to fully review it. We DO NOT recommend this option, except as a helpful research tool.
Let’s Explore Discoveries Through Record Matching – One of Our Favorite Tools on MyHeritage
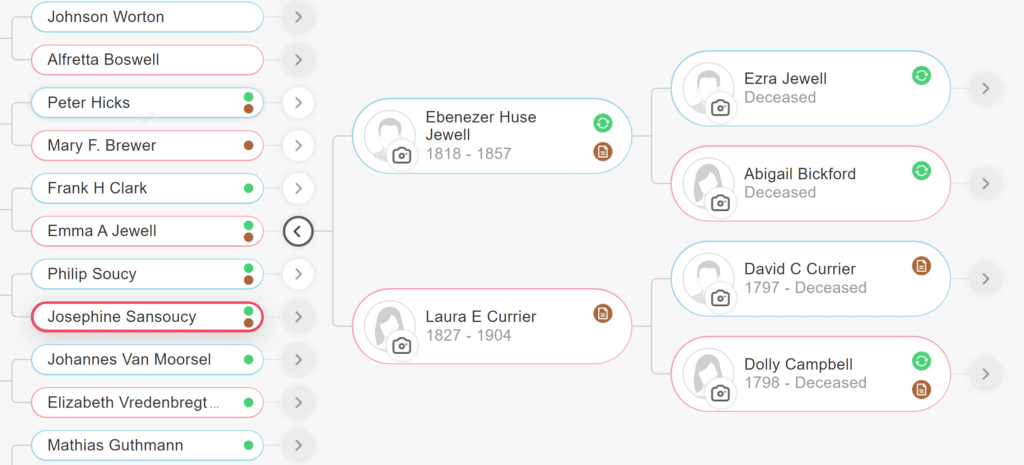
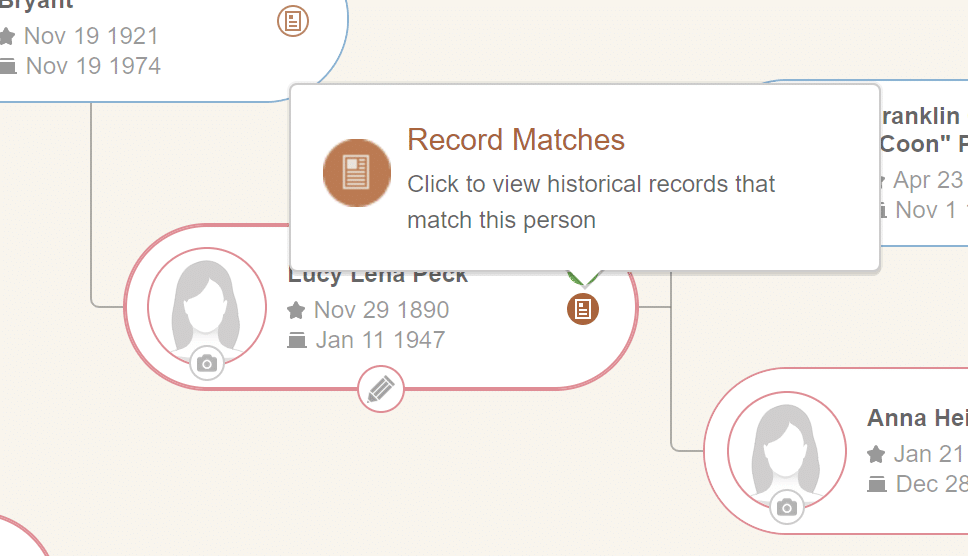
To find Discoveries when viewing your tree, look for icons on an individual’s card. This indicates that there are matches to explore. Smart Matches appear as green circles (and we will not be covering these), while a brown “article” icon shows potential Record Matches (something we are focusing on). Clicking these icons will take you to a list of these respective matches.
Discoveries in Family View
Discoveries in Pedigree View
You can also access Record Discoveries by hovering over the “Discoveries” tab in the main menu from any page.
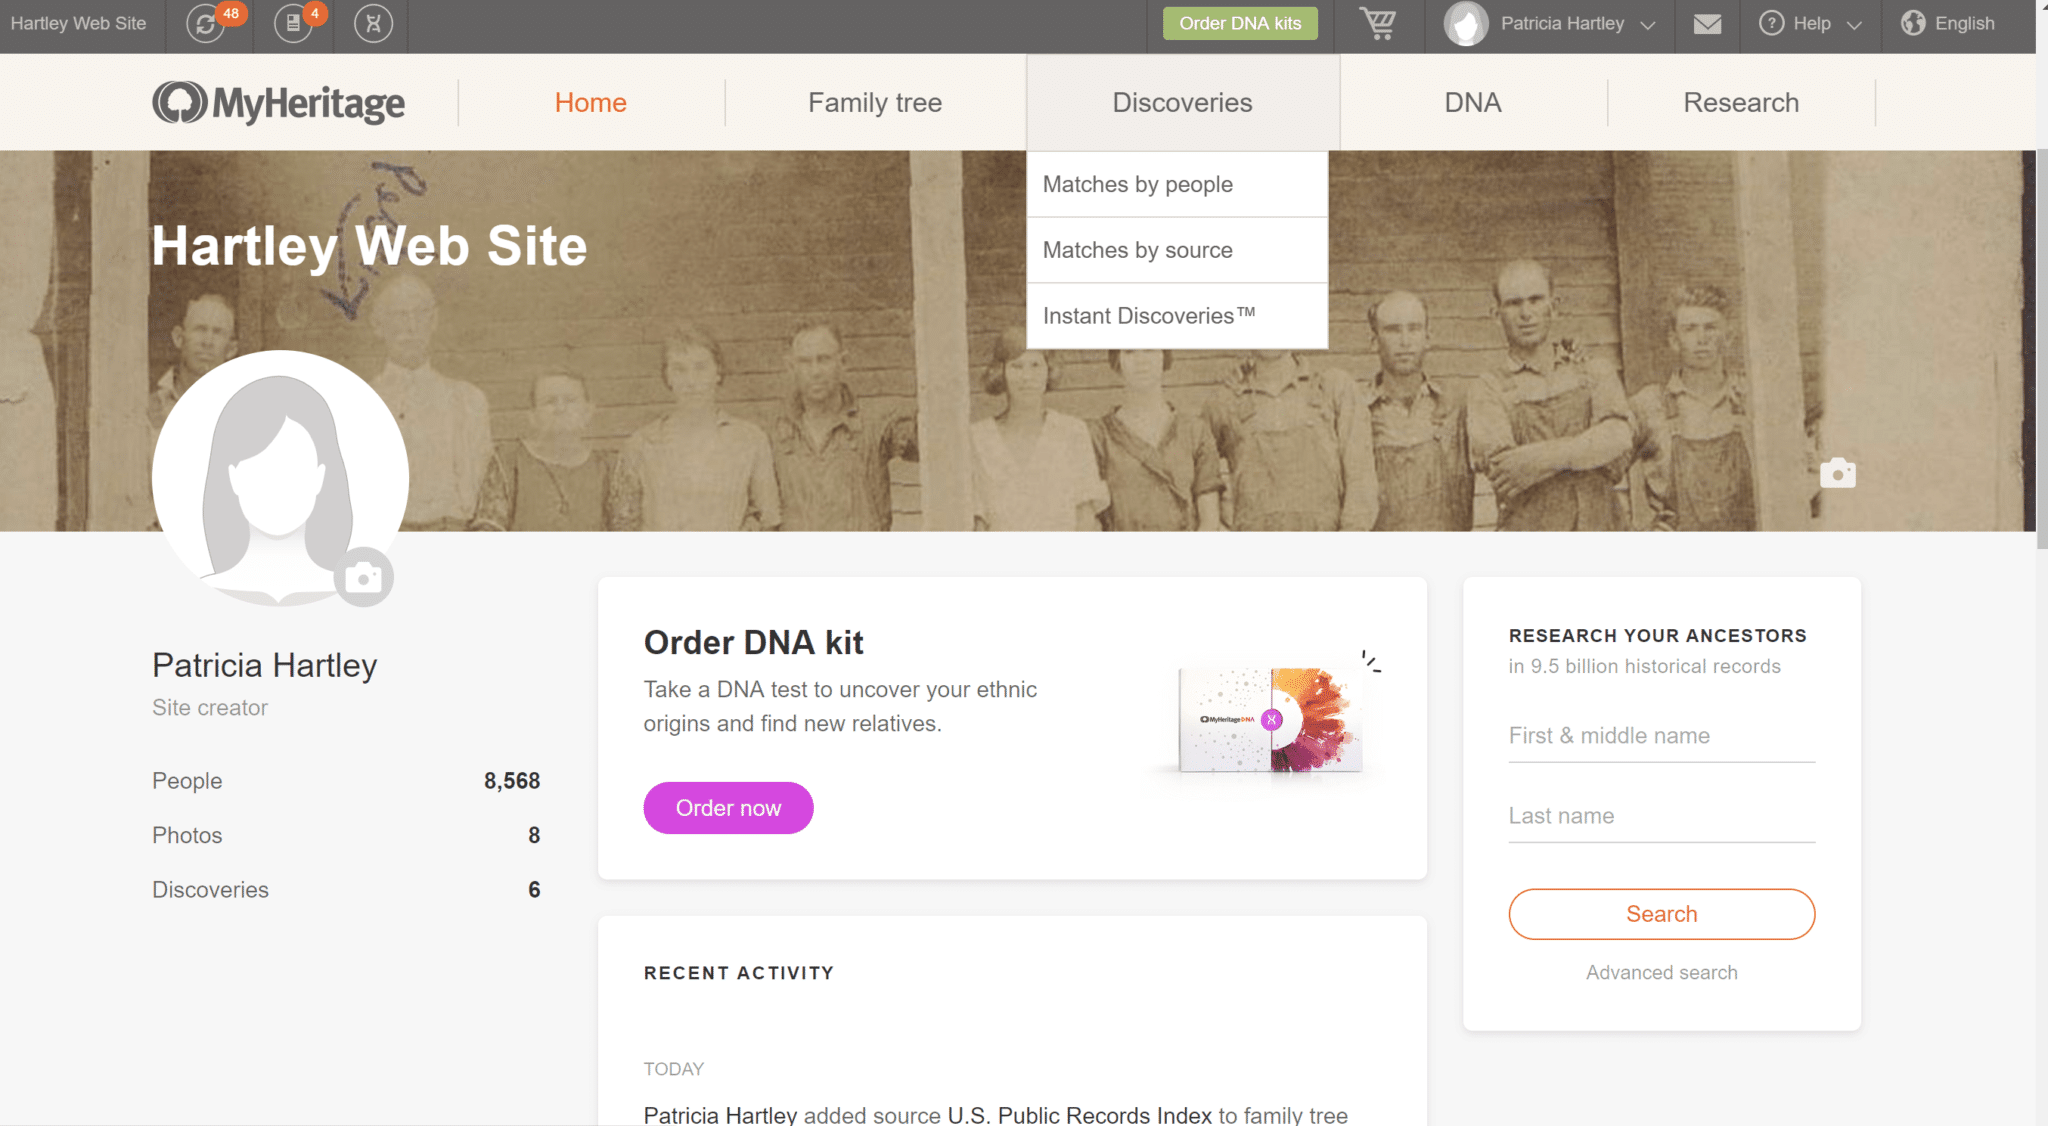
You’ll see several options presented. “Instant Discoveries,” as mentioned above, uses member family trees to try and add entire branches to your own family tree. Since we do not recommend this option as anything more than a tool for providing potential leads, we will not be covering it in this article.
Instead, select the “Matches by People” option from this dropdown. This opens a screen listing the different types of matches MyHeritage has made with the individuals in your family tree. You can also view “Matches by Source” which allows for a very different perspective when exploring Discoveries – we’ll cover that later.
The list produced when you click on “Matches by People” defaults to the “All Matches” setting, which includes both Record Matches and Smart Matches (from family trees). To exclude matches from MyHeritage user-submitted family trees, click “Record Matches” to refine your list.
You will now be presented with a list of Discoveries that MyHeritage pulled from historical records, sorted by people in your tree.
It should be noted that MyHeritage includes both FamilySearch family tree information and Geni family tree information in Record Matches. Although these cannot be filtered out easily, you can ignore them or avoid them if you like by using the “Matches by Source” feature as demonstrated later.

As shown above, “Matches by People” displays a card for each individual in your tree for whom potential record matches were found, and includes a brief description of what the records contain and how they may enhance your tree. If you have a lot of matches, this may help you decide which to tackle first. As we’ll see here, not all matches are going to be accurate or reliable and may need to be rejected.
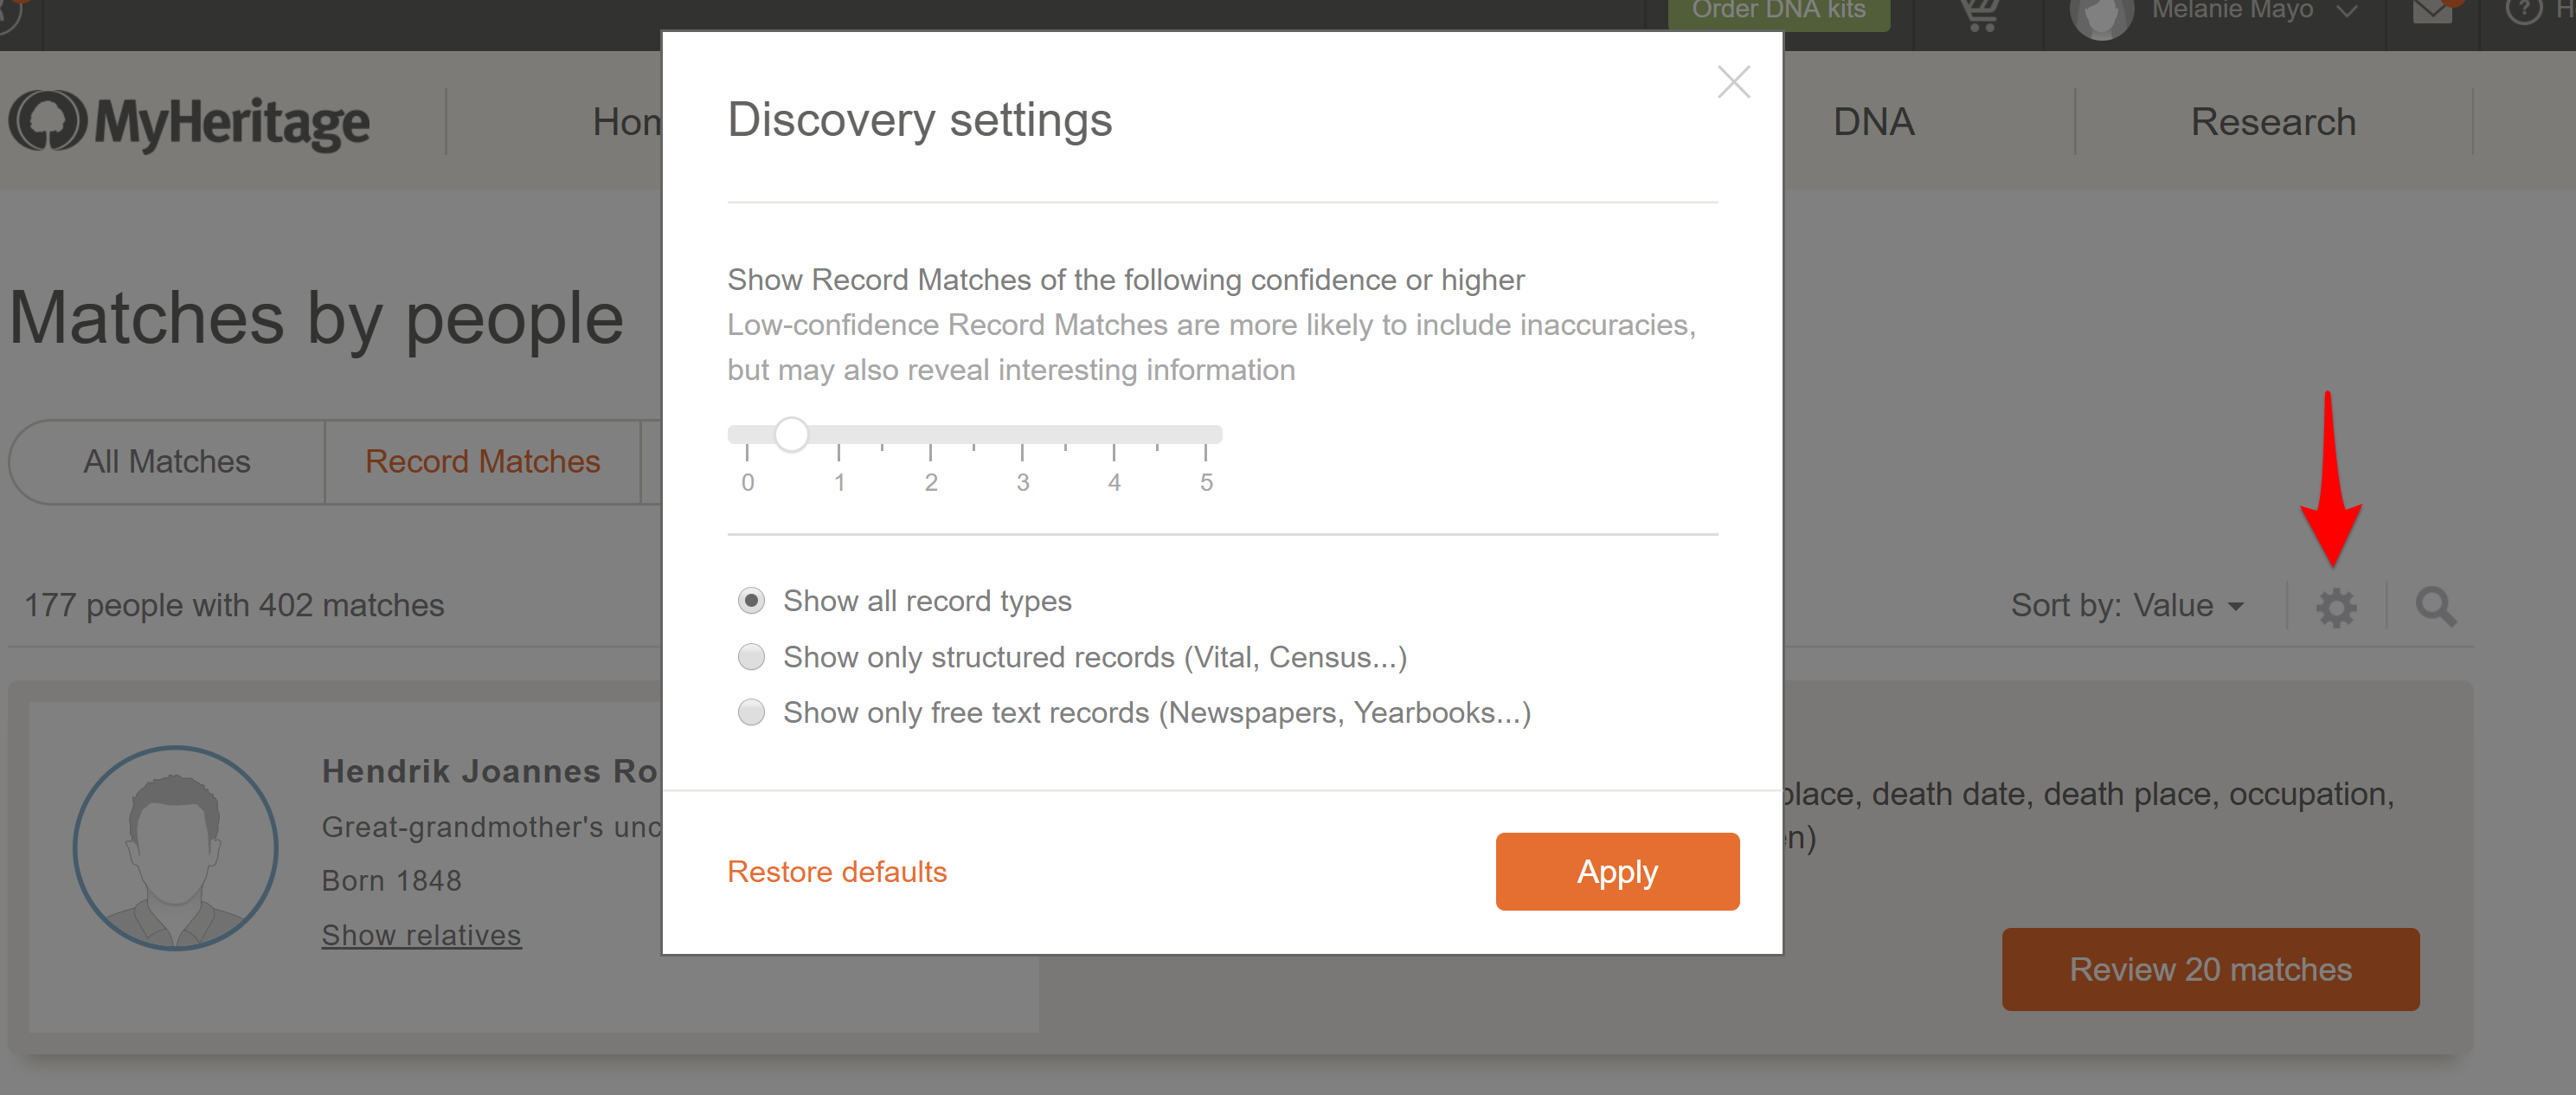
A variety of options are presented to help you filter or arrange these results to your preferences. Click on the gear icon to the right to open Settings. The popup allows you to refine Discoveries by confidence level and choose to only see certain record types.
Use the “Sort by” option to choose to sort Discoveries by name, relationship, number of matches and more.
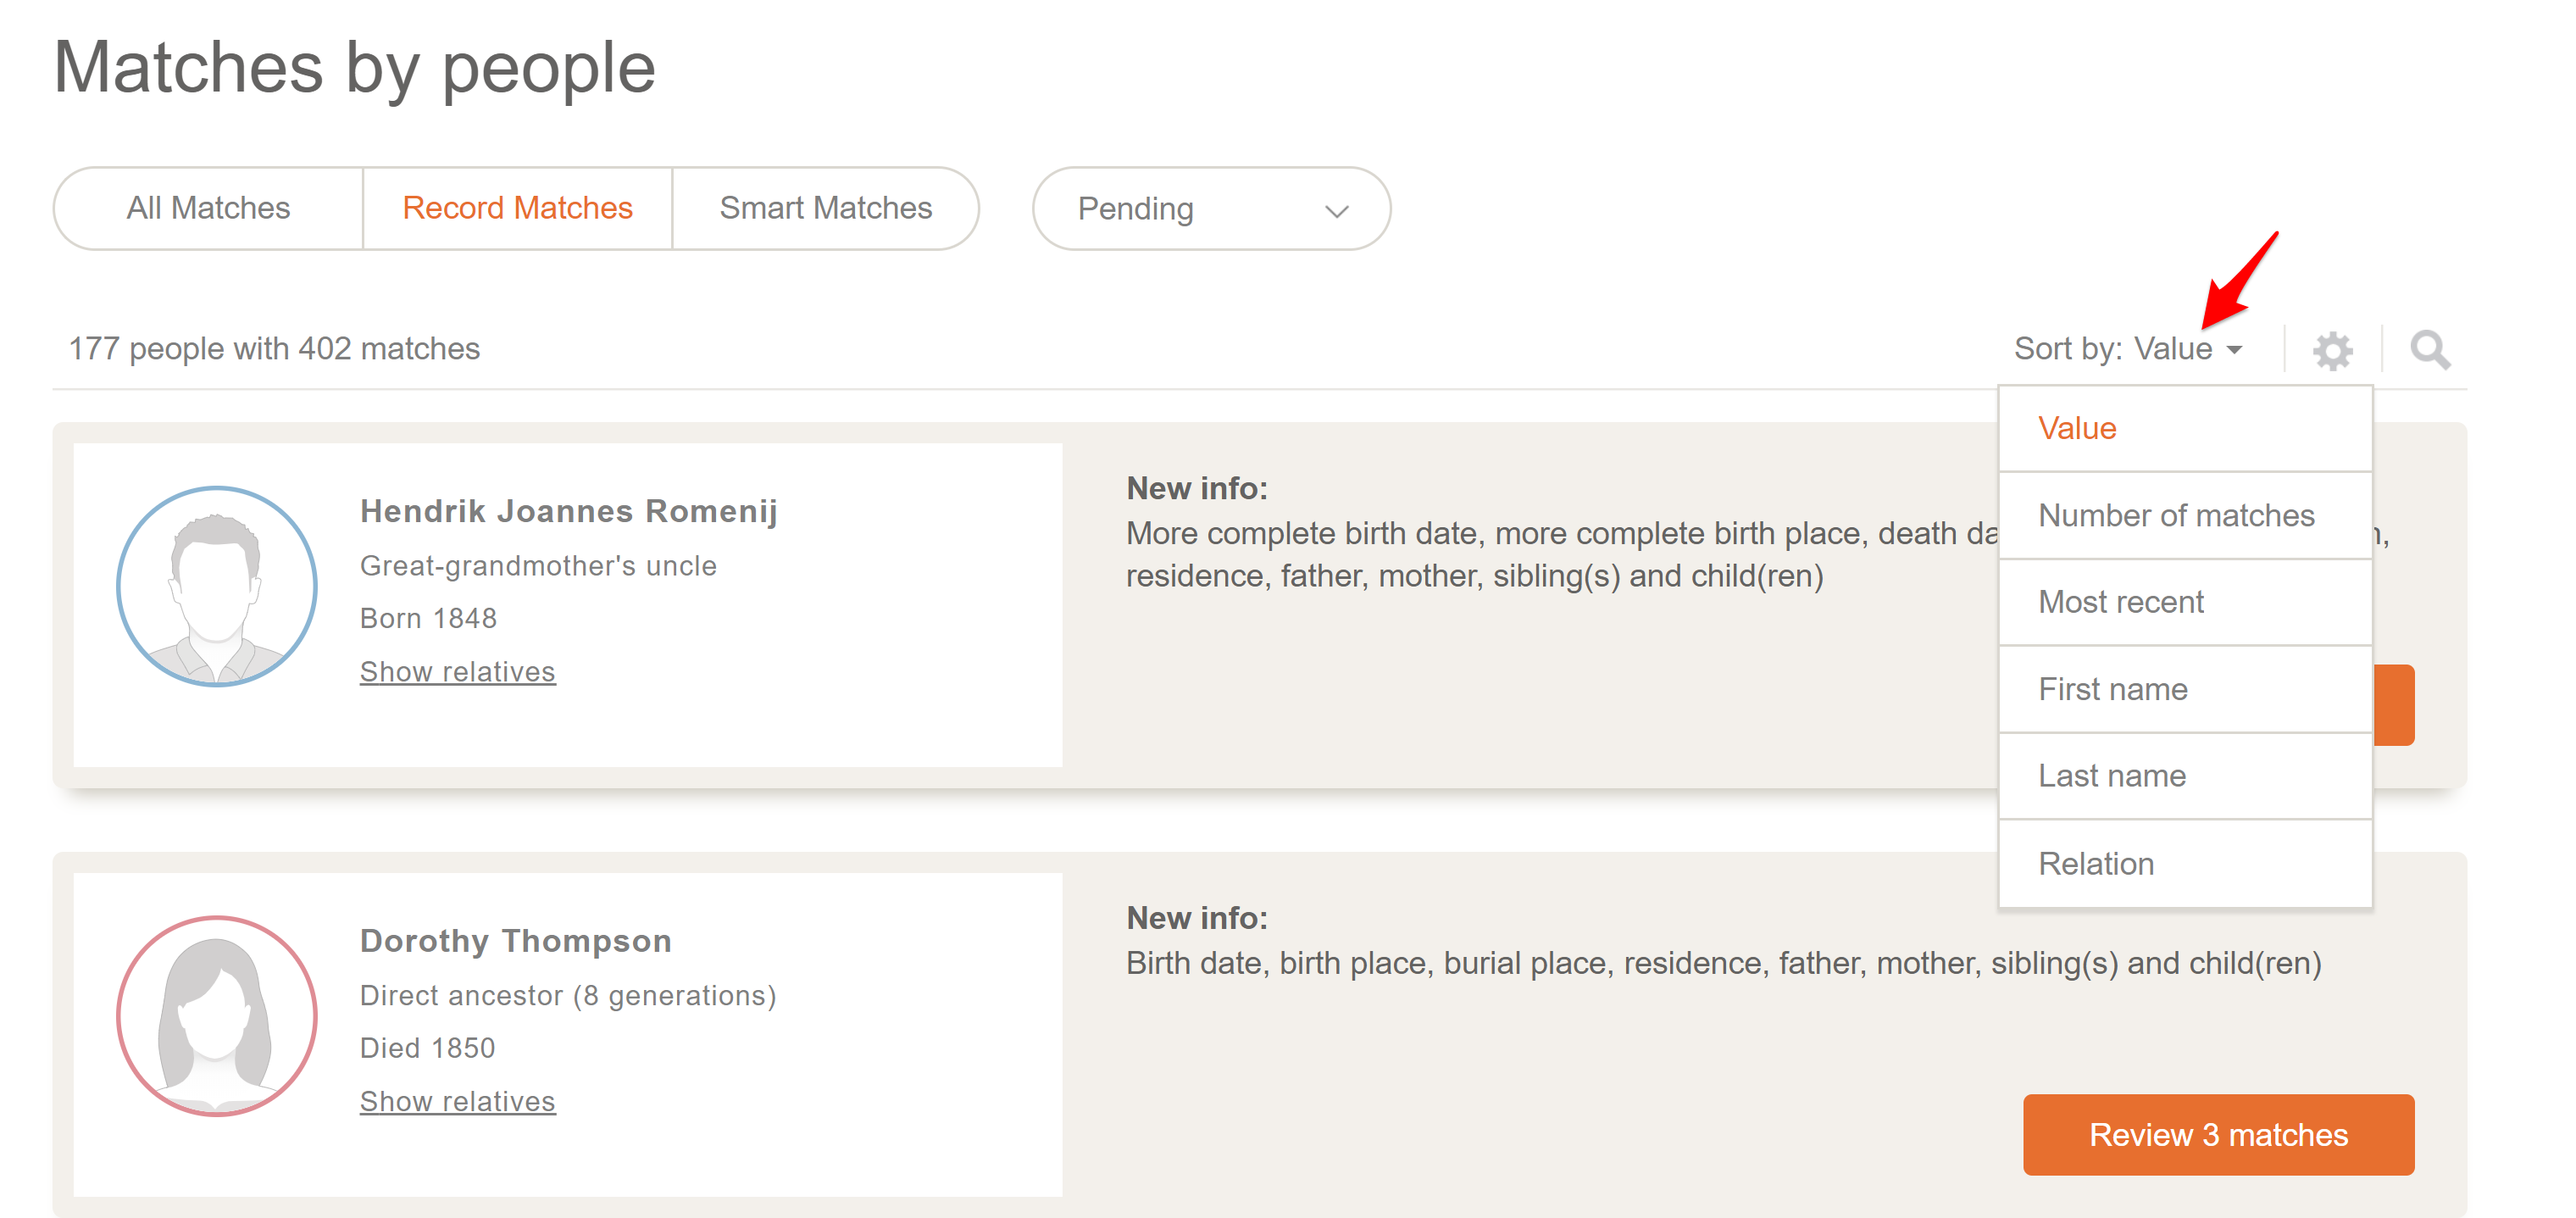
The “Pending” dropdown menu refines your results to show only Pending, New, Confirmed, or Rejected matches – options we will discuss in a moment.

Exploring Your New MyHeritage Discoveries
In the example below for Margaret McCord, it looks like there are two records to help me add Margaret’s vital information, which it seems I don’t currently have in my tree.

Clicking the orange “Review 2 matches” button opens a new window showing the two record matches. In this case, both are from crowd sourced family trees–one in Geni World Family Tree and the other from FamilySearch Family Tree.

I’m always wary of other people’s research. Even in these two matches, there are two different maiden names indicated for Margaret. However, family trees very helpful as a starting point for further investigation, so I’ll click the orange “Review Match” button on the Geni tree match to see if these facts are supported by any sources.
The new screen lists several facts about Margaret and her immediate family; since these facts aren’t in my existing tree, they are labeled as “New Info” in the orange-outlined boxes on the right.
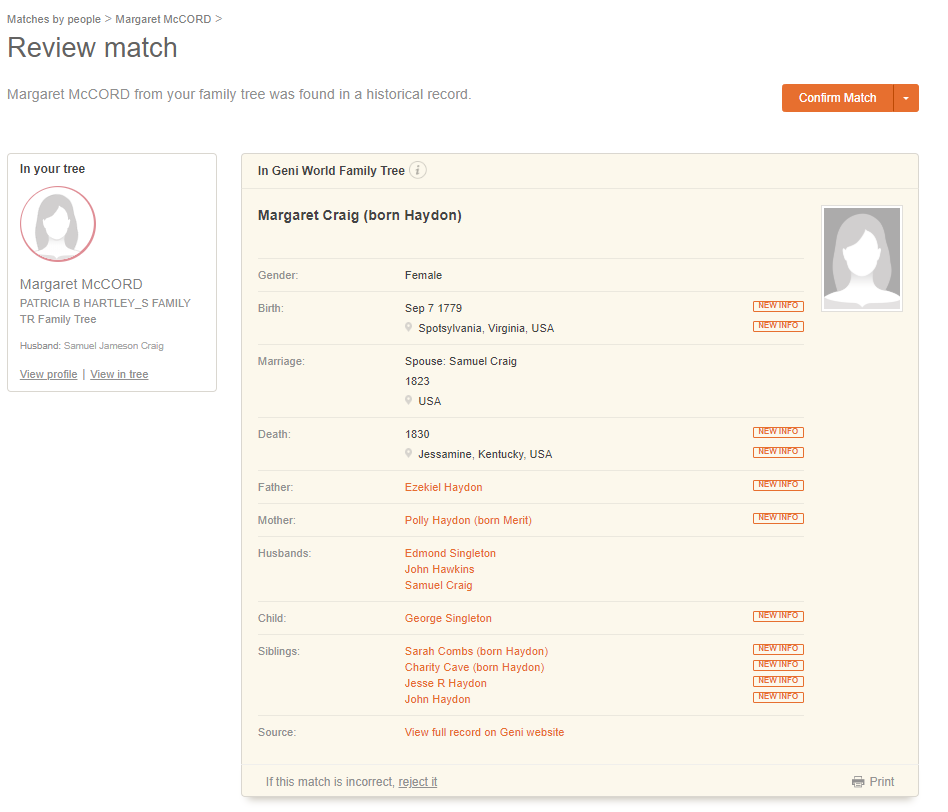
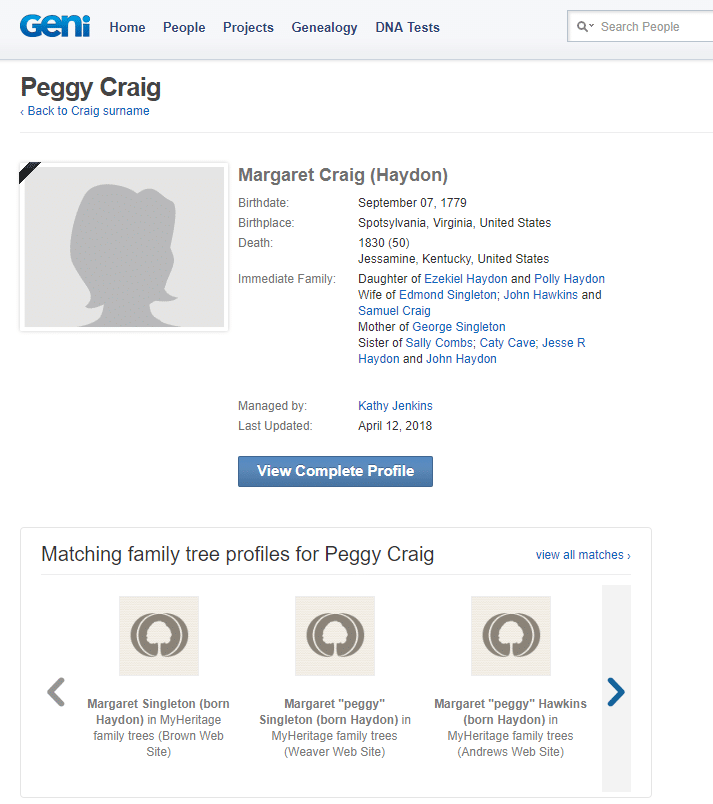
Since I’d like to verify the sources used to create these facts, I’m going to click “View full record on Geni website” next to the Source label and investigate. This takes me to the Geni website and provides an overview of Margaret’s profile. Since viewing the full profile requires registration on Geni, I’ll skip that for now and return to MyHeritage.
Back on the MyHeritage Review Match page, my options are to confirm the match, save the record and the “new info” to Margaret’s profile in my tree, or ignore the record match.

Selecting “Save to Your Tree” will not only save the record to the individual’s profile as a source, but will also automatically replace the information in your tree with any information in the record that is marked as “New” or “Improved” information.
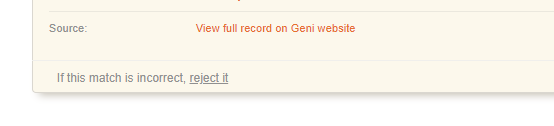
Since I can’t confirm that the information in the Geni tree is reliable and sourced, I’m going to reject the record by clicking the “reject it” link instead. Immediately I receive a rejection confirmation and an option to “Undo Reject.” You can always go back and review rejected matches in the “Matches by People” screen.

Review and Extract a Record Match
Of course, rejecting a match is much less exciting than finding an accurate match. Now let’s explore a MyHeritage record match that will enhance my family tree.
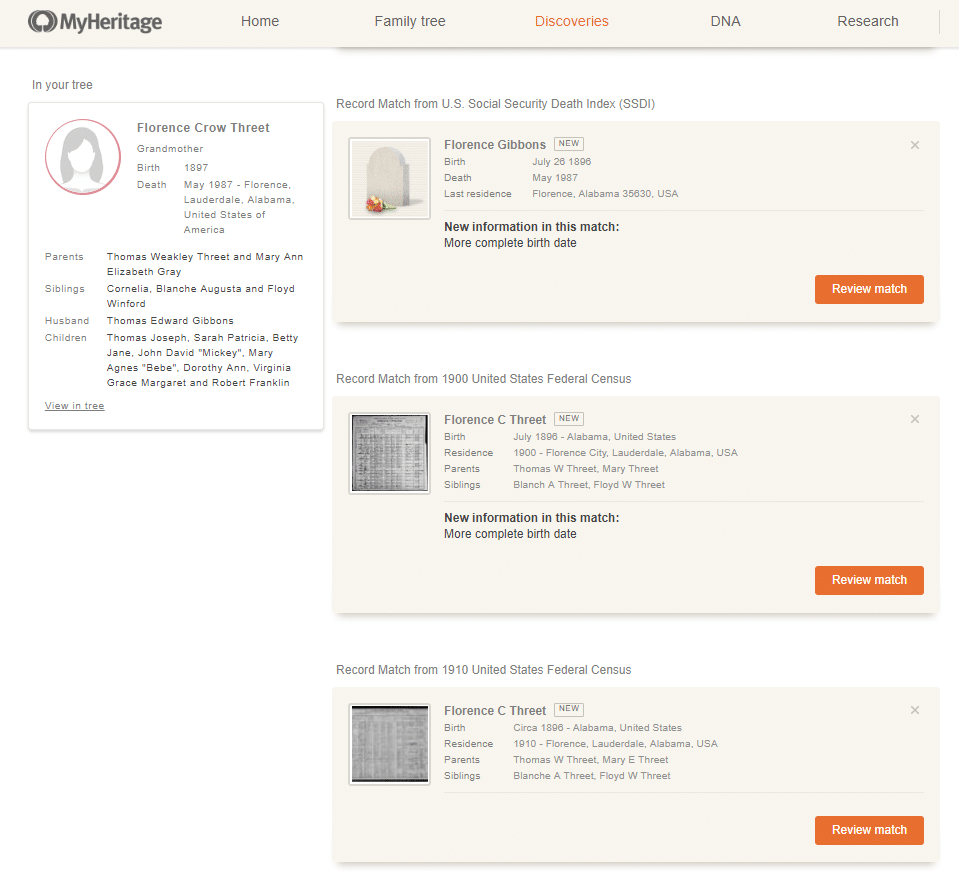
Navigate back to the “Matches by People” page. For this example, I’m exploring the five record matches MyHeritage found for my grandmother Florence Crow Threet.

The Review Matches page reveals two census records, a FamilySearch tree match, a newspaper reference, and a US Social Security Index record match that promises a more complete birth date.
If you have read this far and are not following along with your own research, you may want to start from the beginning of this article by setting up a free trial and adding your tree to make this process easier to follow.
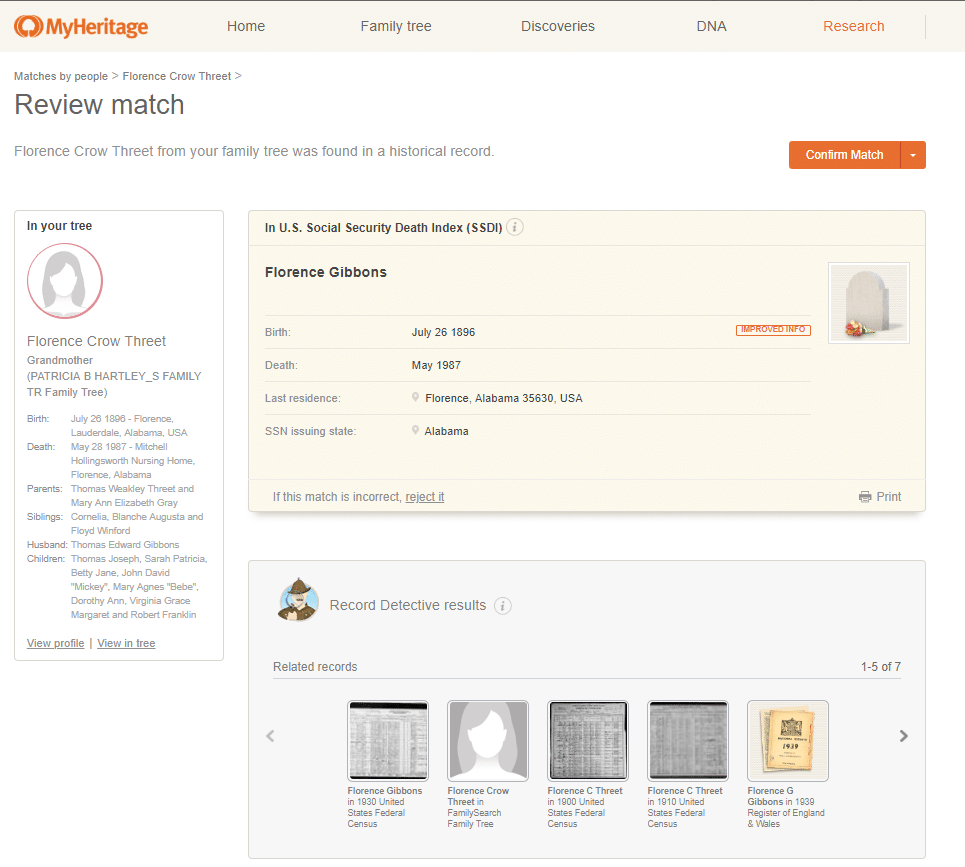
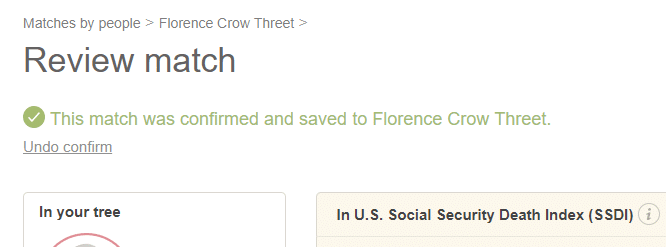
Clicking “Review Match” on the Social Security record opens to a listing of all information contained in the record and suggests that the birth date is “Improved Info.” Although it looks like the same date I already have in my tree, I’ll click on “Confirm Match” to explore further.
SIDE NOTE: The “Records Detective Results” box at the bottom of this screen will appear if MyHeritage has any additional suggestions for records that may be related, but aren’t necessarily matches.
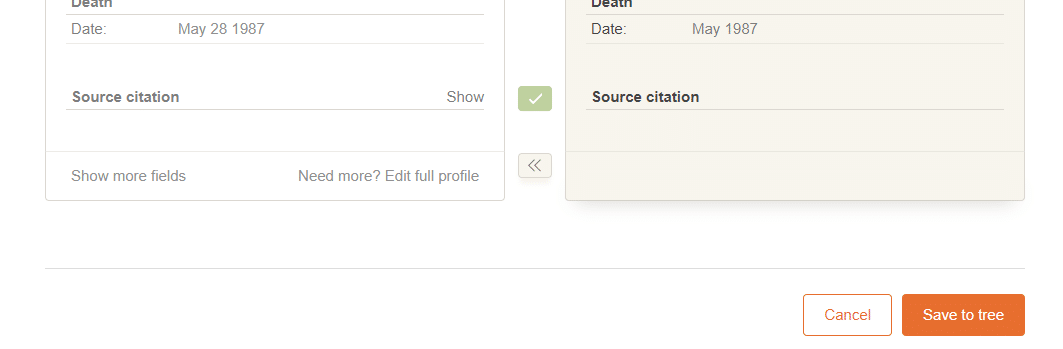
The new screen invites you to “Extract Information to Your Family Tree.” Extract is a term MyHeritage uses to indicate the option to select specific pieces of information within a record to save to your tree instead of accepting the entire record and all of its updates.
This is important, because in this Social Security record, my grandmother’s surname is listed as her married name, “Gibbons.” Because MyHeritage shows that this is different from what I have listed in my tree as her last name, I have the option to replace the last name in my tree with the last name from the record. I list females in my tree using their maiden names, so I don’t want to replace what I have.
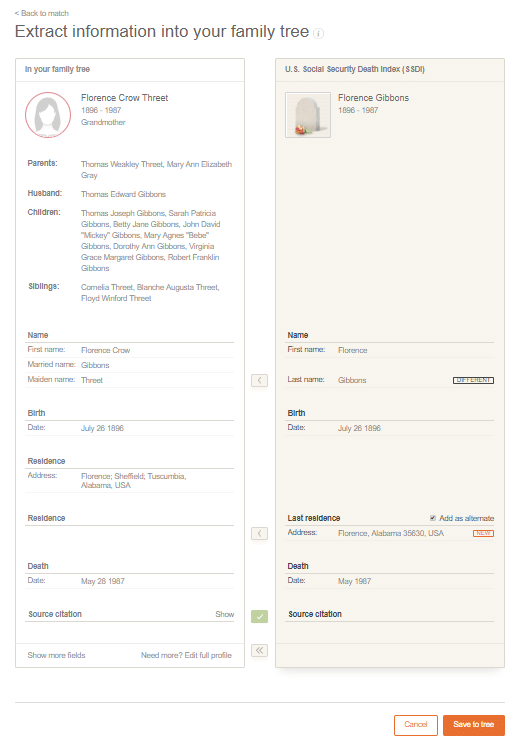
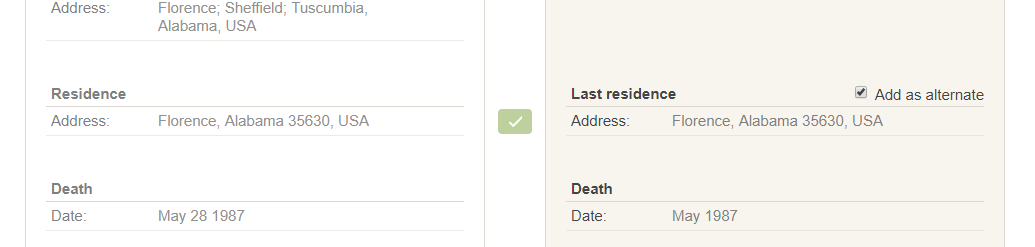
However, I would like to add the “New” fact of “Last residence” to my tree, so I’ll click the arrow next to that fact. This adds the address to my grandmother’s profile as an alternate fact for her residence on that date and turns the arrow box into a green box with a check mark. If I had extracted this fact in error, clicking the green box again will “undo” this action.
I’d like to save these changes to my tree, and indicate the source as the Social Security Death Record Index. The green box next to “Source Citation” is automatically checked, so all I have to do now is click the orange “Save to Tree” button.
Again, I receive a confirmation that the record was saved as well as the option to undo the action. I’ve found MyHeritage pretty goof-proof, especially with its multiple options to undo!
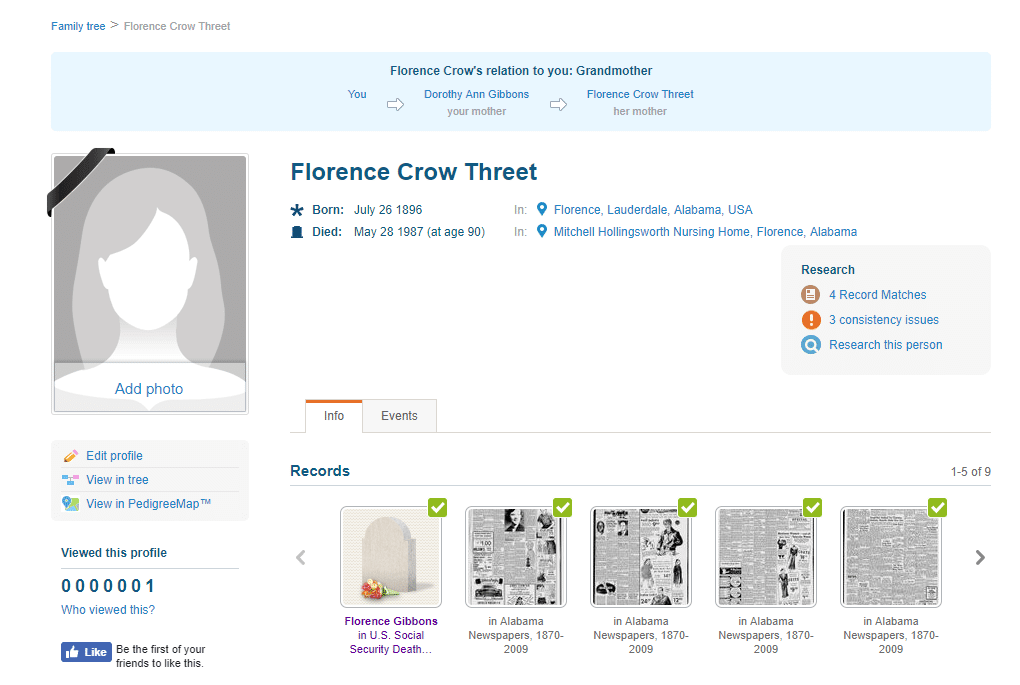
When I go back to my grandmother’s MyHeritage profile, I can see that the Social Security Death Index is now attached as a source record (in purple print below).
How to Review a Story Match
Now let’s look at a different type of Record Match, which MyHeritage labels as stories. These are usually newspaper mentions or obituaries.
In reviewing some of these matches, I found several articles that were published in my local newspaper about my immediate family members that I had previously never found using traditional search tools offered in Google or Google News Archive. So far, I’ve been very impressed with MyHeritage’s story matches and the ease of which you can save these records to your tree. Let me show you what I mean.
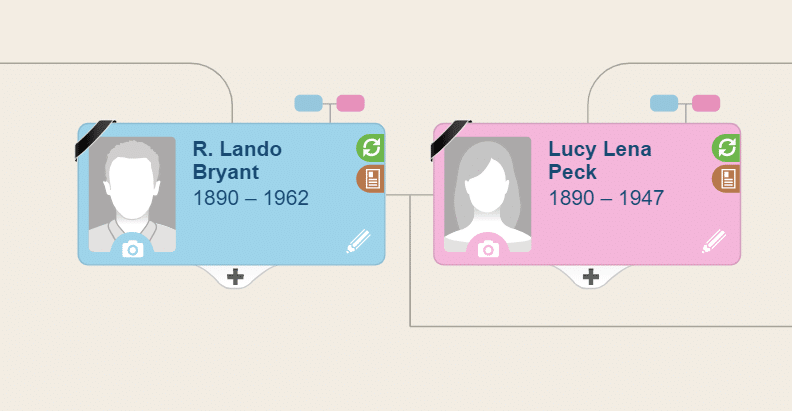
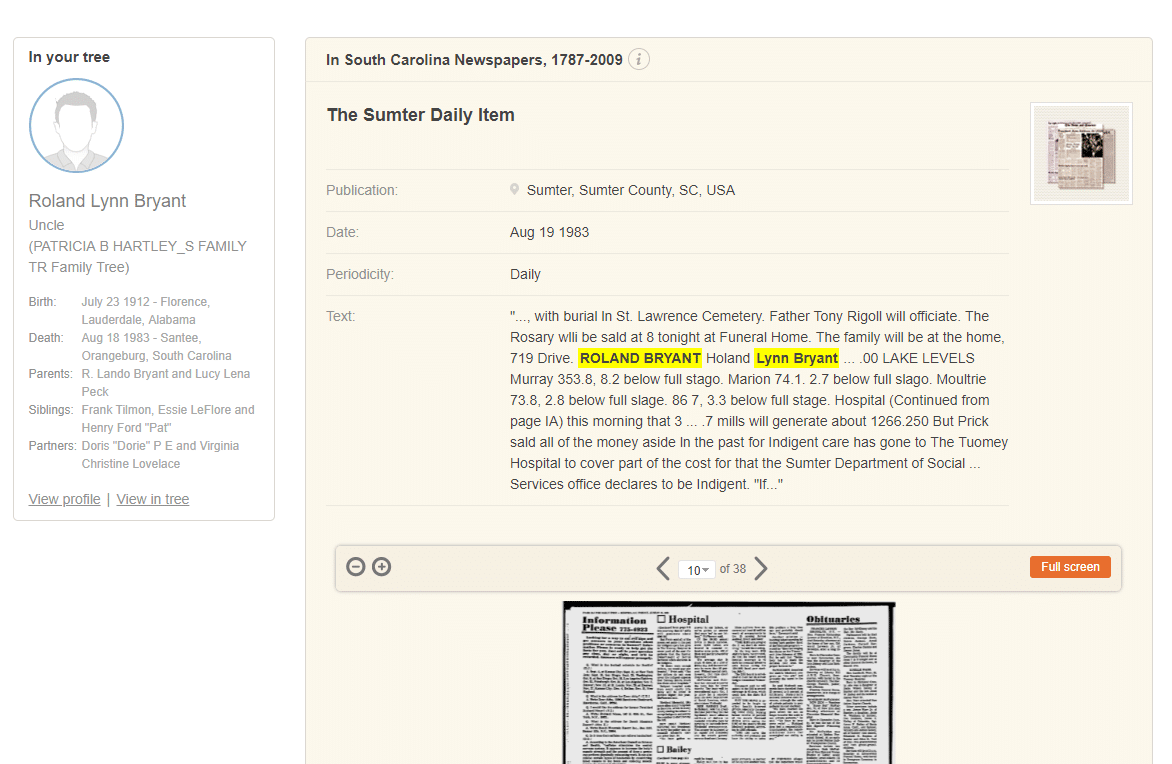
We’ll return to “Matches by People” and start by reviewing the three record matches MyHeritage has found to my uncle Roland Bryant’s profile.

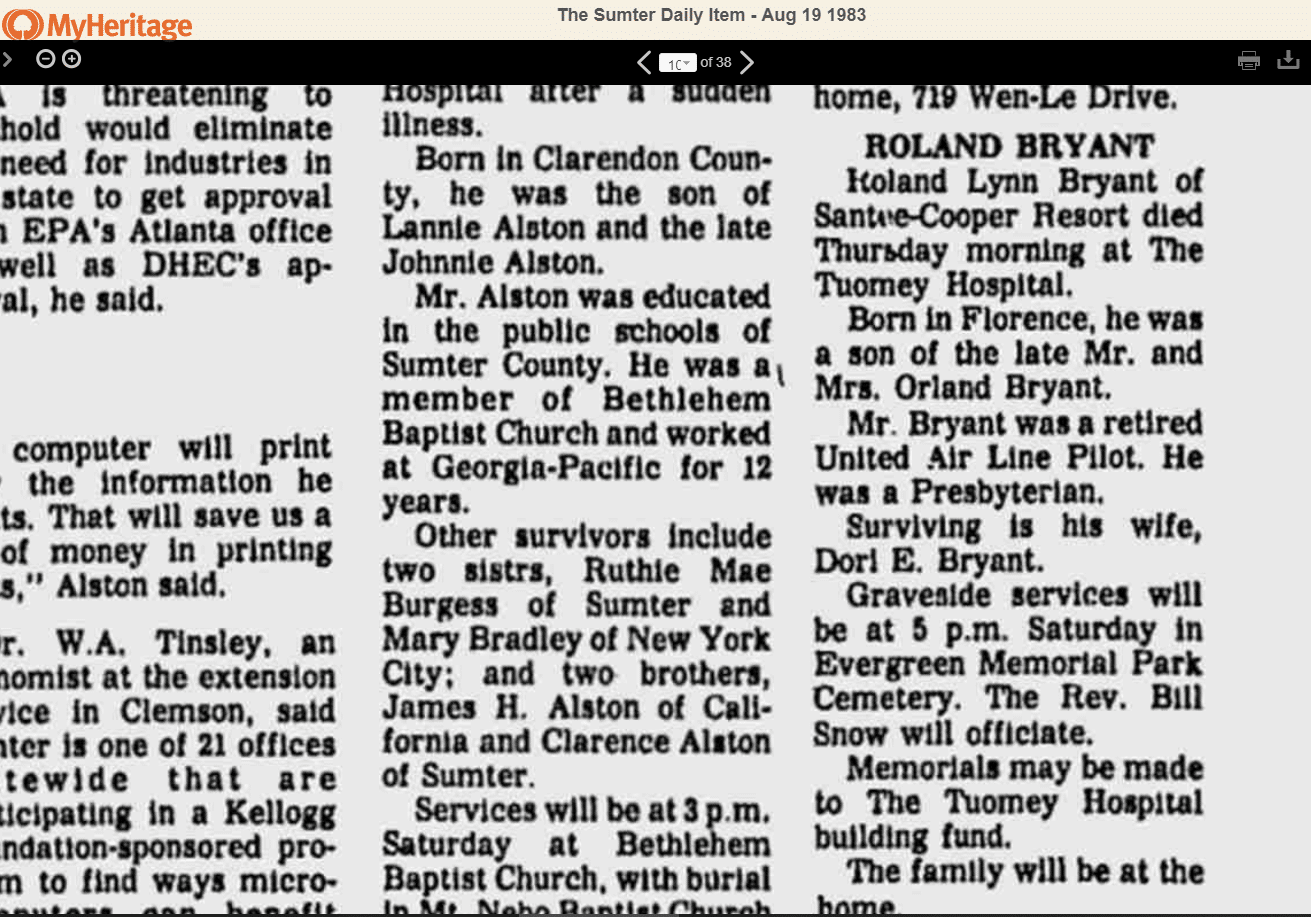
Clicking the orange “Review 3 Matches” box reveals that one of the three matches appears to be his obituary from a South Carolina newspaper. I’ll click the orange “Review Match” button to investigate further.
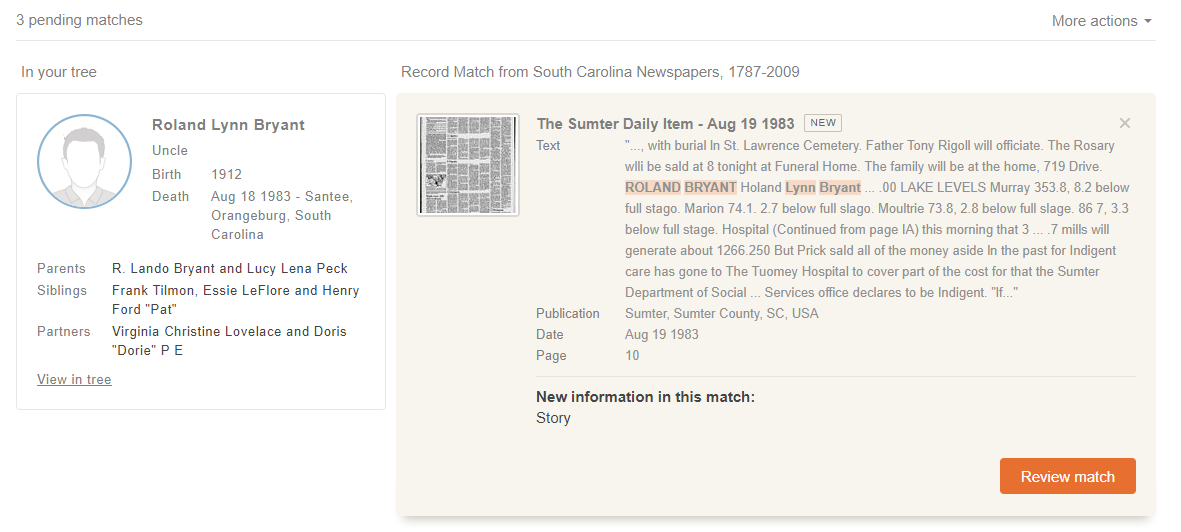
In this screen, MyHeritage highlights the mentions of your family member’s name within a short summary of the article at the top of the record match. They also offer an image of the page from which the summary was excerpted below. This excellent feature allows you to easily verify that the information being presented and check it for quality. I love this.
Clicking the orange “Full Screen” button provides the largest view of the newspaper page for review.
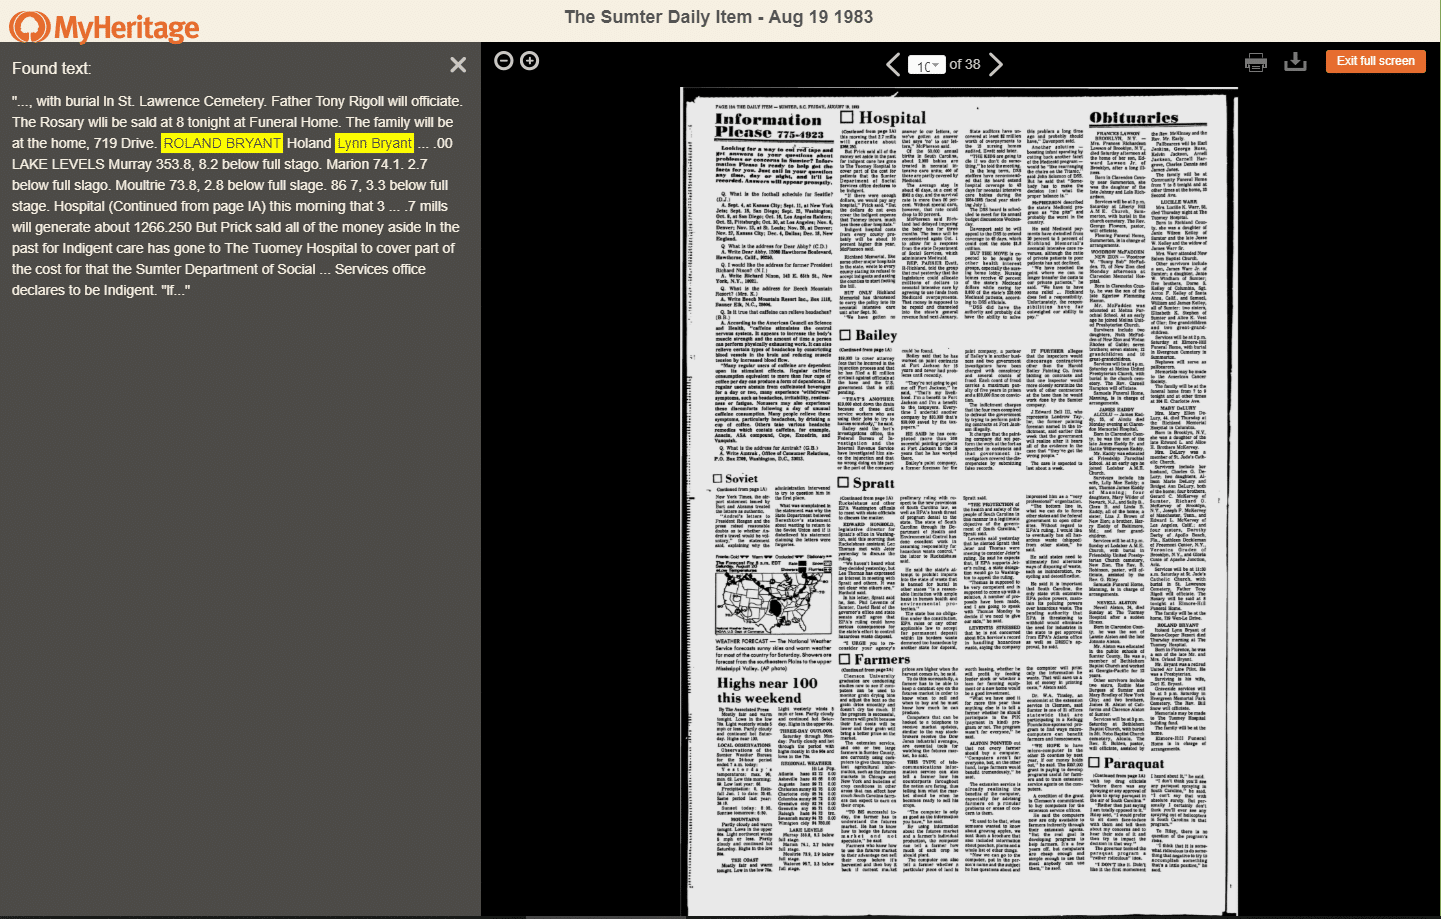
Clicking the “X” to the right of the summary to close that box and using the “+” key, I can expand and enlarge the image to locate the obituary.
This screen view also offers the option to print the document or download it to your computer, which is always recommended if you find that it is a record you will be adding to your tree or saving to review later.

To save the record to your MyHeritage tree, click the orange “Exit Full Screen” button and click the orange “Confirm Match” button back on the “Review Match” screen.

As with other record match reviews, you have the option to extract specific pieces of information from this record into your tree, or accept the entire record as-is.
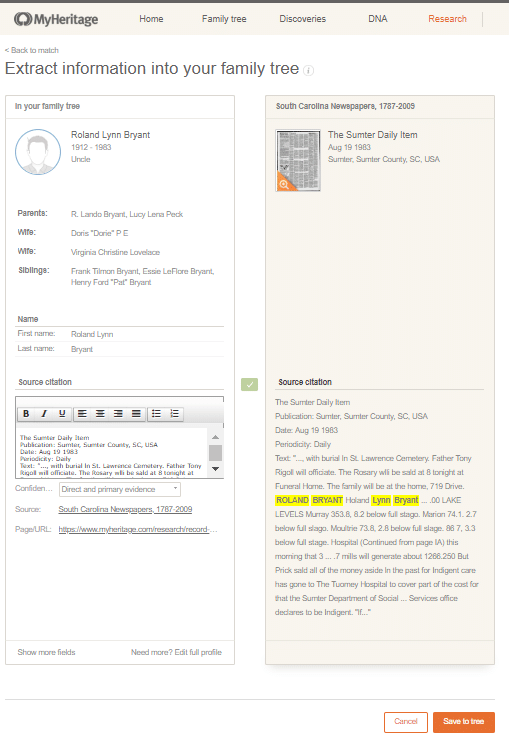
With story matches, you also have the option to edit the source citation. In this example, there is a lot of irrelevant information included in the summary of this article; this information was excerpted from different areas of the newspaper page that contains my uncle’s obituary. If I wanted, I could delete the extra information from the citation text box to save only the relevant information.
Additionally, you can tag the “Confidence” you have in the reliability of the information using the dropdown menu. In this case, this newspaper article is “Direct and Primary Evidence” so I’ll keep that designation within the source citation. Clicking the orange “Save to Tree” button will save this information and close the Review Match screen.

Now, Let’s Look at Record Matching in “Matches by Source”
Open the Discoveries dropdown in the main menu and select “Matches by Source.”

“Matches by Source” contains all of the same records as you’ll find in “Matches by People;” these records are just categorized by the source of the record rather than by a particular individual in your tree.
By default, these sources are listed by the number of matches, from largest to smallest, but you can use the “Sort by” tool on the right to sort by source name. Another sorting option, “Site Manager,” is useful for reviewing user-created MyHeritage family tree sites; this option sorts the list by the name of the person who owns the family site.
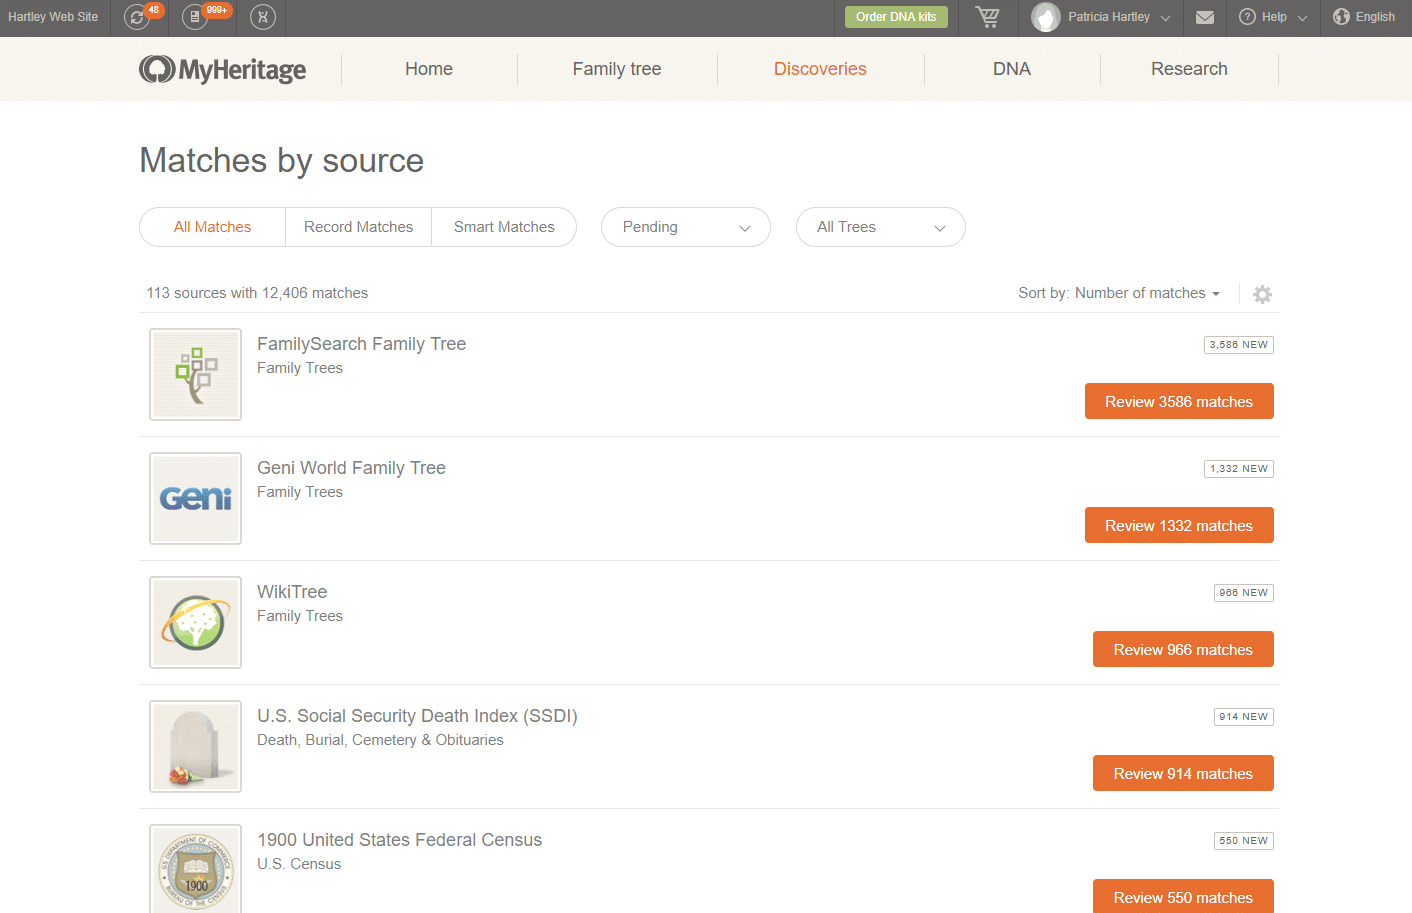
Because we’re focusing on Record Matches and won’t be exploring any family tree sites, let’s filter our source list to Record Matches only by clicking “Record Matches” in the options under the “Match by Source” heading.

Reviewing and Extracting Facts of Multiple Family Members in One Record
As we mentioned previously, MyHeritage includes access to international records at no additional cost with several of its subscription plans. Many Record Matches, including census records, will offer the option to review and extract information for multiple members of your family tree. Let’s see how that works.
We’ll start today with a review of a United States record, the 1850 Federal Census, and click the orange “Review 144 Matches” box to explore the matches.

The next screen lists each of the individuals within your tree for whom there is a potential match in the 1850 US Federal Census. By default, the list is sorted by value, but you can also use the “Sort by” button to rearrange the list by last name, first name, or relationship to the home person in your family tree.

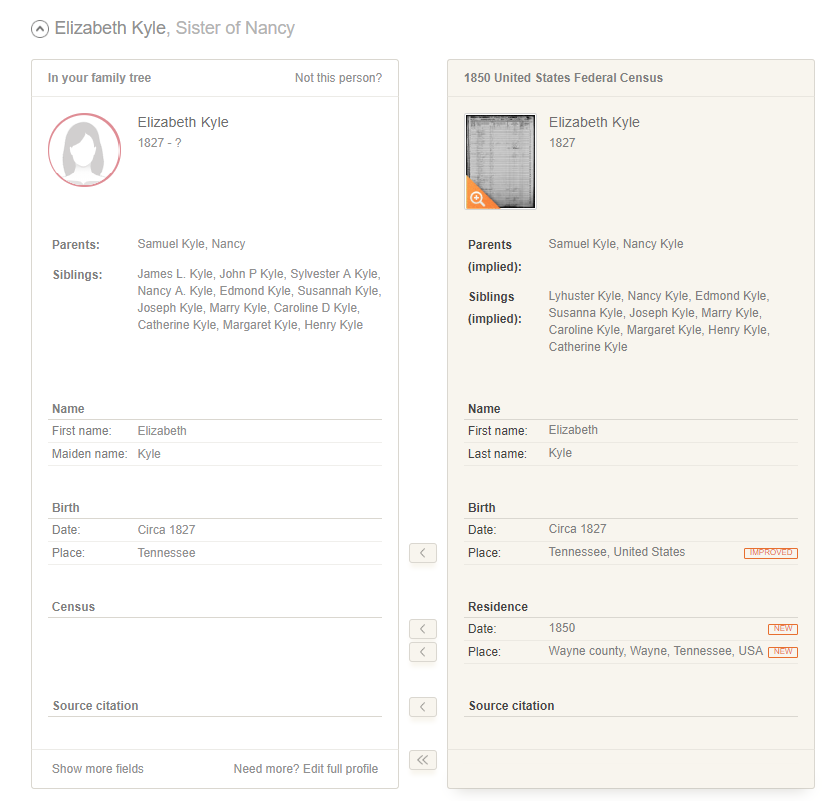
In this example, we’ll start with a potential match to my great-great-grandmother Nancy A. Kyle. After I click the orange “Review Match” button within the suggested match, a list of information from the 1850 Wayne County, Tennessee household of Samuel Kyle is displayed.
Under the listing is a clickable image of the actual census record. After careful review, this looks like a perfect match to my Nancy Kyle and her father Samuel, so I’ll click the orange “Confirm Match” button at the top of the screen.

The next screen invites you to “Extract Information Into Your Family Tree.” From the icons on the left, we see that there are references in this record to several people in Nancy Kyle’s family.
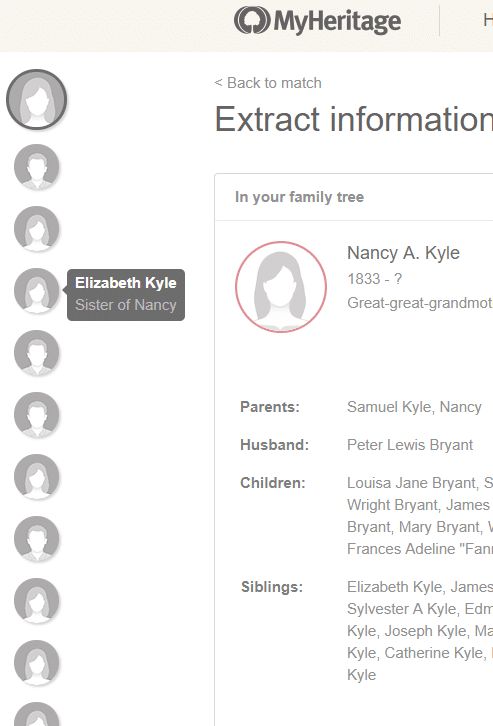
Indeed, scrolling down the record match, we see that each person listed in the census record has their own card from which we can review and transfer, or extract, information from the record directly into that person’s profile in our family tree.
Each of these cards compares facts from the record to the facts already in your tree, and indicates any “Improved” or “New” information for review. Each fact can be extracted individually by clicking the left-facing arrow between the cards, or you can accept all of the suggestions in that individual’s card by clicking the double-arrow near the bottom of the cards.

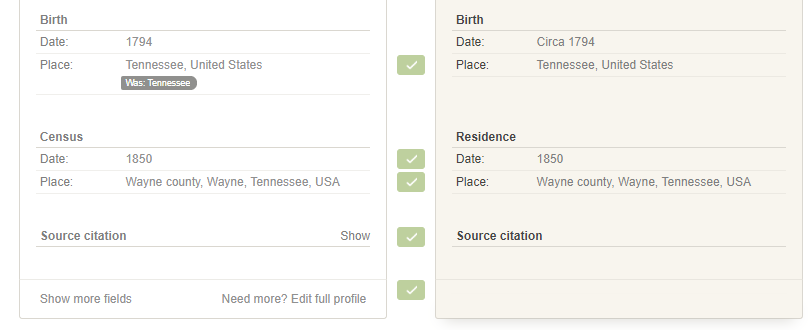
In this case, I’d like to replace my “Tennessee” birthplace citation with the more complete “Tennessee, United States” reference, and I’d also like to add the family’s residence in 1850 and the record’s source citation, so I’m going to click the double arrows. This turns each of the arrow boxes into a green box with a check mark and extracts the information to my tree. Clicking on any of the green boxes will undo the transfer.
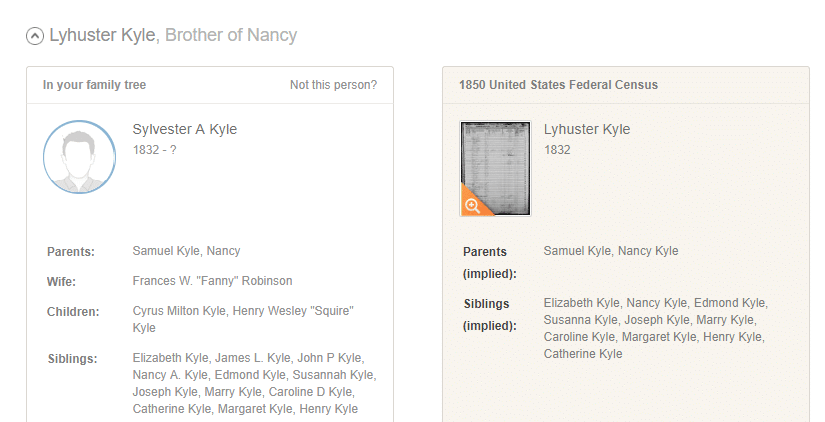
As you work your way through each of the potential fact extractions in the record, you might find one like this, for which MyHeritage didn’t find a match with anyone already listed in my tree. Although the census taker (or, more likely, the record transcriber) recorded Nancy’s brother Sylvester’s name as Lyhuster, MyHeritage is asking me to pick which person in the tree with which I could match Lyhuster’s profile.
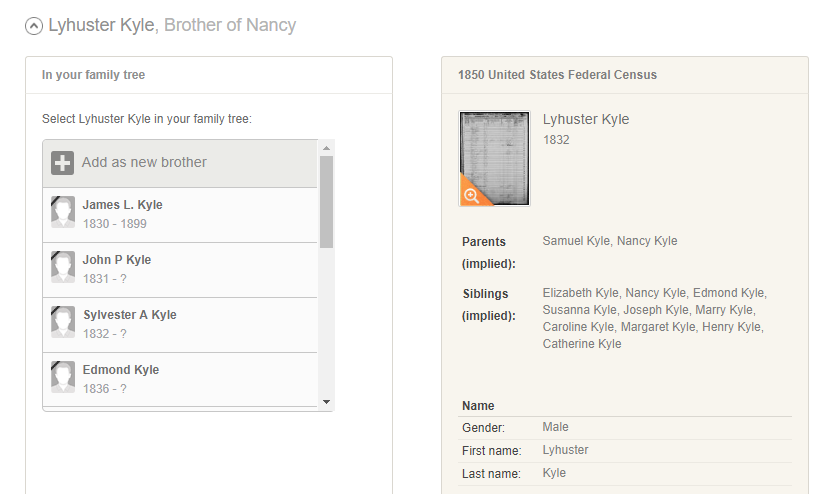
When I select Sylvester’s name from the list on the left, his profile appears and I can continue reviewing the information from the census.
At the bottom of the screen, you do have the option of extracting all of the information from the record into your tree with one click of the “Extract All Info” button. This is a good option if you’ve reviewed all of the information in the record and agree to transfer it all, which may replace any existing facts you’ve listed with the suggested “Improved” information in addition to adding anything labeled as “New.” But be very careful accepting records in their entirety without careful review first.
If you have selected only particular facts to extract and save into your tree, click the orange “Save to Tree” button to complete the extraction and add the record to the profiles of each of the individuals you’ve updated.

Once you complete this review you can continue to move on to new individuals in your matches list, or go back to reviewing Discoveries by person. As I mentioned, my tree had more than 12,000 matches of various sorts so I have a lot of work to do to review them all. If you are experiencing the same vast amount of matches here are some suggestions for managing the task.
- When reviewing Discoveries by source, avoid large record groups first (such as U.S. census records) since you may be able to find this information on other sites. Instead take a look at some of the more obscure and focused collections that may be new to you and go back to large collections later.
- Focus on story matches first, such as newspaper articles, which will allow you to add more depth to a tree. MyHeritage has an excellent selection of these and they are so much fun to explore.
- When sorting by person, considering make a “hit list” of your ancestors with active brick walls and focus on those people. You might just get lucky and finally solve your mystery once and for all.
- Get organized by choosing an order for how you will review matches and then go one by one until you complete all of them, keeping careful notes on changes, where you stopped for a night, and where you want to pick up again.
And always remember to take every match with a grain of salt until you can prove it. As demonstrated in this article, not every Discovery presented to you will be accurate. You have to be careful and use your knowledge to make informed choices.
We hope that this information helped you better understand the MyHeritage Discoveries tool and the many benefits of exploring a new site in your research. For more help with MyHeritage you can read our other articles about their services here – including DNA matching, family tree charts, error reporting for your family tree and more.
Thank you to Patricia Hartley for her considerable help creating this resource.